The Compliance AI feature in QEval automates compliance verification within evaluation forms. Traditionally, QA reviewers manually verified compliance-related questions (e.g., “Did the agent disclose the recording disclaimer?”). With Compliance AI, the system evaluates conditions automatically using metadata, sub-questions, and predefined rules.
This provides:
-
Faster compliance checks
-
Reduced manual QA effort
-
Consistent, rule-based evaluations
-
Scheduling of automated compliance jobs
Purpose
-
Automate compliance checks without manual call playback.
-
Allow User to define logical rules (metadata, sub-questions, conditions).
-
Standardize compliance validation across programs.
-
Run automated checks on a schedule for efficiency.
Note: Only users with the AI Compliance role can configure and schedule Compliance AI.
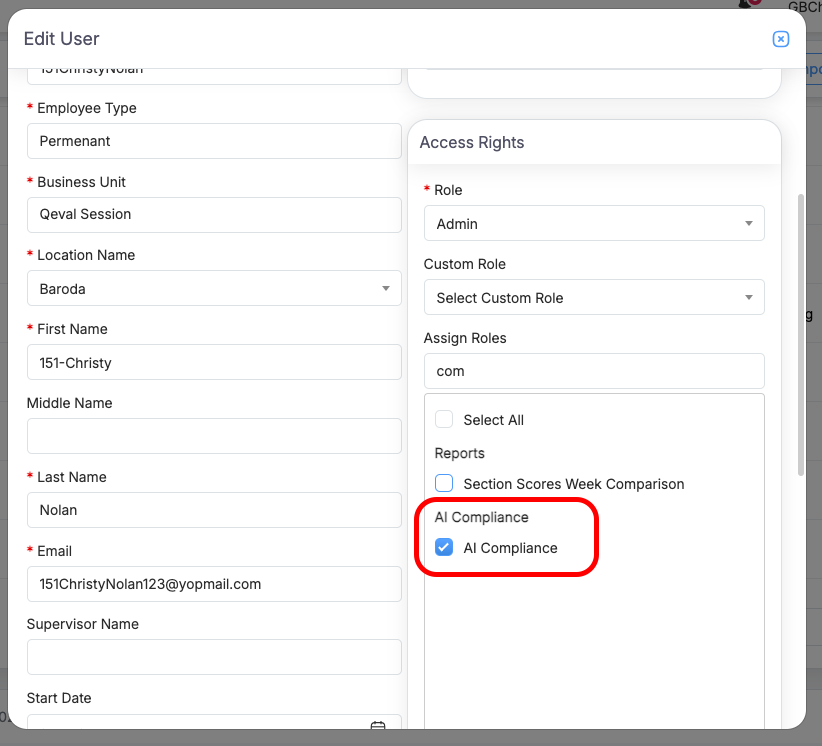
Access Control
-
Access to the AI Compliance module and the ability to schedule compliance frequency is restricted to users who have been assigned the AI Compliance role under the Access Rights Assign Role section.
-
Only users with role management permissions can assign the AI Compliance role. This role can be granted to any user except agents.
Steps to Configure Compliance AI
The Compliance AI setup is completed through a guided 5-step configuration.
- Metadata Filters
- Metadata Mapping
- Sub-Questions
- Conditions
- Save & Schedule
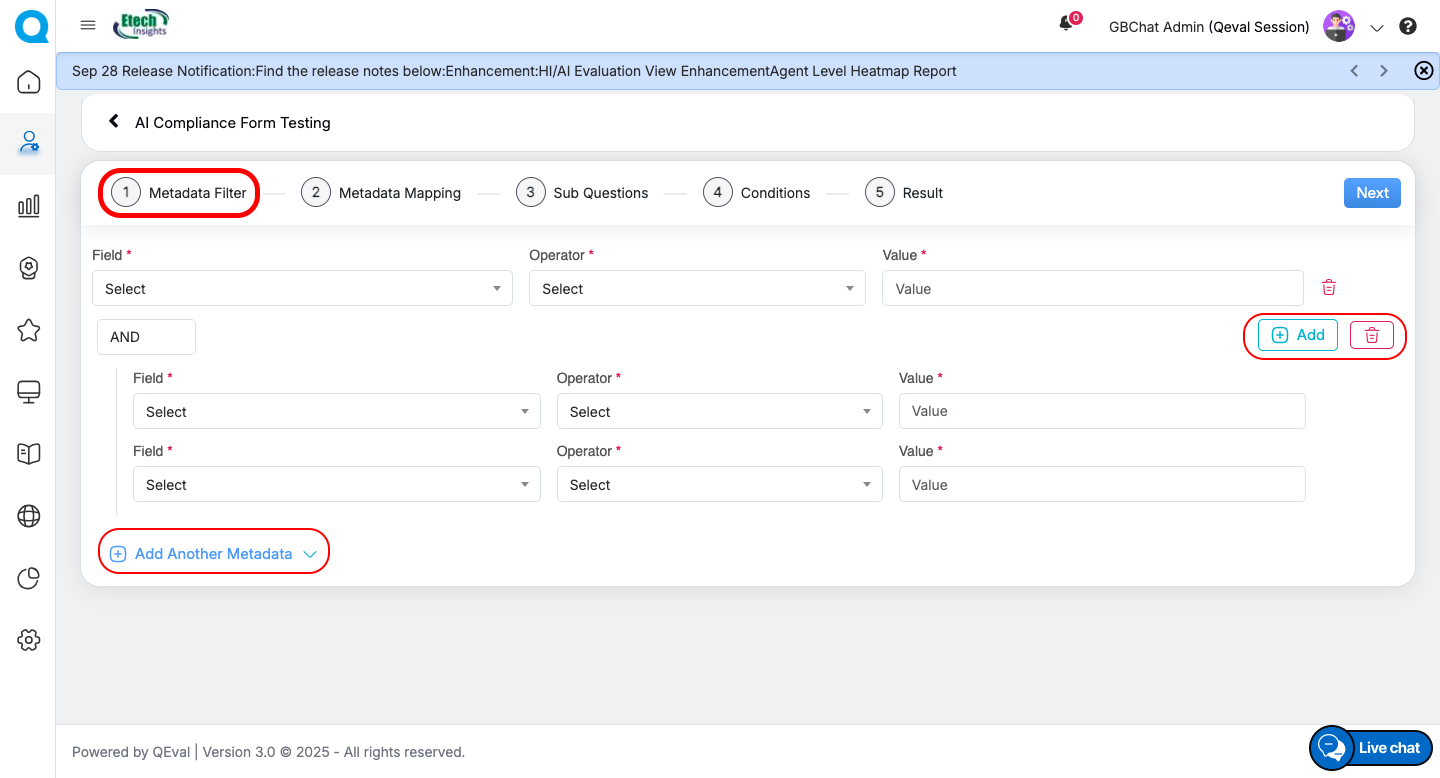
1. Metadata Filters
The Metadata Filter step allows you to define which records (metadata) should be included for processing in the AI Compliance evaluation. By applying filters, you control exactly which data will be considered during the compliance checks.
Purpose
Metadata filters serve as the entry criteria for your AI Compliance Form. During the AI evaluation, only the records that meet the defined filter conditions will proceed to the next configuration steps — Metadata Mapping, Sub-Questions, Conditions, and Result.
How It Works:
-
Filter Type Selection
-
Choose between a Single Filter or a Group Filter.
-
Single Filter – applies one condition.
-
Group Filter – lets you combine multiple metadata and choose a Group Condition to define how they relate.
-
-
Field Selection
-
In the Field Name dropdown, select from available metadata fields (e.g., custom_callDuration, custom_firstname, custom_lastname).
-
These fields come from the system’s metadata library.
-
-
Operator Definition
-
Choose an operator from the predefined static list to describe how the field should be matched.
-
Available operators include:
-
Equal To
-
Does Not Equal To
-
In / Not In
-
Greater Than / Greater Than or Equal To
-
Less Than / Less Than or Equal To
-
Contains / Does Not Contain
-
Starts With / Ends With
-
-
-
Value Input
-
Enter the value you want to match against in the Value text box (supports alphanumeric input).
-
-
Add or Remove Filters
-
Click the Add button to include additional filter rows.
-
Use the Trash icon to delete a filter you no longer need.
-
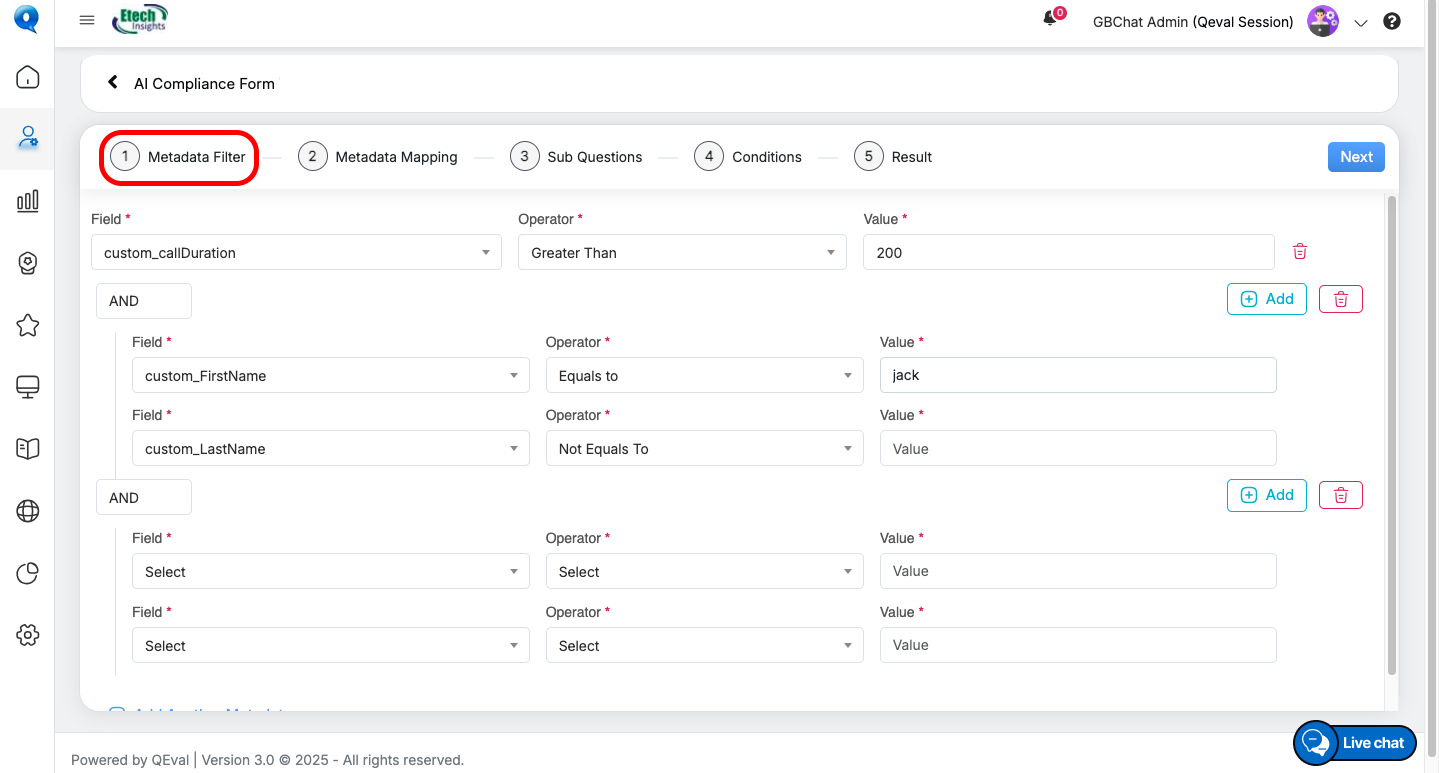
Example:
Suppose you want to evaluate only calls that are longer than 200 seconds and belong to agents whose first name equals “Jack.”
-
Set Field = custom_callDuration, Operator = Greater Than, Value = 200.
-
Add another filter: Field = custom_FirstName, Operator = Equals To, Value = Jack.
Best Practice
-
Keep filters as specific as possible to avoid processing unnecessary records.
-
Use Group Filters logic when combining multiple conditions for complex selection.
-
Always review your filters before clicking Next to ensure the right data set is included in the AI evaluation.
2. Metadata Mapping
The Metadata Mapping step allows you to connect the questions (Call information) from your AI Compliance Evaluation Form to the metadata fields available in the system. This mapping ensures that each question in the evaluation form uses the correct call or record data during the AI compliance check.
Purpose
Metadata mapping links each question (call information) with the appropriate metadata field so the system can automatically retrieve and analyze the right data for compliance evaluation.
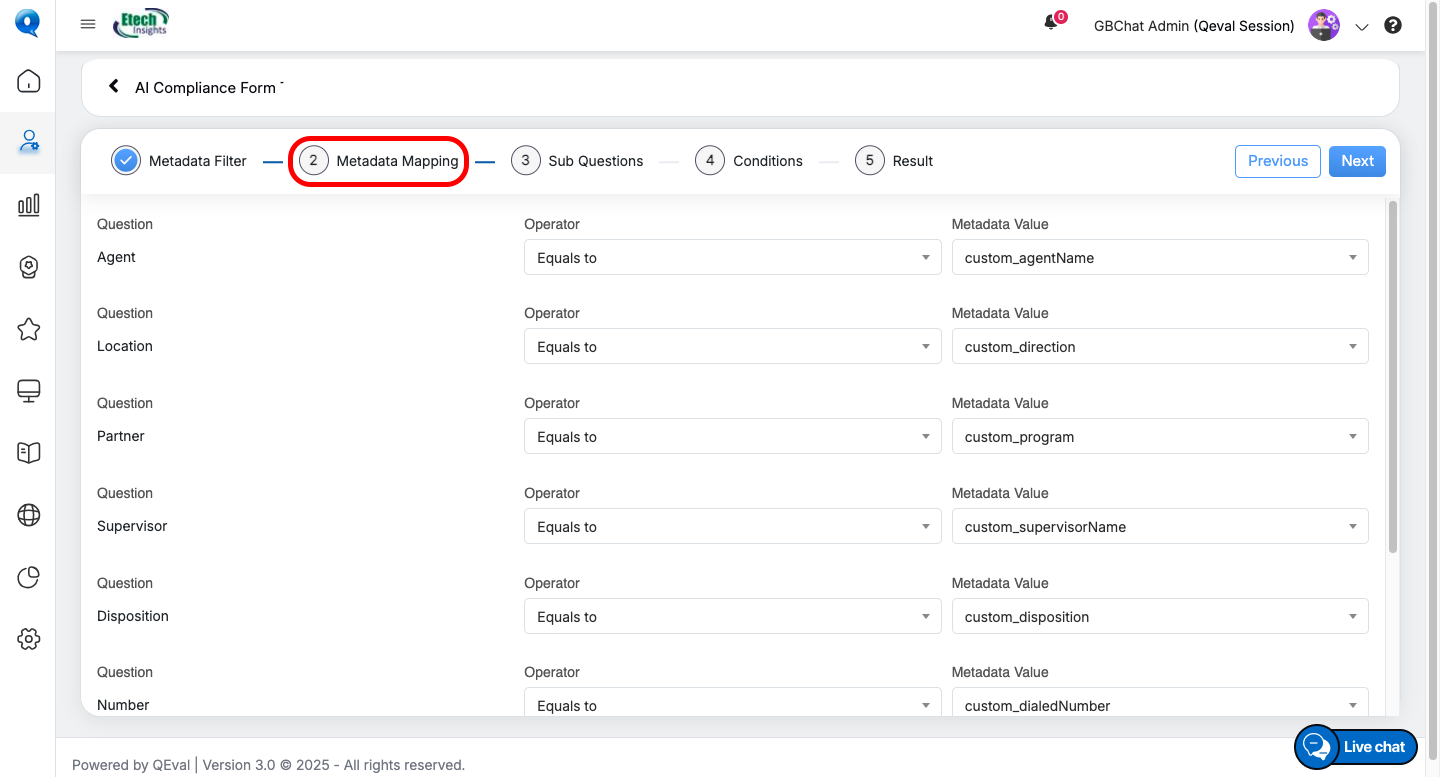
Interface Overview
The Metadata Mapping screen is divided into three main columns:
-
Question (Call Info)
-
Displays the list of questions or call-related information coming from the evaluation form.
-
These are automatically populated and cannot be changed.
-
-
Operator
-
A dropdown menu that lets you define how the question should be compared to the selected metadata value.
-
Common operators include:
-
Equals To
-
Does Not Equal To
-
Contains
-
Does Not Contain
-
Starts With
-
Ends With
-
-
You can select the operator that best matches your compliance rule logic.
-
-
Metadata Value
-
A dropdown menu showing available metadata fields from your system (e.g., custom_agentName, custom_direction, custom_program).
-
Select the metadata field that corresponds to the question’s requirement.
-
How to Map Metadata
-
Review the list of questions automatically shown under the Question column.
-
For each question, choose the appropriate Operator (e.g., Equals To).
-
Select the Metadata Value that represents the correct data field for that question.
-
Repeat this process for all listed questions to ensure accurate mapping.
Example:
| Question (Call Info) | Operator | Metadata Value |
|---|---|---|
| Agent | Equals To | custom_agentName |
| Location | Equals To | custom_direction |
| Supervisor | Equals To | custom_supervisorName |
In this example:
-
The Agent question is mapped to the custom_agentName metadata field.
-
The Location question is mapped to custom_direction.
-
The Supervisor question is mapped to custom_supervisorName.
This mapping ensures the AI system can correctly reference the metadata when applying compliance logic in later steps.
3. Sub-Question Module
The Sub-Question Module allows you to break down each main question from the evaluation form into more detailed checks. Sub-questions help ensure that compliance logic is applied with precision and clarity.
Purpose
Sub-questions act as supporting questions under each main evaluation question. They provide specific criteria and guidelines that the AI system will reference during compliance checks.

Interface Overview
-
Each Main Question from the evaluation form is displayed in a non-editable format for reference.
-
Under each main question, user can add one or more sub-questions along with their corresponding guidelines.
-
Guidelines help clarify the intent or rule associated with the sub-question, ensuring consistent evaluation.
How to Add Sub-Questions
-
Locate the Main Question displayed on the screen.
-
Click the “+ Add” button to create a new sub-question.
-
Enter the Sub-Question text in the provided field.
-
Provide mandatory guidelines specifying how each sub-question must be evaluated.
-
Upon selecting the add button, A new row will appear, allowing you to add additional sub-questions if required.
Key Details
-
Multiple sub-questions can be added under a single main question.
-
Each sub-question will have a guideline.
-
You can add up to 15 sub-questions per main question.
-
Sub-questions created here will be available for use in the Conditions Module (Step 4).
Example:
-
Main Question: Does the agent send the chat ID within 30 seconds?
-
Sub-Question 1: Was the chat ID shared by the agent within the required time?
-
Guideline: Verify if the agent provided the chat ID before 30 seconds
-
-
This ensures the compliance form not only checks broad compliance points but also evaluates detailed supporting conditions.
4. Condition Module
The Condition Module is used to define the logical rules that determine how main questions in the AI Compliance Form are evaluated. This step connects metadata and sub-questions to form conditions that lead to a final Main Answer.
Purpose
Conditions act as the decision-making rules for compliance checks. They allow users to specify when a main question should be marked as “Yes,” “No,” or any other available answer type, based on either metadata values or responses to sub-questions.
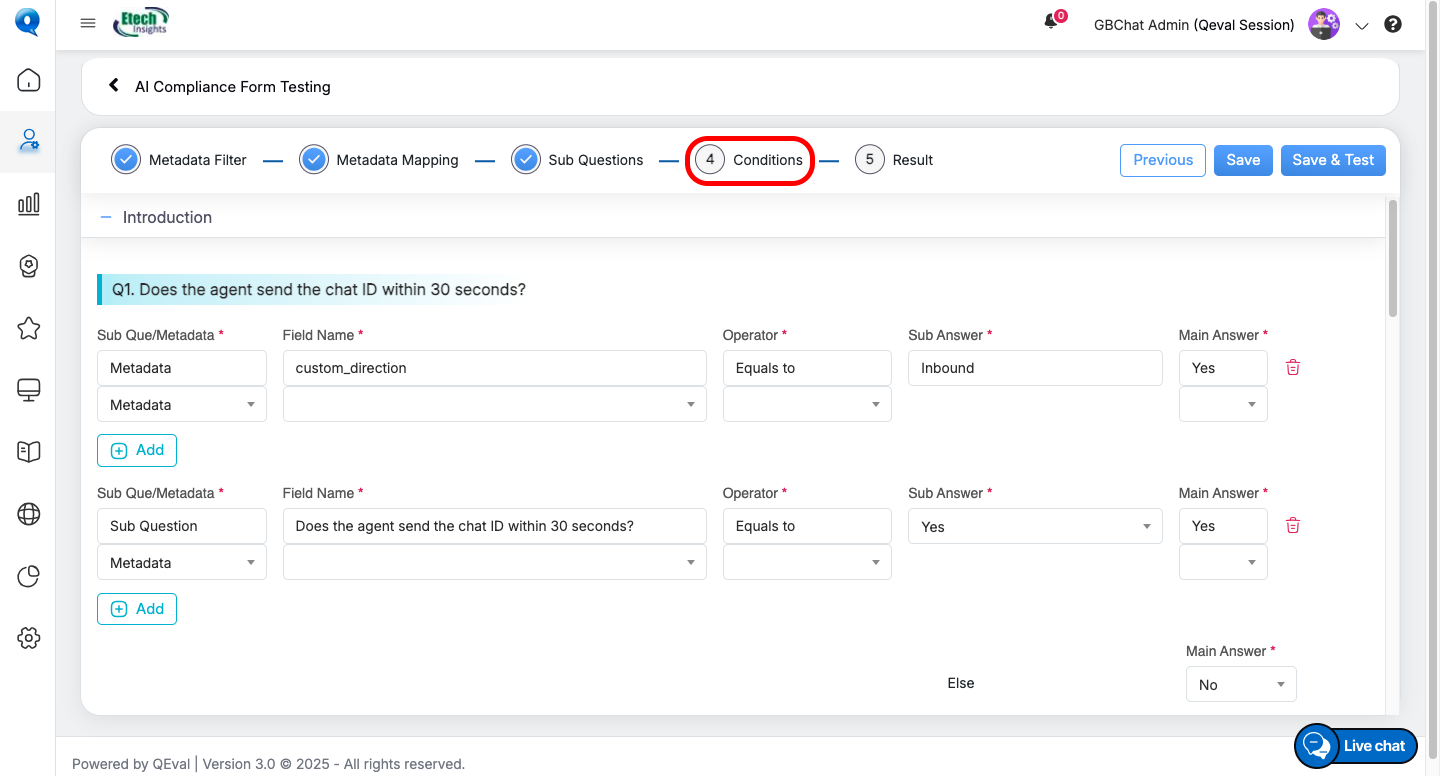
Interface Overview
In this module, users will work with the following sections:
-
Entity Type (Sub Question/Metadata): Choose whether the condition is based on a metadata field or a sub-question.
-
Field Name: If Metadata is selected, choose the metadata field. If Sub-Question is selected, pick the sub-question created earlier.
-
Operator: Select a logical operator from the predefined list in the dropdown (e.g., Equals To, Not Equals To).
-
Answer: Define the expected value.
-
For sub-questions, only Yes/No options are available.
-
For metadata, a text field will appear where values can be entered.
-
-
Main Answer: Define the outcome for the main question if the condition is satisfied (e.g., Yes, No, or NA).
Types of Conditions
-
Single Condition: One rule that must be satisfied.
-
Group Conditions (AND/OR):
-
AND: All conditions within the group must be satisfied.
-
OR: Any single condition within the group can satisfy the logic.
-
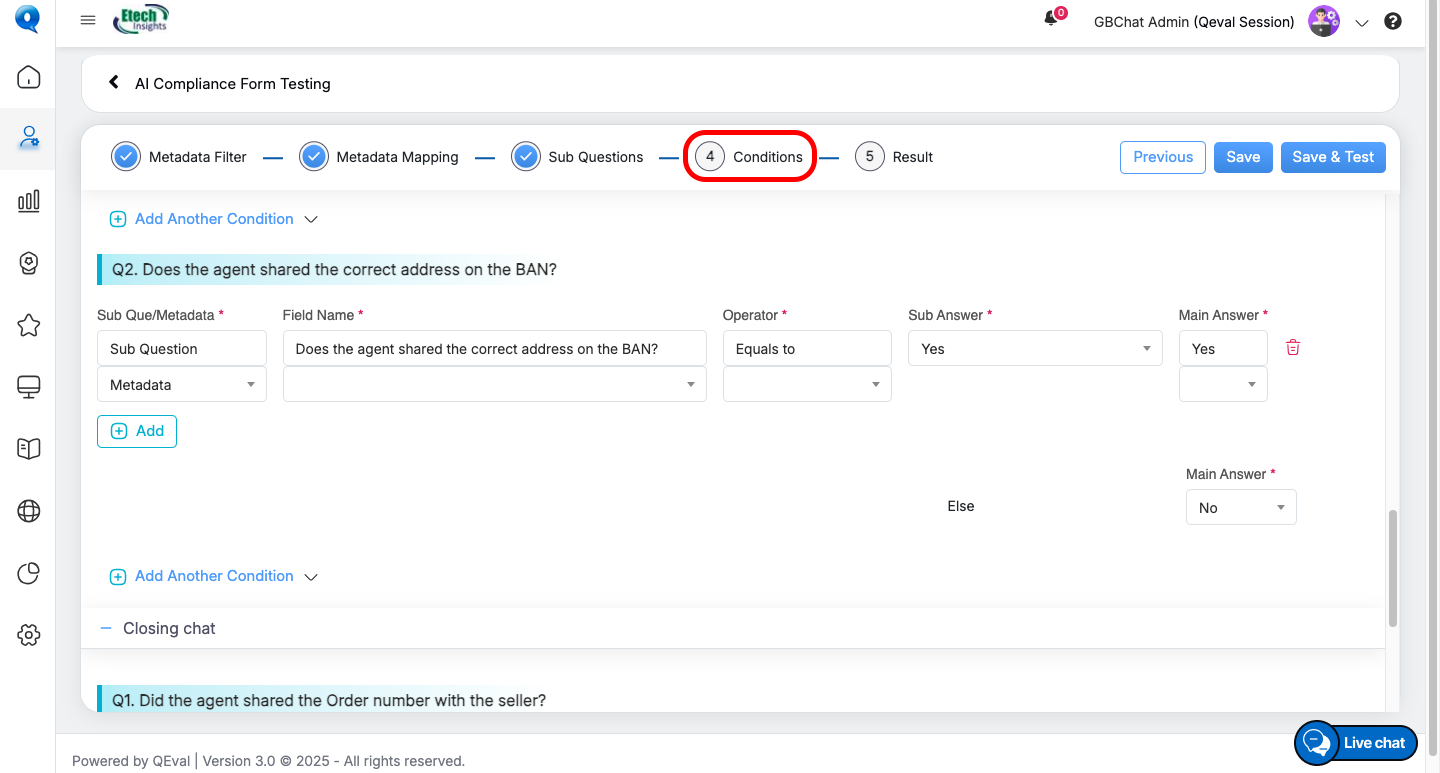
Key Features
-
Users can add multiple conditions under a single main question.
-
Each condition row requires:
-
Entity type (Sub Question/Metadata).
-
Field Name.
-
Operator.
-
Sub Answer
-
Main Answer.
-
-
Every main question includes a default Else Condition, which is applied if none of the defined conditions are met.
Example:
-
Q1. Does the agent send the chat ID within 30 seconds?
-
Condition 1: Metadata → custom_direction Equals To Inbound → Main Answer = Yes.
-
Condition 2: Sub Question → “Does the agent send the chat ID within 30 seconds?” Equals To Yes → Main Answer = Yes.
-
Else Condition: Main Answer = No.
-
Save & Test
After completing configuration, users can either Save or Test Save.
Save
-
Persists the Compliance AI setup into the system.
-
Once saved, the compliance rule becomes available for use in scheduled jobs.
-
A confirmation message (e.g., “Compliance AI configuration saved successfully”) will appear.
Save & Test
-
Validates the rule logic without scheduling.
-
Executes the conditions on the available evaluations to verify whether the applied logic and rules function as intended.
-
Returns a preview of compliance outcomes for verification.
-
Helps Users confirm if mappings, sub-questions, and conditions are correct before finalizing.
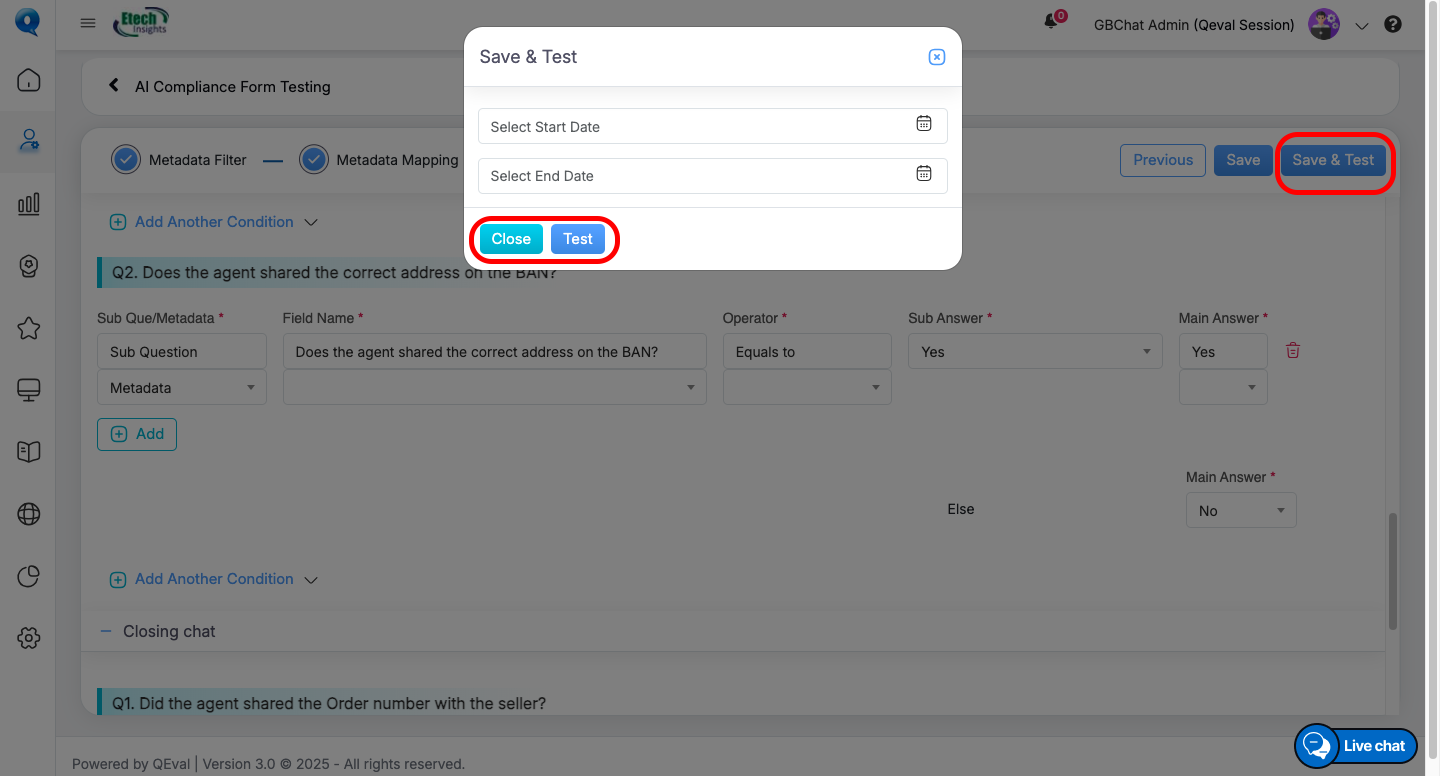
5. Result
After Metadata, Sub-questions, and Conditions are configured, and once Save & Test is applied with a defined start and end date, the system generates the Result section.
This section connects the configured logic to the possible answers of the main compliance question and displays the evaluated outcomes in a structured table.
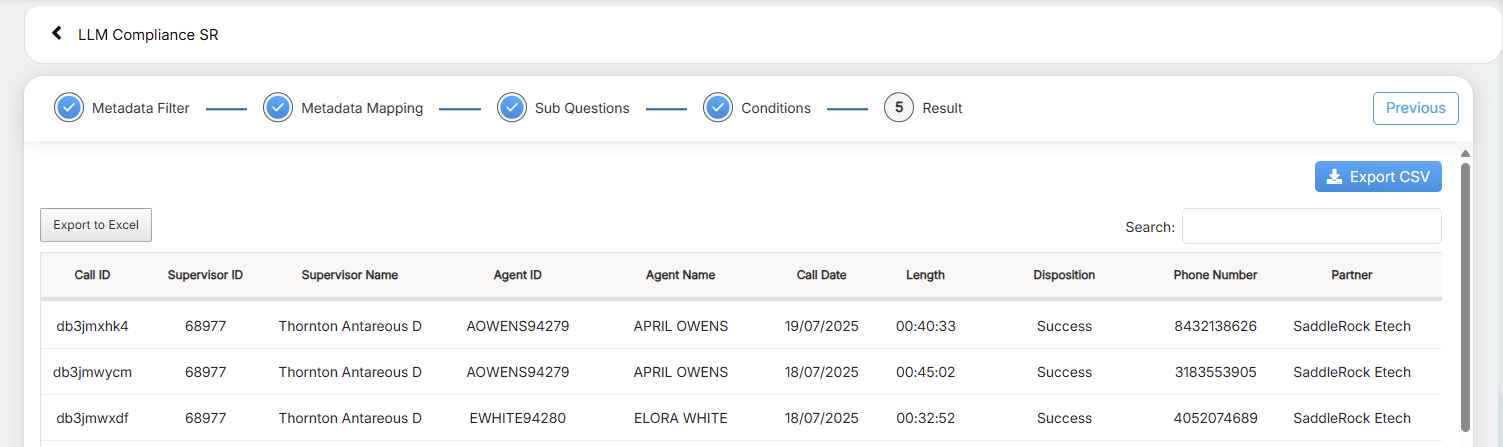
Result Table View
-
The table presents all filtered evaluation results based on the applied logic.
- Each record includes key details such as Call IDs, Agent names, Call dates, dispositions, and other relevant information columns.
-
This gives supervisors and auditors a clear, traceable view of compliance evaluations at the call level.
Key Features of the Result Tab
-
Search Functionality
The built-in search bar allows quick filtering of records by specific details such as call IDs, agents, or other information. -
Export Options
Users can export the results in multiple formats, including Excel and CSV, for reporting and further analysis.
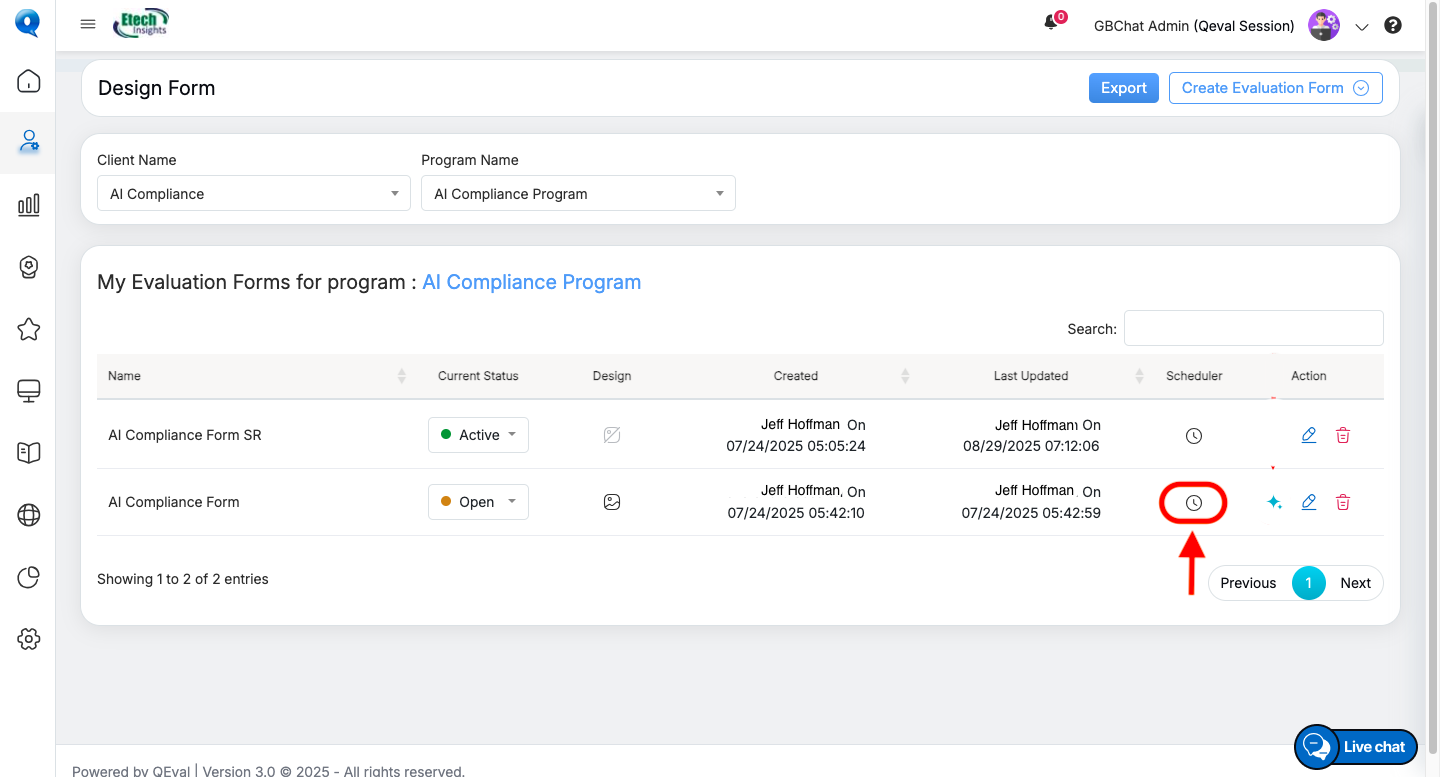
Frequency Scheduler
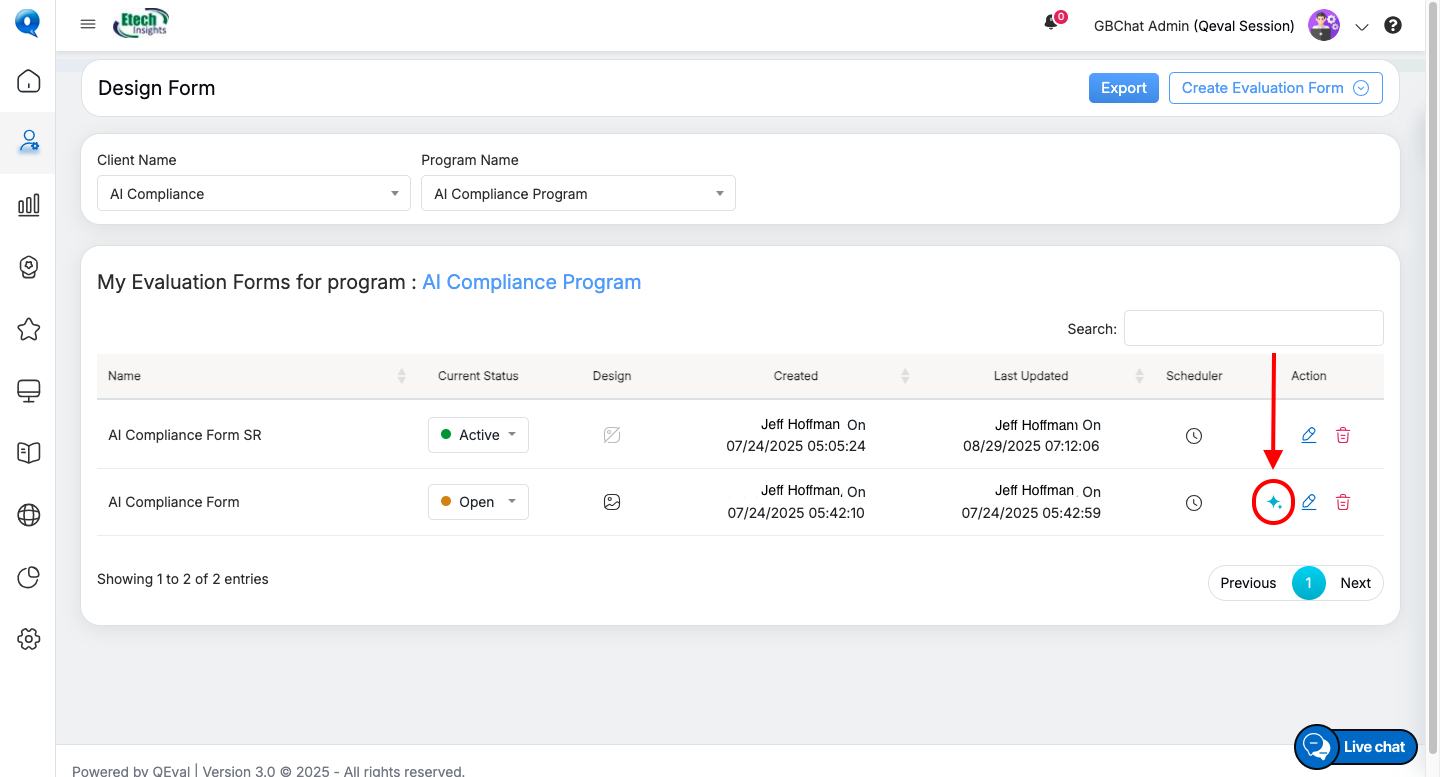
Once compliance rules are configured and saved, users can schedule automated compliance jobs using the Scheduler (Clock icon) available next to each evaluation form.
The Frequency Scheduler allows users to automate the execution of compliance evaluations at predefined intervals.
-
The scheduler can be accessed by clicking the clock icon in the Scheduler column on the Manage Form screen.
-
This action opens the Frequency Scheduler pop-up, where users can configure when and how often the evaluation should run.
- The scheduler can only be configured for forms in Open status. Once scheduled, compliance jobs will run automatically at the defined frequency (Hourly, Daily, Weekly, or Monthly).
Accessing the Scheduler
-
From the Evaluation Form List, locate the desired form and click the Clock icon in the Scheduler column.
-
The Prompt-Based AI Process Subscribe window will open.
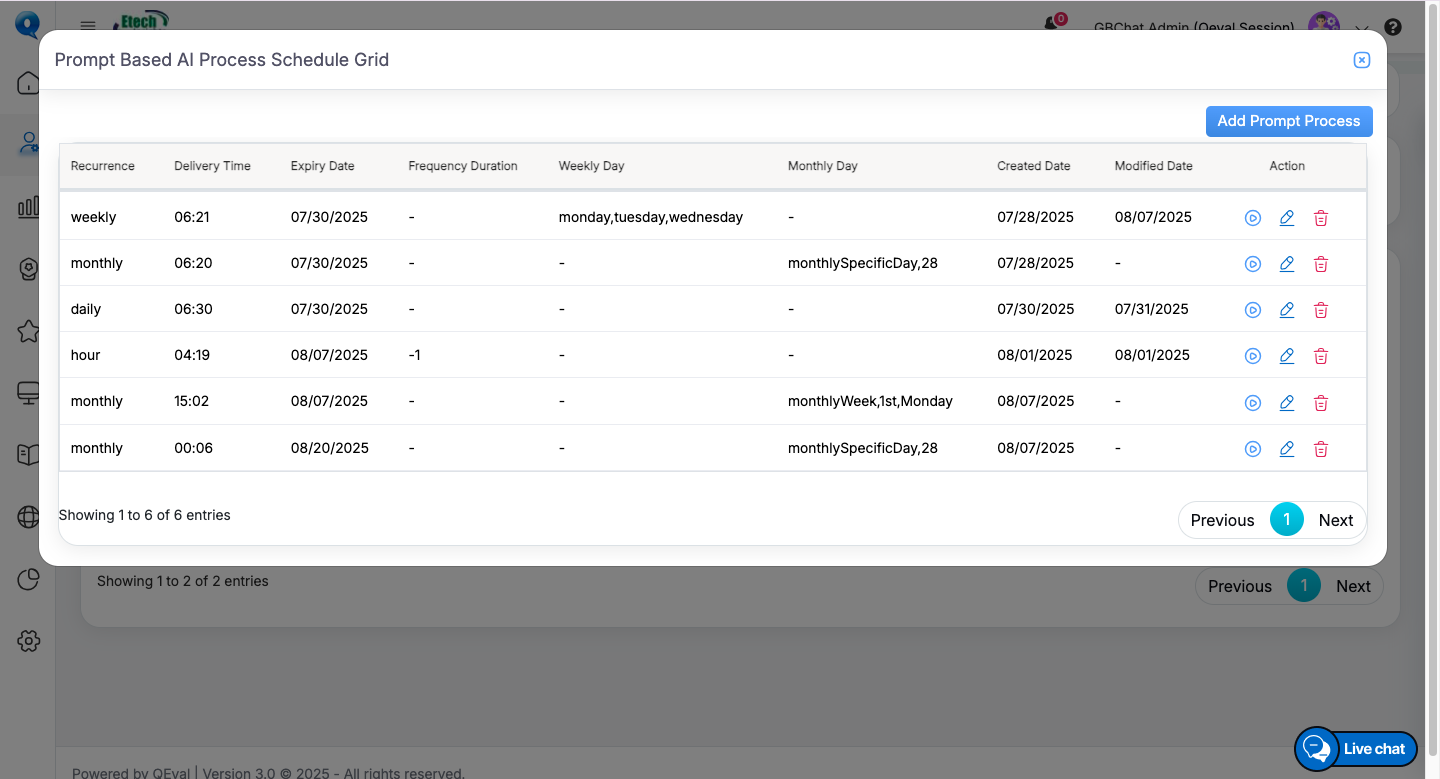
Managing Scheduled Processes
All the scheduled processed appears here, in the Prompt Based AI Process Schedule Grid shown below.
From here, you can also:
-
Add Prompt Process → Create a new scheduled job.
-
Edit → Modify an existing schedule.
-
Delete → Remove a schedule.
-
Play → Run a job Manually using this button.
Scheduling Options when you click Add or edit button, Recurrence Options:
Users can choose between Repeat or Does Not Repeat for recurrence.
-
Does Not Repeat (default):
-
Requires the user to specify a one-time execution Date and Time.
-
-
Repeat:
Provides multiple scheduling options:- Once – Allows users to run a one-time compliance review for a selected Scope, Rule Set, and Execution Date, ideal for historical audits and targeted checks.
-
Hourly – Specify the frequency duration in hours.
-
Daily – Choose a fixed time for daily execution.
-
Weekly – Select both the execution time and specific day(s) of the week.
-
Monthly – Configure one of the following:
-
On the Following Day: Define the schedule using a numeric value (1st, 2nd, etc.) and day of the week (e.g., Every 1st Monday).
-
On This Day of the Month: Select a specific calendar day (e.g., 1, 15, 31).
-
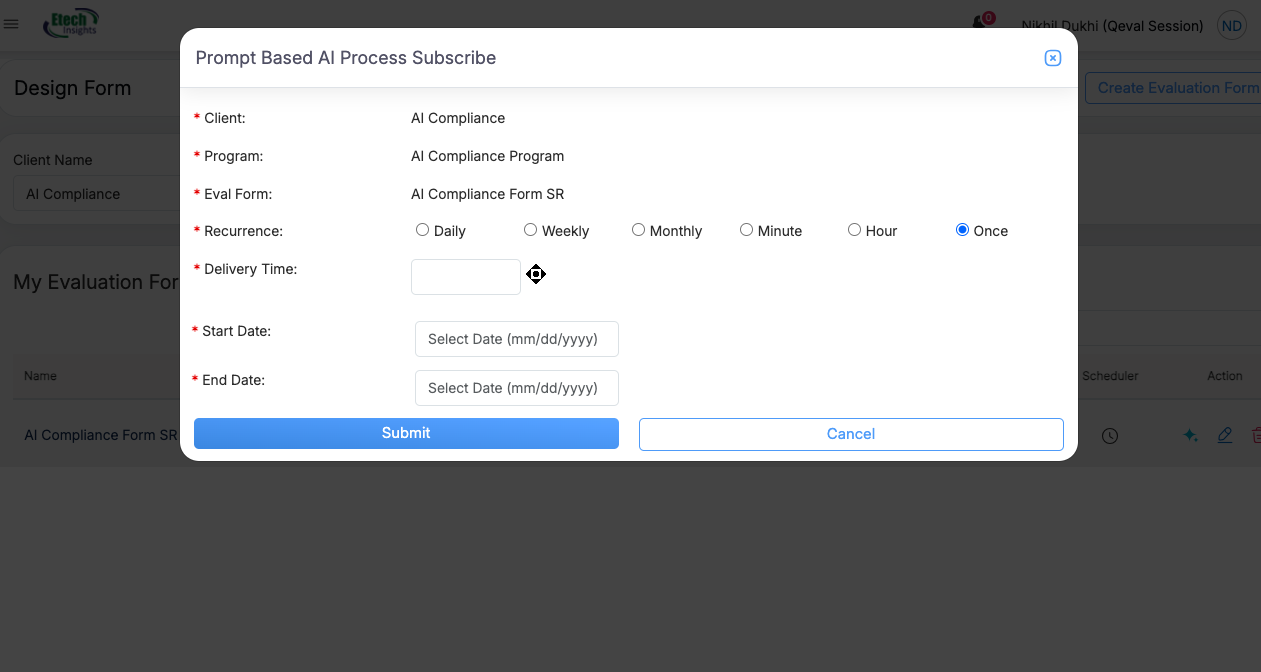
Once saved, the system will automatically trigger the evaluation process according to the defined schedule.
Example:
Schedule → Repeat Weekly, every Monday, Tuesday and Wednesday at 06:21 AM until 07/30/2025.
Best Practice: Always double-check recurrence, delivery time, and expiry date before hitting Submit to avoid missed or duplicate compliance runs.
Compliance AI ensures accurate, consistent, and automated compliance verification within QEval. With metadata filters, sub-questions, and logical conditions, Users can configure compliance checks tailored to their workflows. The scheduler further enables recurring automated evaluations, ensuring continuous compliance monitoring.
Video