Users with access permissions can rate the performance of the agents based on the categories in the Evaluation Forms. Users can generate new evaluations as well as search for existing ones. To know how to create and design evaluation forms, refer to Forms.
The term ATA is used for the module Auditing The Auditors. This module has been designed to review the quality evaluation made by QA Verifier for a particular Interaction. The review made for a QA verifier displays the number of defect-free ACTs and line item accuracy in the reports. Following this review, a QA Verifier can either accept the auditing made or can make a dispute with the audit. To know about the ATA Functionality, refer to ATA Evaluation.
To access both these functionalities, select Quality > Evaluation/ATA and the Manage Evaluation screen will be displayed.
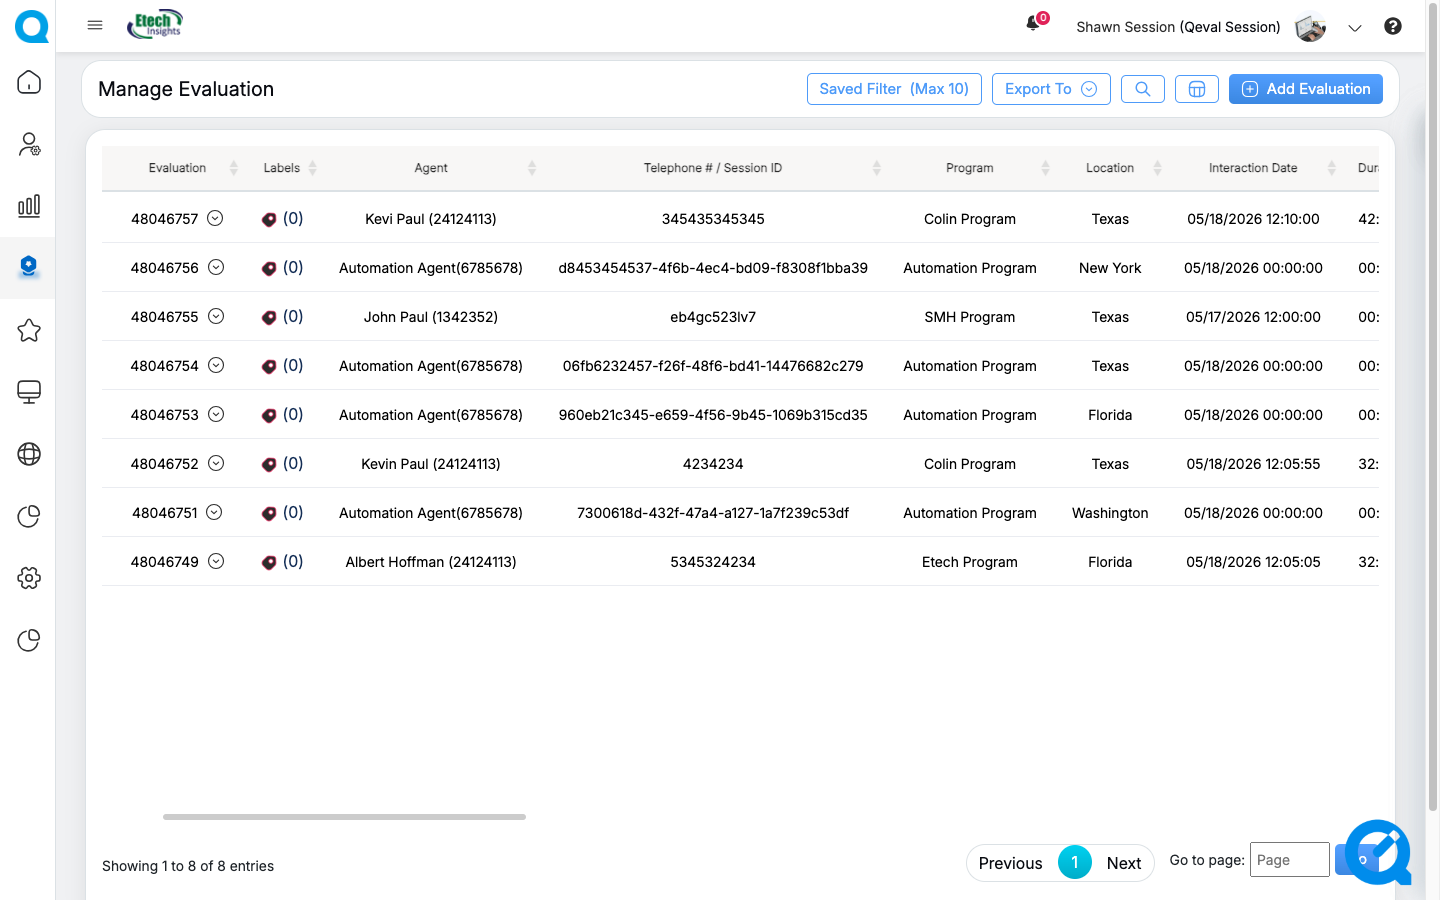
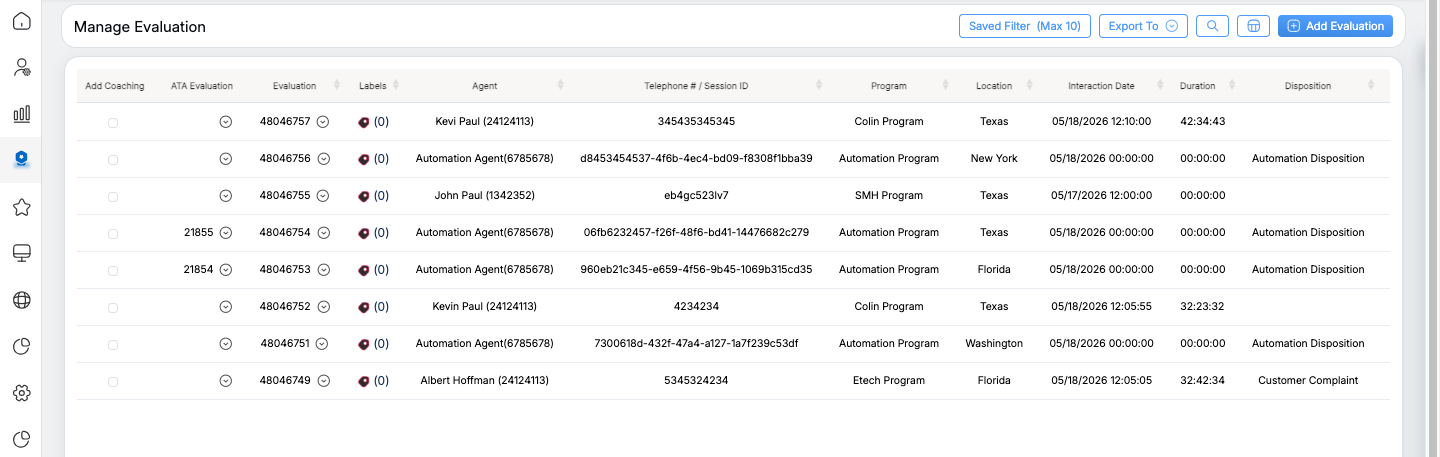
Manage Evaluation
The Manage Evaluation page displays a centralised data grid containing evaluation records and interaction details. Users can view key information such as Evaluation ID, Labels, Agent Name, Telephone # / Session ID, Program, Location, Interaction Date, Duration, and other evaluation-related details.
Manage Evaluation
The table below describes the available columns displayed within the data grid.
| Column Name | Description |
|---|---|
| Add Coaching | Allows users to initiate coaching for the evaluation. |
| ATA Evaluation | Displays ATA evaluation details and status. |
| Evaluation | Unique evaluation ID for the interaction. |
| Labels | Displays labels or tags associated with the evaluation. |
| Agent | Name and ID/session details of the evaluated agent. |
| Telephone # / Session ID | Displays the customer phone number or session ID. |
| Program | Shows the associated program name. |
| Location | Displays the agent or interaction location. |
| Interaction Date | Date and time of the interaction. |
| Duration | Total interaction duration. |
| Disposition | Displays the interaction outcome or disposition. |
| Score | Final evaluation score achieved. |
| Auto Failure Score | Displays auto-failure score details if applicable. |
| Status | Current evaluation status. |
| Evaluator | Name of the evaluator who completed the evaluation. |
| Evaluation Date | Date when the evaluation was completed. |
| Modified Date | Last modified date of the evaluation. |
| Modified By | Name of the user who last modified the evaluation. |
| Evaluation Time | Total time taken to complete the evaluation. |
| Reviewed | Indicates whether the evaluation has been reviewed. |
| Partner Name | Displays the associated partner name. |
| Total Possible Point | Maximum achievable points for the evaluation. |
| Total Obtained Point | Total points obtained in the evaluation. |
| Auto Failure Status | Indicates whether auto-failure criteria were triggered. |
| ATA Status | Displays the ATA review or agreement status. |
| Supervisor | Name of the assigned supervisor. |
| Upload Status | Displays the call or interaction upload status. |
| Agent Status | Shows whether the agent is active or inactive. |
| Sub Program Name | Displays the associated sub-program name. |
| Coaching Created | Indicates whether coaching has been created for the evaluation. |
| Call-Id | Unique identifier assigned to the interaction record. |
The page also provides quick access to important actions, including Saved Filters, Export To, Search Evaluation, and Add Evaluation, enabling efficient evaluation management and record handling.
Pagination controls are available at the bottom of the page, allowing users to navigate through records using the Previous, Next, or Go to Page options for direct page access.
Go to Page Navigation
The Go to Page feature allows users to directly navigate to a specific page within the Manage Evaluation records. Users can enter the desired page number and click Go or press Enter to instantly access the selected page. This functionality minimizes manual navigation across multiple pages and improves accessibility and efficiency while reviewing evaluation records.
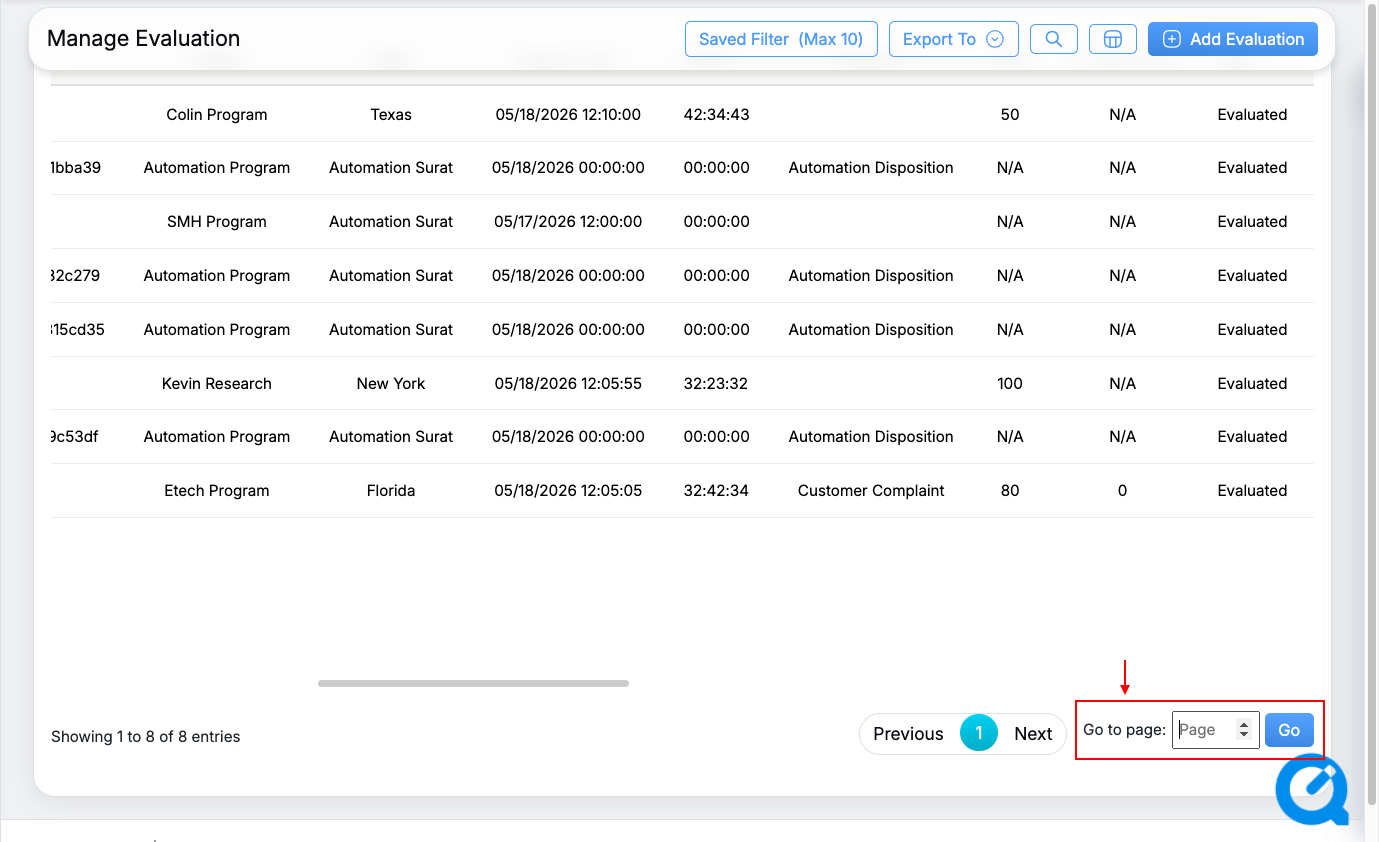
Go to page feature highlighted
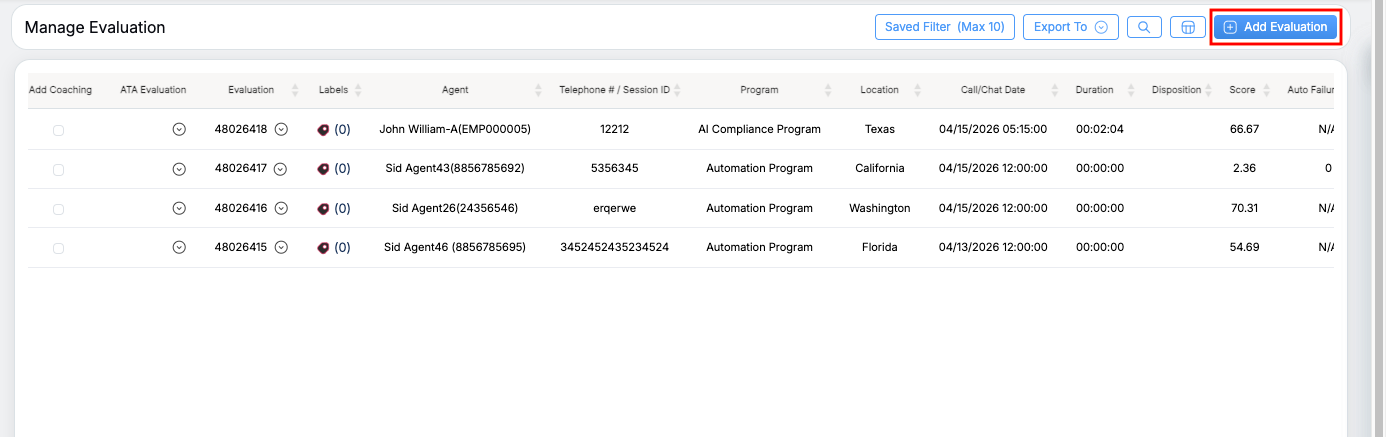
Let’s understand about adding evaluation from this console.
Add Evaluation
To add a new evaluation, click on the Add Evaluation button.
The following screen will be displayed:
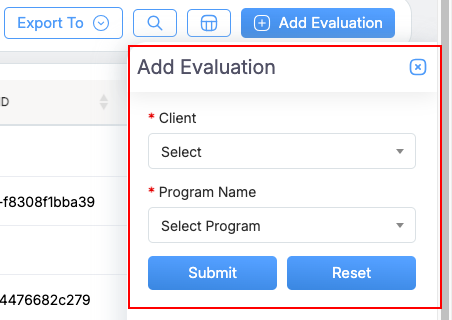
Select the Client Name and Program Name from the respective dropdown list. Then click on the Submit button to proceed with the evaluation or click on the Reset button to cancel the process and reset these fields.
Once submitted, the user will be directed to the Evaluation Form created for the selected client and its program as shown below:
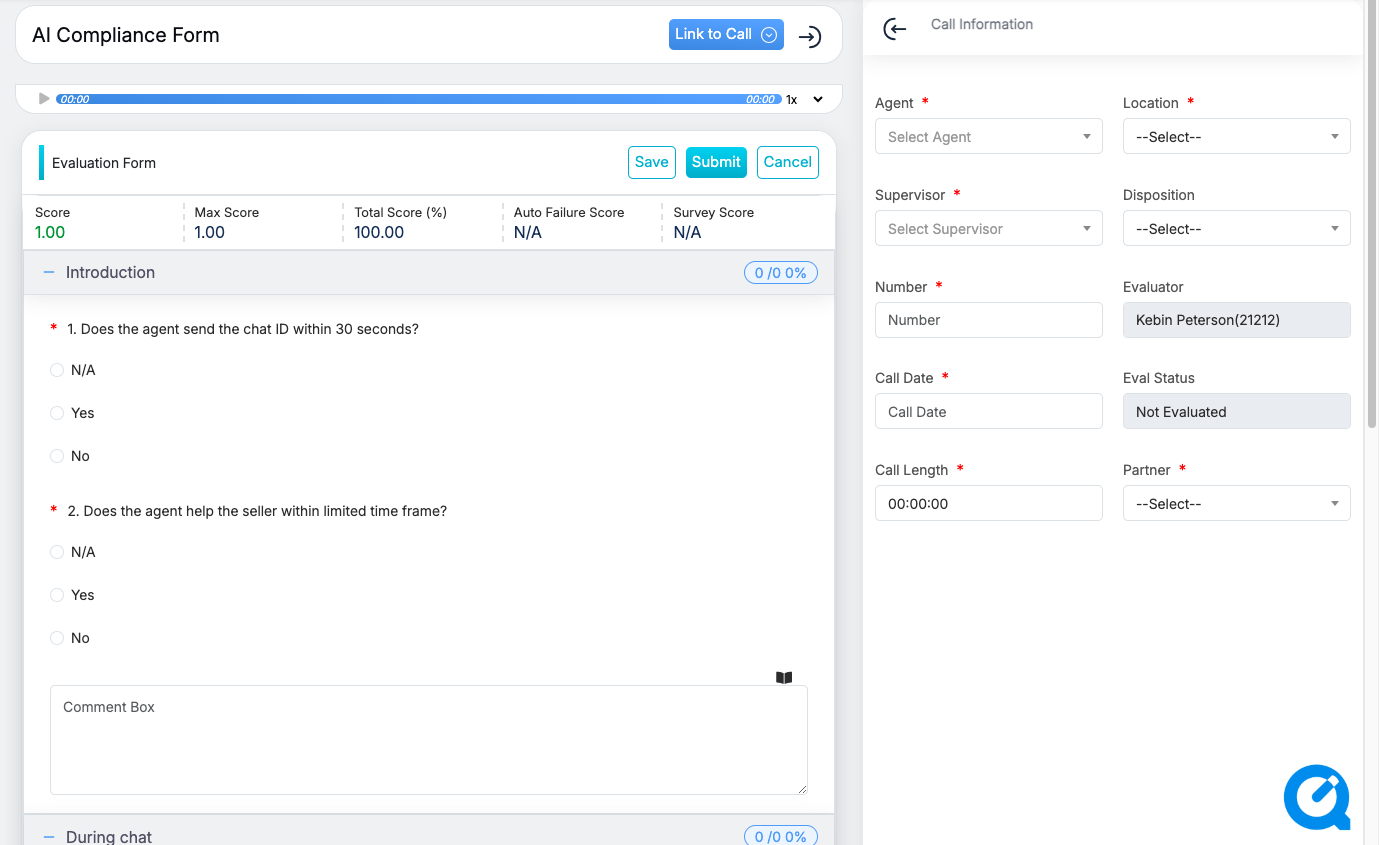
Evaluation Form
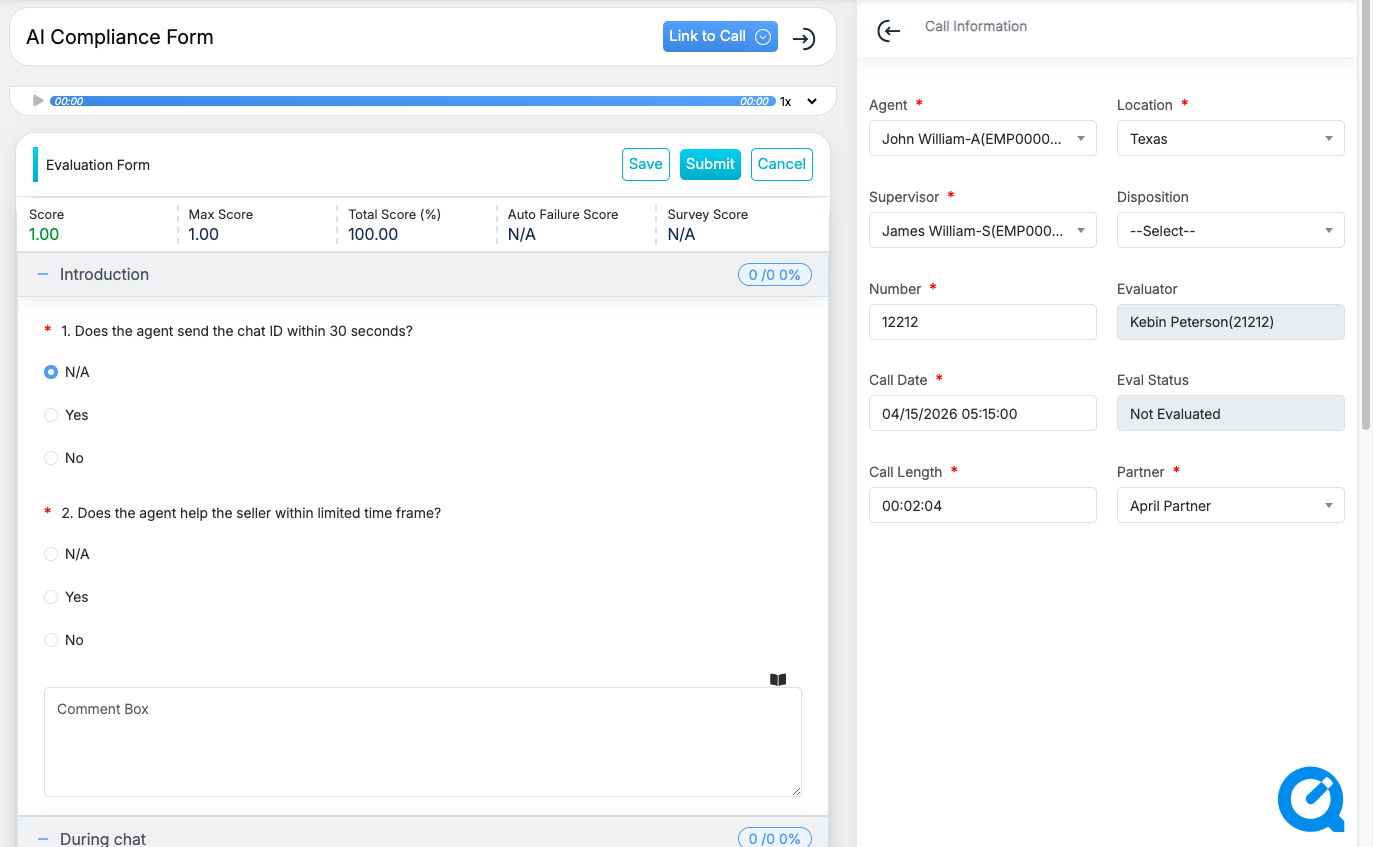
The top-right corner of the screen displays the Evaluation ID, the Agent Name, and the form creation date.
From this screen, one can start adding the evaluation for the questions displayed under the categories on this evaluation form. The following elements will be displayed on this page:
|
Screen Elements |
Description |
|---|---|
| Title Page |
The title of this page displays the Name of the form. |
| Scores Summary |
The form displays the panel of scores – Score, Max Score, Total Score (%), and Auto Failure Score. |
|
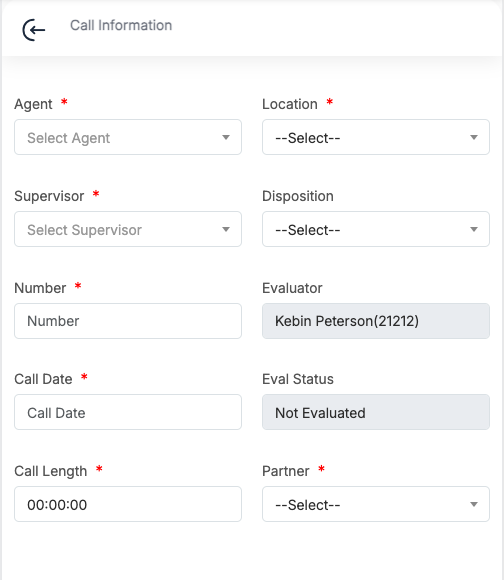
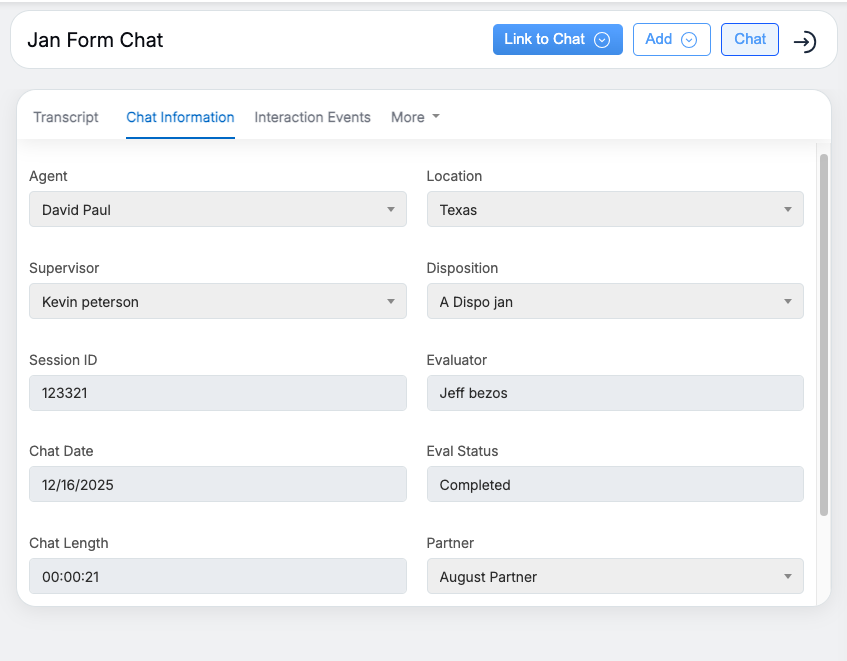
Call Information / Chat Information |
The page displays a default category Call Information or Chat Information based on the type of form, the user has selected while creating the Evaluation form. To know more, refer to Create Evaluation Form. Call Information
Chat Information
The following fields are displayed under this default category. |
|
Auto Scroll |
If the auto scroll option is enabled, the call playback starts, the transcript synchronizes with the audio in real time and automatically scrolls to follow the current playback position; seeking, pausing, or resuming the call updates the transcript immediately.
|
| Agent |
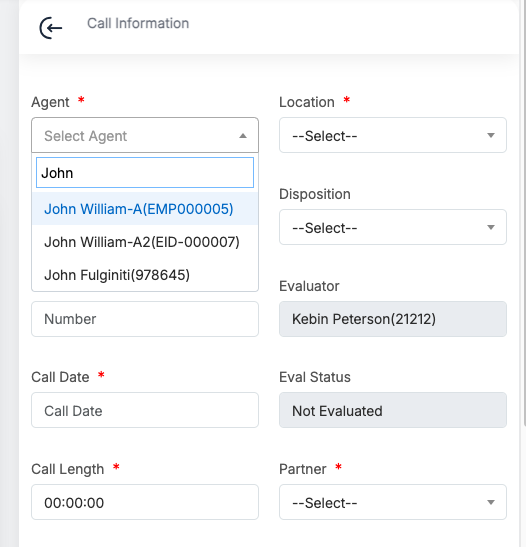
Select the required agent from the dropdown list. To search any specific agent, enter the keywords of that agent and the matching agent names will be displayed in the list.
|
| Location |
If the Is Agent Popup Information Allowed? checkbox is selected while creating a new program, then once the Agent is selected from the dropdown, this field will be auto-populated. To know more about auto-population, refer to Auto Populate Agent Information. If the above-mentioned checkbox is not selected, then from the current page, select the required location from the dropdown list. To search any specific location, enter the keywords of that location and the matching location names will be displayed in the list. |
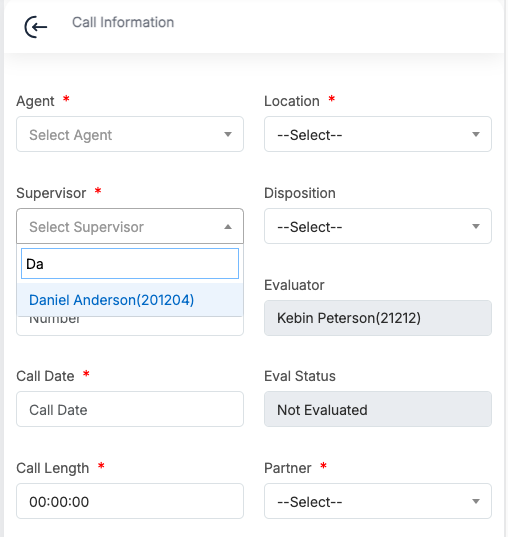
| Supervisor |
If the Is Agent Popup Information Allowed? checkbox is selected while creating a new program, then once the Agent is selected from the dropdown, this field will be auto-populated. To know more about auto-population, refer to Auto Populate Agent Information. If the above-mentioned checkbox is not selected, then from the current page, select the required supervisor from the dropdown list. To search for any specific supervisor, enter the keywords of that supervisor and the matching supervisor names will be displayed in the list.
|
| Disposition |
Select the required disposition from the dropdown list. To search for any specific disposition, enter the keywords of that disposition and the matching dispositions will be displayed in the list. |
| Session ID / Number | Enter the session ID of the chat conversation for which the evaluation is being carried out. Enter the Telephone number through which the call conversation was conducted and for which the evaluation is being carried out. |
| Evaluator | This field will display the name of the logged-in user with the appropriate access rights and will be able in read-only mode. |
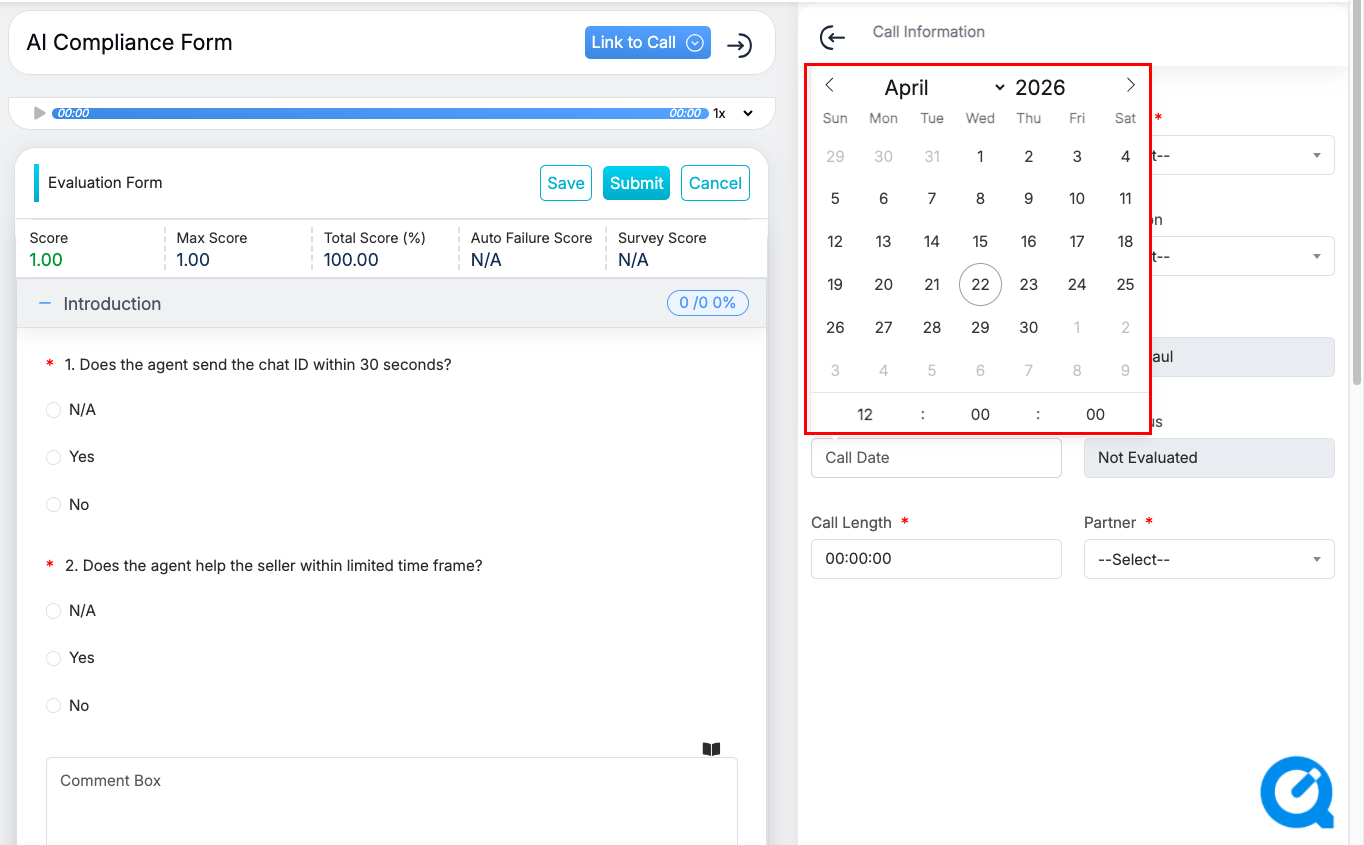
| Chat Date / Call Date and Timestamp |
Select the date and time when the chat/call conversation occurred between the agents and customers/visitors, and for which the evaluation will be carried out.
|
| Eval Status | Displays the evaluation status – Not Evaluated, In Process, Evaluated – of any chat/call. |
| Chat Length / Call Length | Enter the chat/call conversation duration in the 24-hour format i.e., HH:MM:SS. |
| Call Player |
It is used to play the recorded call conversation for evaluation purposes.
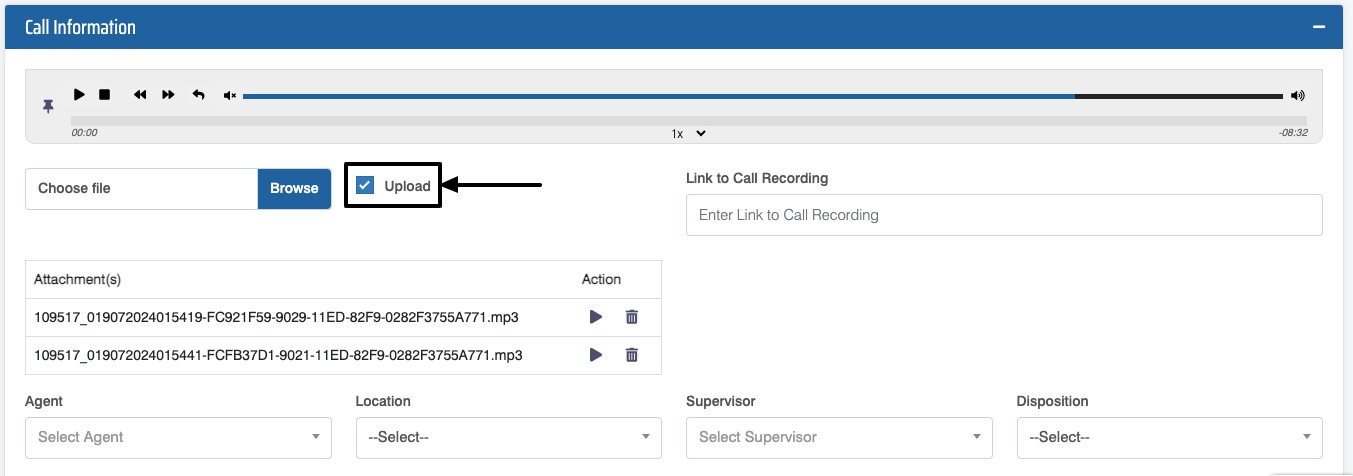
Attach Call File(s) To play any call recording, one needs to upload that recording from the local system to the QEval. To do so, click on the Choose file field following which a dialogue box will be displayed to select the call recording. Notes:
Once the file is attached, it will be displayed in the Attachment(s) table as shown below:
From this table, one can play the required call recording by clicking on the Play The call recording can also be deleted by clicking on the Delete Link to Call Recording The link to the call recording can also be entered in the Link to Call Recording field to upload any call.
Note: Only the files uploaded to the server will be played through the Link to Call recording file module. Player Elements Once the required call recording(s) is attached, one can play and pause. Following mentioned are the representation of each icon displayed on the call recording player.
Speed One can adjust the speed of the recording by clicking on the highlighted element as shown on the following screen:
The speed can be in 1x, 1.5x, 2x, 2.5x, 3x, 3.5x, and 4x. Upload Even if the file is played in the interface, an evaluator or supervisor won’t be able to view it for evaluation unless the call information evaluation form has been submitted by check marking the Upload as shown on the following screen:
|
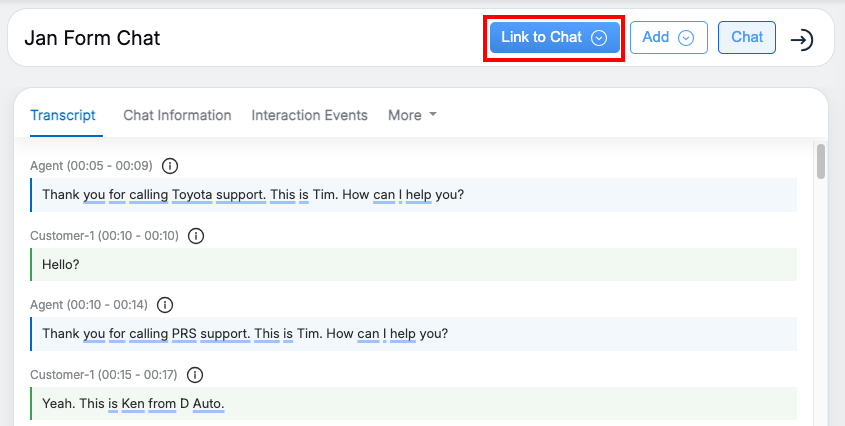
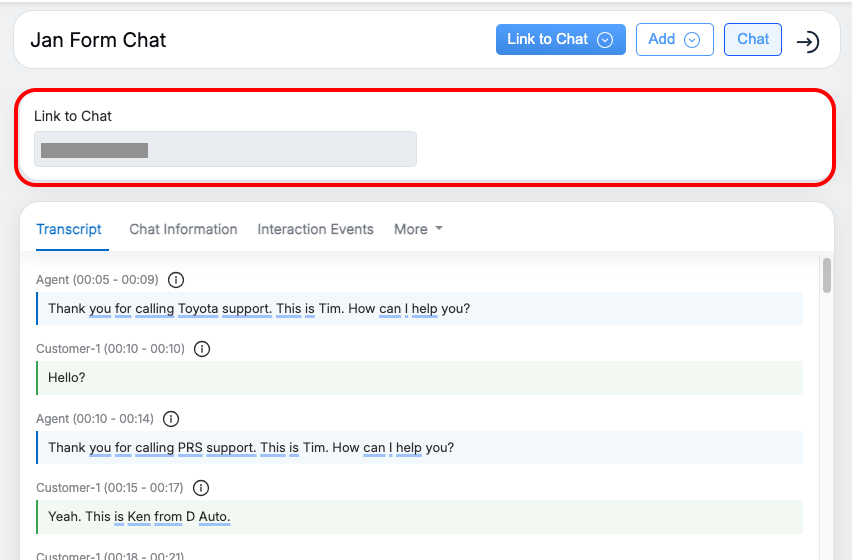
| Attach “Link to chat” for Chat form type |
You can enter the chat link by clicking Link to Chat.
This opens a field where you can paste the chat URL, and the system automatically converts it into a transcript, as shown below.
|
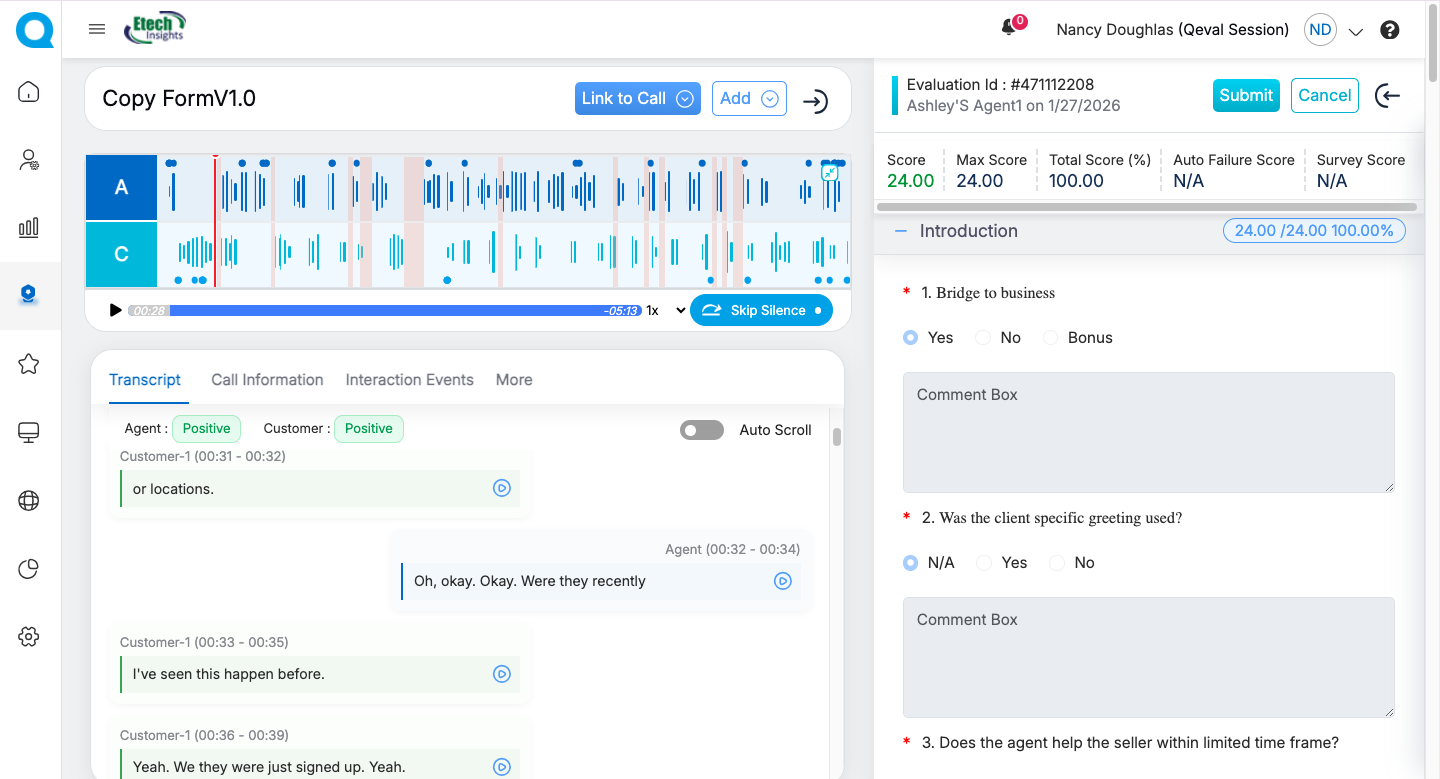


Once the details are provided under the default category, evaluating the categories and their questions will be the next step.
Different categories and questions are added to the evaluation form while designing it will be displayed here. To know about designing an evaluation form, refer to Design Form.
Users can complete the evaluation by entering the required responses for the questions displayed under each category.
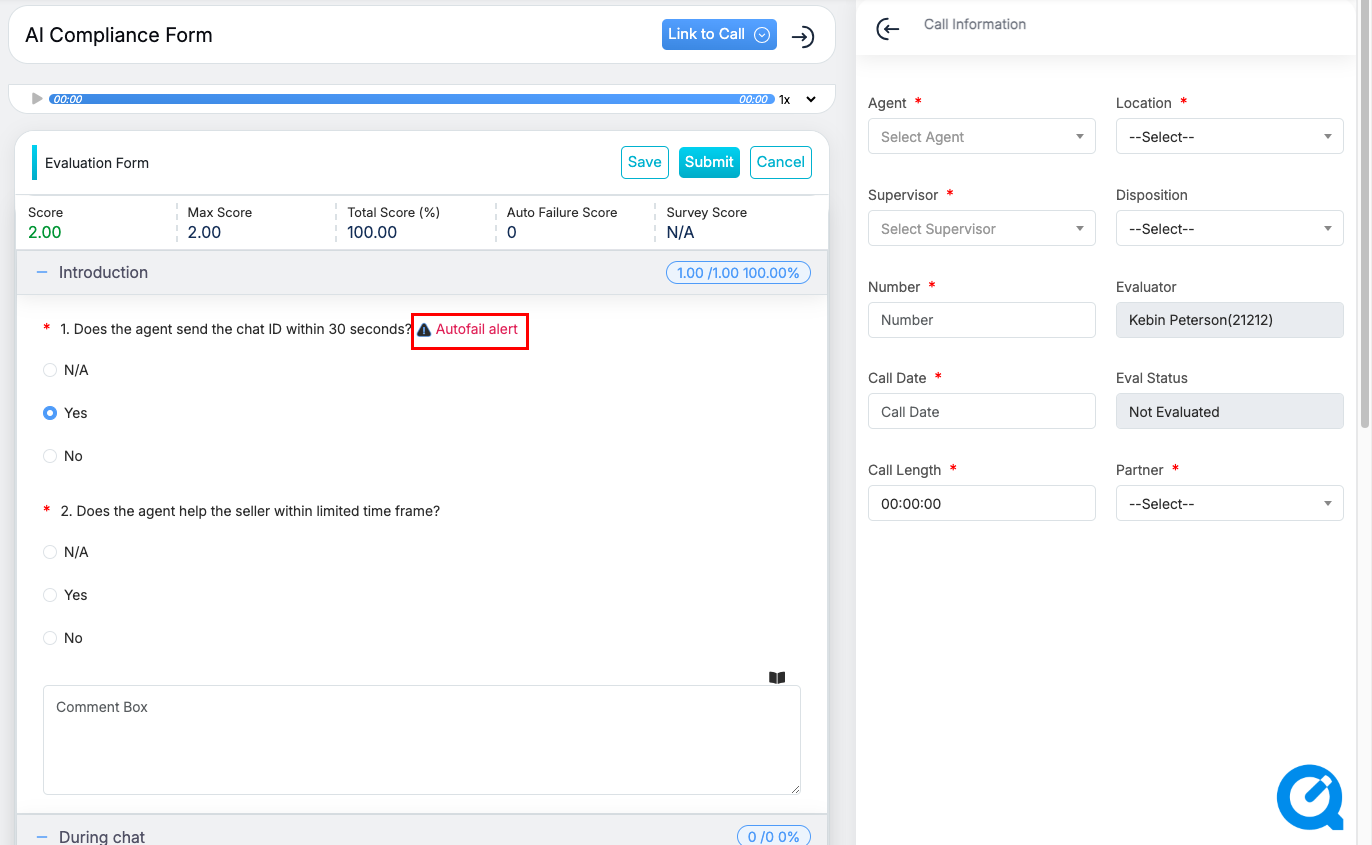
Auto-fail parameters are automatically highlighted with an Alert icon or Auto-Fail Alert tag whenever triggered based on configured rules, enabling quick identification of critical compliance failures.
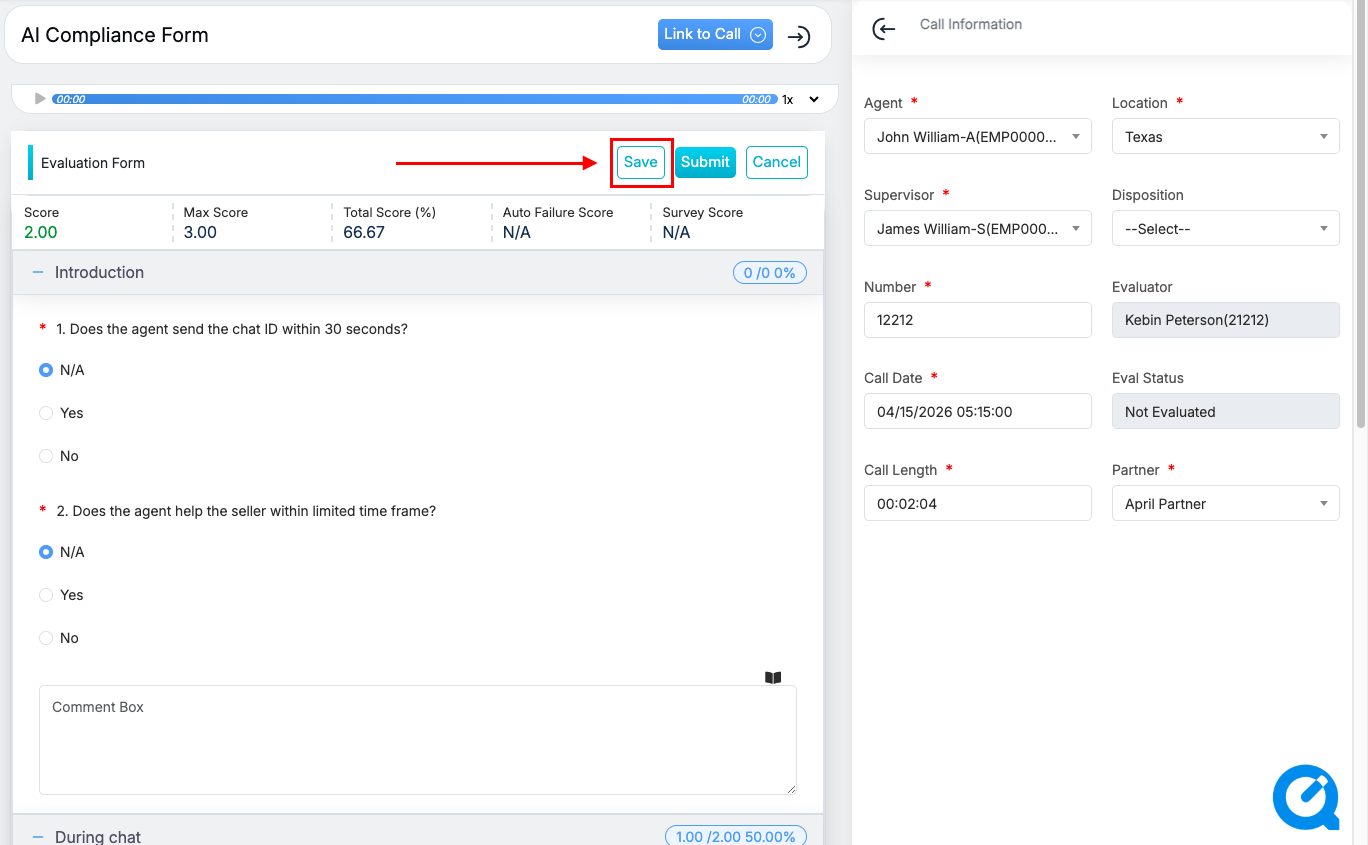
Once all required details are entered, the evaluation can be saved.
Save
One can save the evaluation even if it is not completed. The system will identify such evaluations as In Progress.
To save any incomplete form, click on the  button.
The form will be saved and the following confirmatory message will be displayed:
Acknowledgement of Evaluation saved
- On clicking the OK button for the confirmation message, the user will be redirected again to a new Evaluation Form screen where all the previously entered information will be reset.
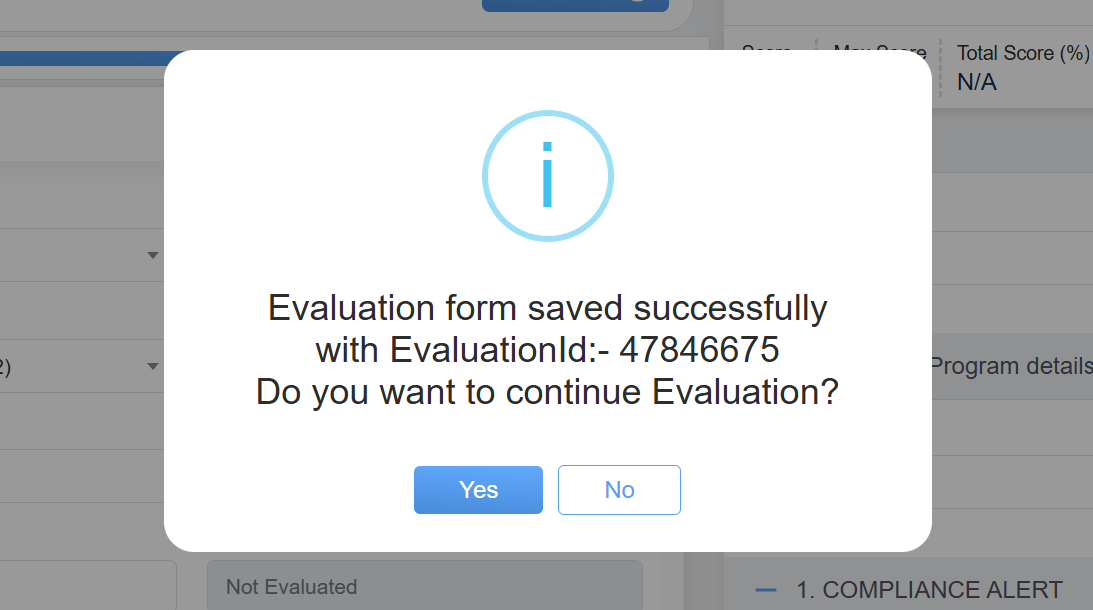
On clicking the Cancel button, the user will be redirected to the Manage Evaluation screen which will display the Evaluation Forms with their unique IDs as shown below:

Submit Button
Once all the details are provided in the evaluation form, click on the Submit button as shown below.
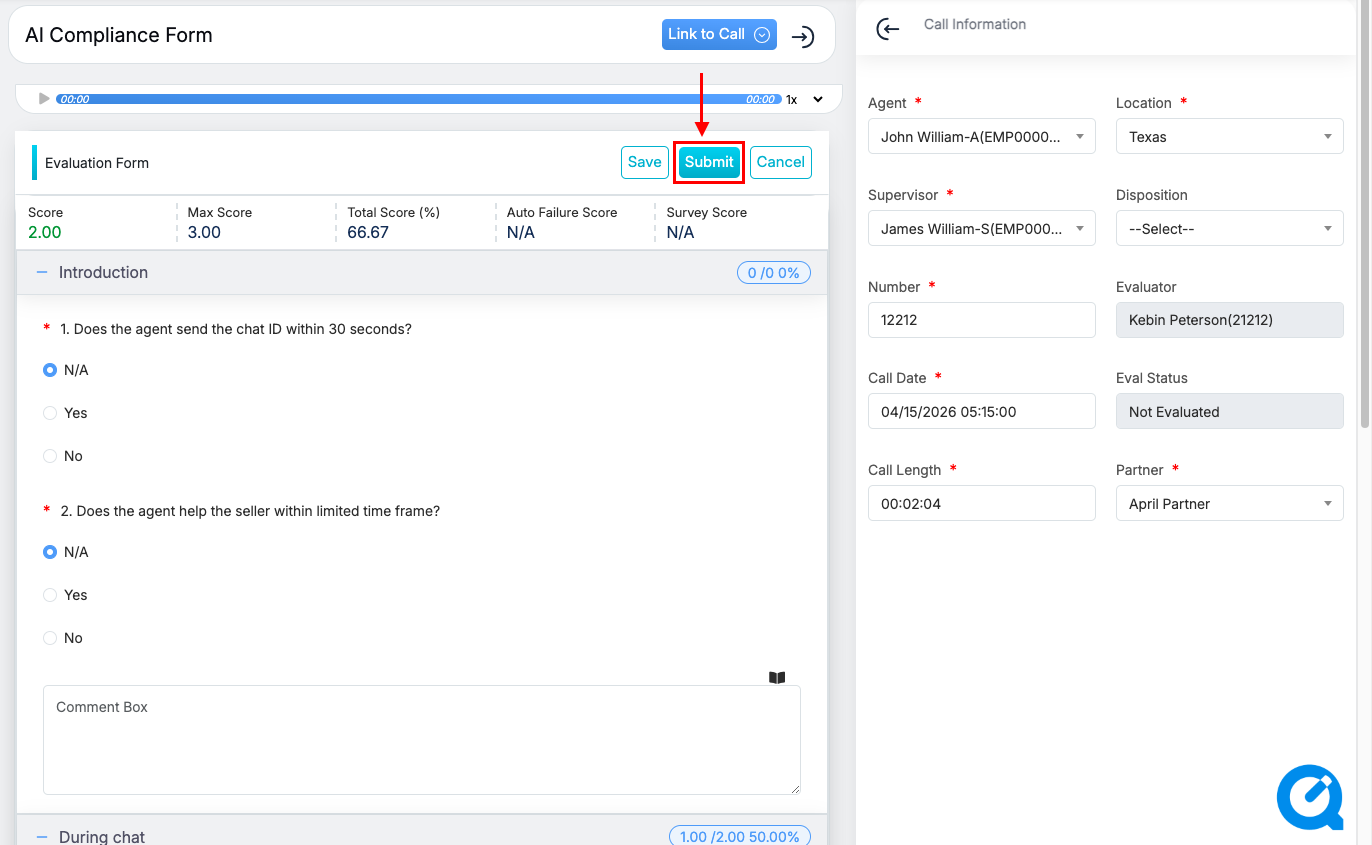
The following message will be displayed to the user:
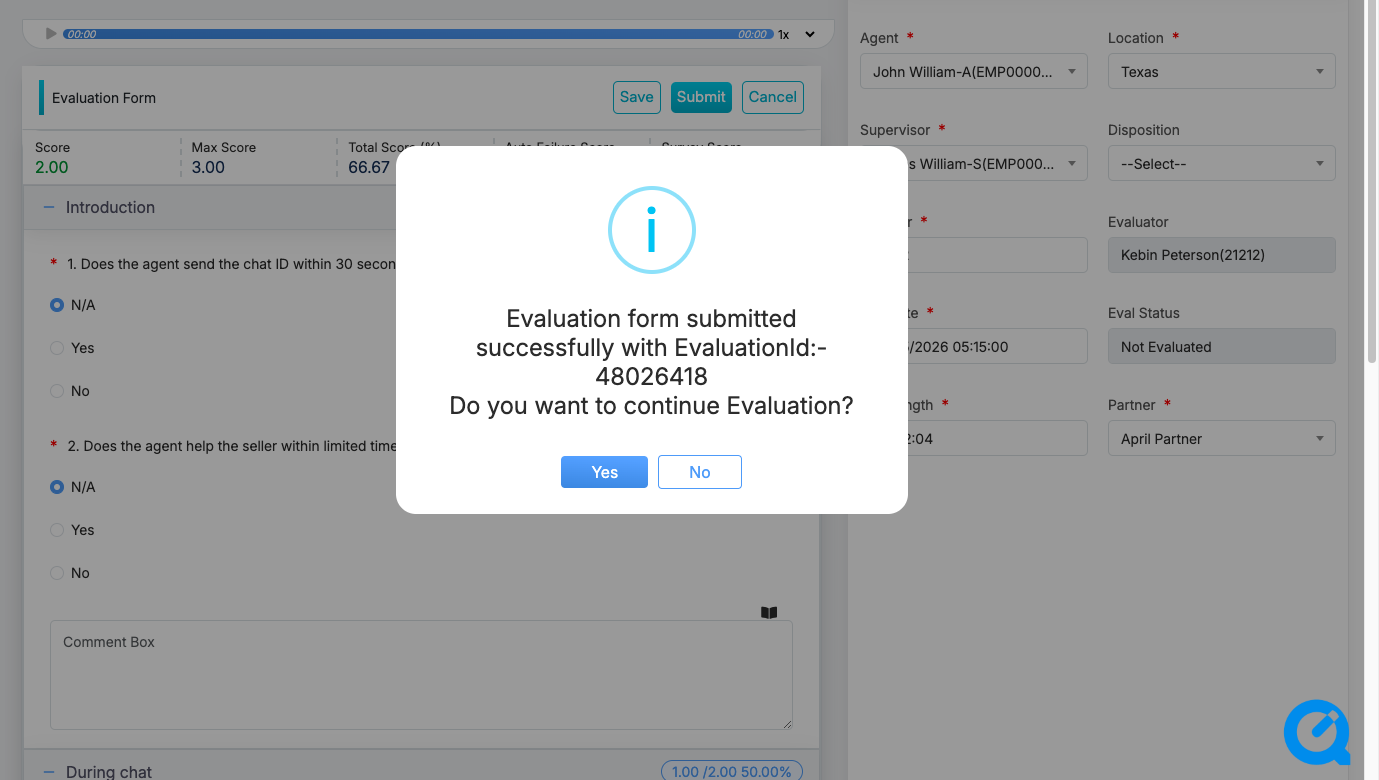
On clicking the OK button for the confirmation message, the user will be redirected again to a new Evaluation Form screen where all the previously entered information will be reset.
On clicking the Cancel button, the user will be redirected to the Manage Evaluation screen which will display the Evaluation Forms with their unique IDs as shown below:
The created evaluation will be visible in the grid on this page.
Cancel
To cancel the evaluation process, click on the  button.
The user will be redirected to the Manage Evaluation screen.
Search Evaluation
One can search for any evaluation for any client and its program.
To access this functionality, from the Manage Evaluation page, click on the Search Evaluation button.
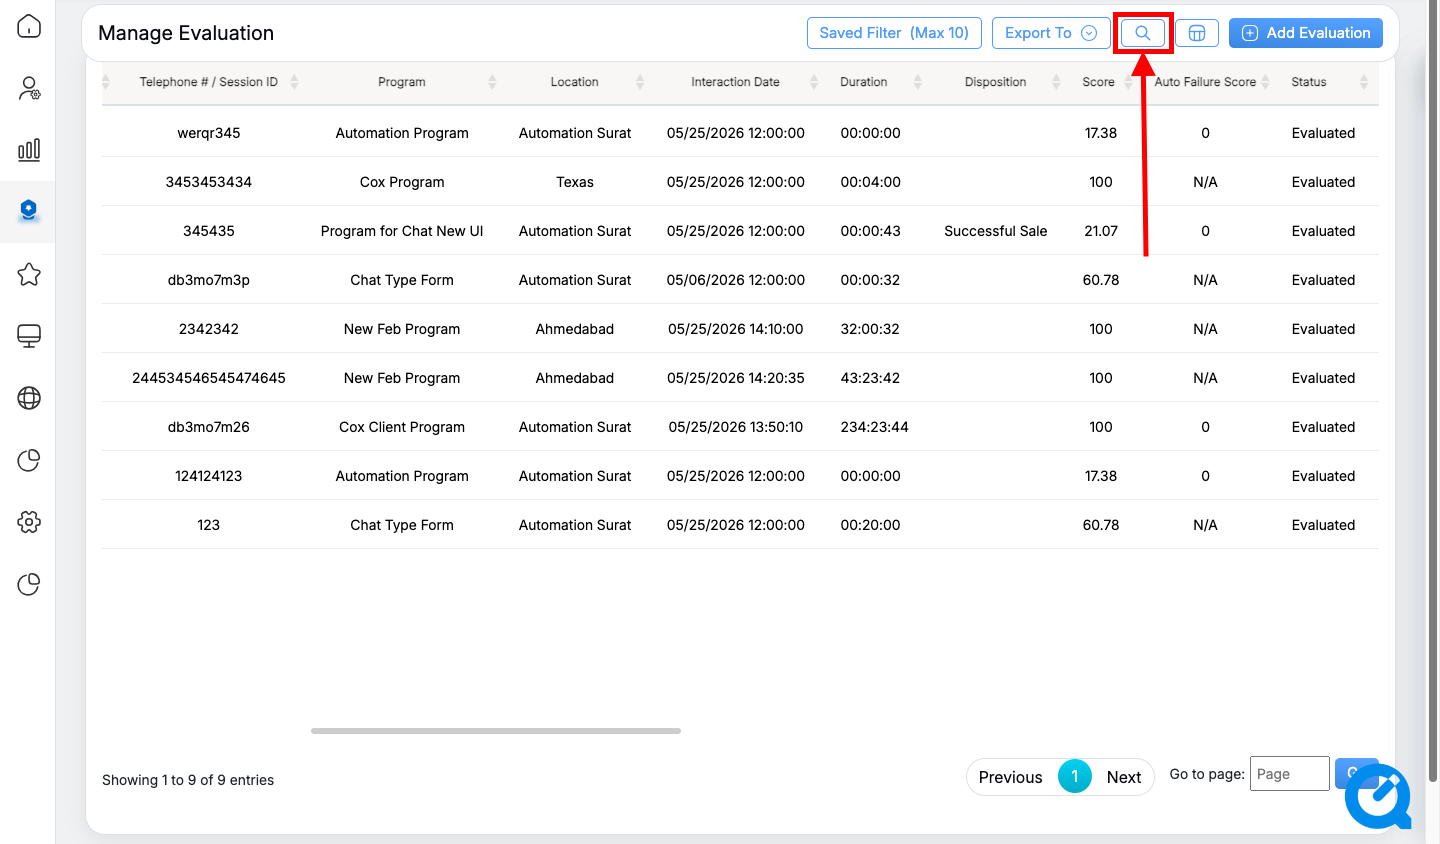
Search Evaluation
The following screen appears.

Configure the following filters to search for any specific evaluation form:
|
Screen Elements |
Description |
|---|---|
|
Client Name |
Select the client name from the dropdown list. Once selected, Program names and Evaluation forms will be listed in their respective dropdown lists. |
|
Program name |
Select the Program name from the dropdown list for the respective client. |
|
Evaluation form |
Select the Evaluation form for the respective client and program name. |
|
Sub Program Name |
Select the Sub Program name for the respective client, program and evaluation form name. |
|
Evaluation Status |
Select the evaluation status from the dropdown list.
|
|
Date Range |
User can define a date range by either selecting from predefined timeframes in the dropdown or specifying a custom range based on the need. Available filters include Today, Last 7 Days, Last 10 Days, Last 30 Days, Last 12 Weeks, Last 6 Months, Week to Date, Month to Date, Previous Day, Previous Week, Previous Month, and Custom Date Range. Choose the option as required. |
|
Start Date |
If user selects the custom date range then users would be able to select the start date and end date as per their need. |
|
End Date |
Select the end date to which the evaluation should be searched. |
|
Evaluation ID |
Enter the Evaluation ID based on which the form should be searched. |
|
Telephone # / Session ID |
Enter telephone or session ID based on which evaluation can be searched. |
|
Agent Name |
Select the agent from the options which appear as you start typing. |
| Supervisor Name | Select the supervisor from the options which appear as you start typing. |
|
Evaluation Date |
Select to search on the basis of the evaluation date. |
|
Interaction Date |
Select to search on the basis of the Interaction date. |
|
Modified Date |
Select to search on the basis of the modified date. |
|
Score From |
To define the score range, enter the score from the number. |
|
Score To |
Enter score to number. |
|
Partner |
Select the Partner name from the dropdown list which will display the different Partner Names. |
|
Verifier |
Select the verifier from the dropdown list. |
|
Call Upload Status |
Select the call upload status from the dropdown list.
|
|
Select Role |
Select the user role from the dropdown list. |
|
ATA Status |
Select the ATA status from the dropdown list.
|
|
Agent Status |
Select the Agent status from the dropdown list.
|
|
Autofail |
Select the Autofail option from the dropdown list
|
|
Evaluation Count |
Select the Evaluation count to choose the number of Evaluations (10,25 or 50) to display in the search result. |
Click  to search the evaluation and based on the set filters the search result will be displayed on the Manage Evaluation page.

The page displays a grid containing a list of evaluations. One can print update, delete, and view evaluations by clicking on the ![]() displayed under the Evaluation column beside the Evaluation ID.
displayed under the Evaluation column beside the Evaluation ID.
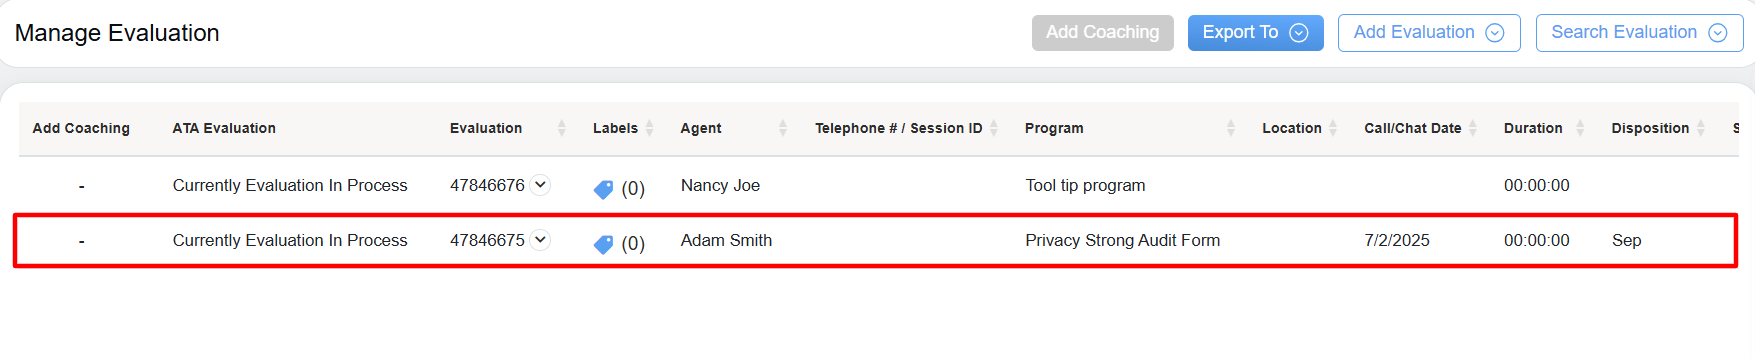
If the evaluation is completed by the QA Verifier, then the ATA process can be conducted for such evaluations. To know more about the ATA process, refer to ATA Evaluation.
If the evaluation is in progress, then “Currently Evaluation In Process” will be displayed under the ATA Evaluation column as shown below:

Evaluation in process
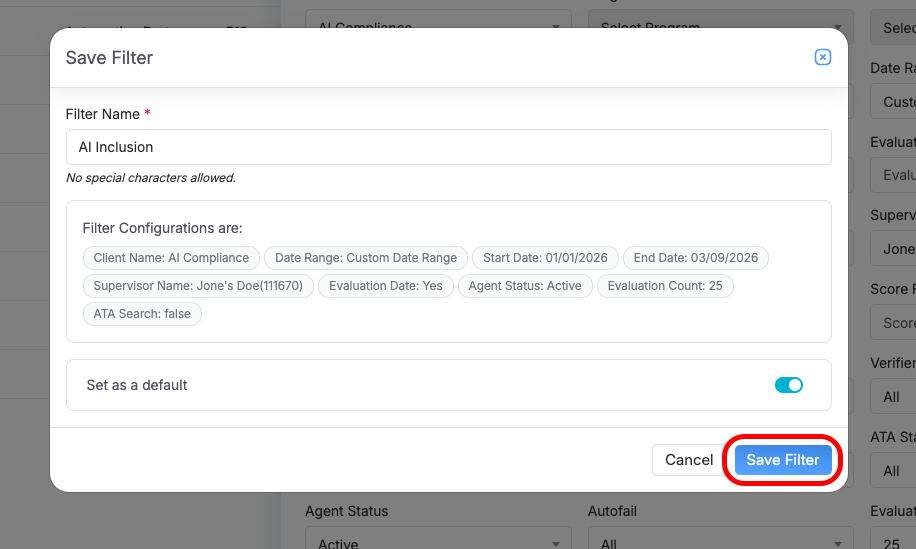
Save Filter
The Save Filter feature allows users to store frequently used search filter combinations and quickly reuse them later. This helps save time and ensures consistent search results without manually applying the same filters each time.
1. Saving a Filter
After applying the desired search filters:
Click Save Filter at the bottom of the search panel.
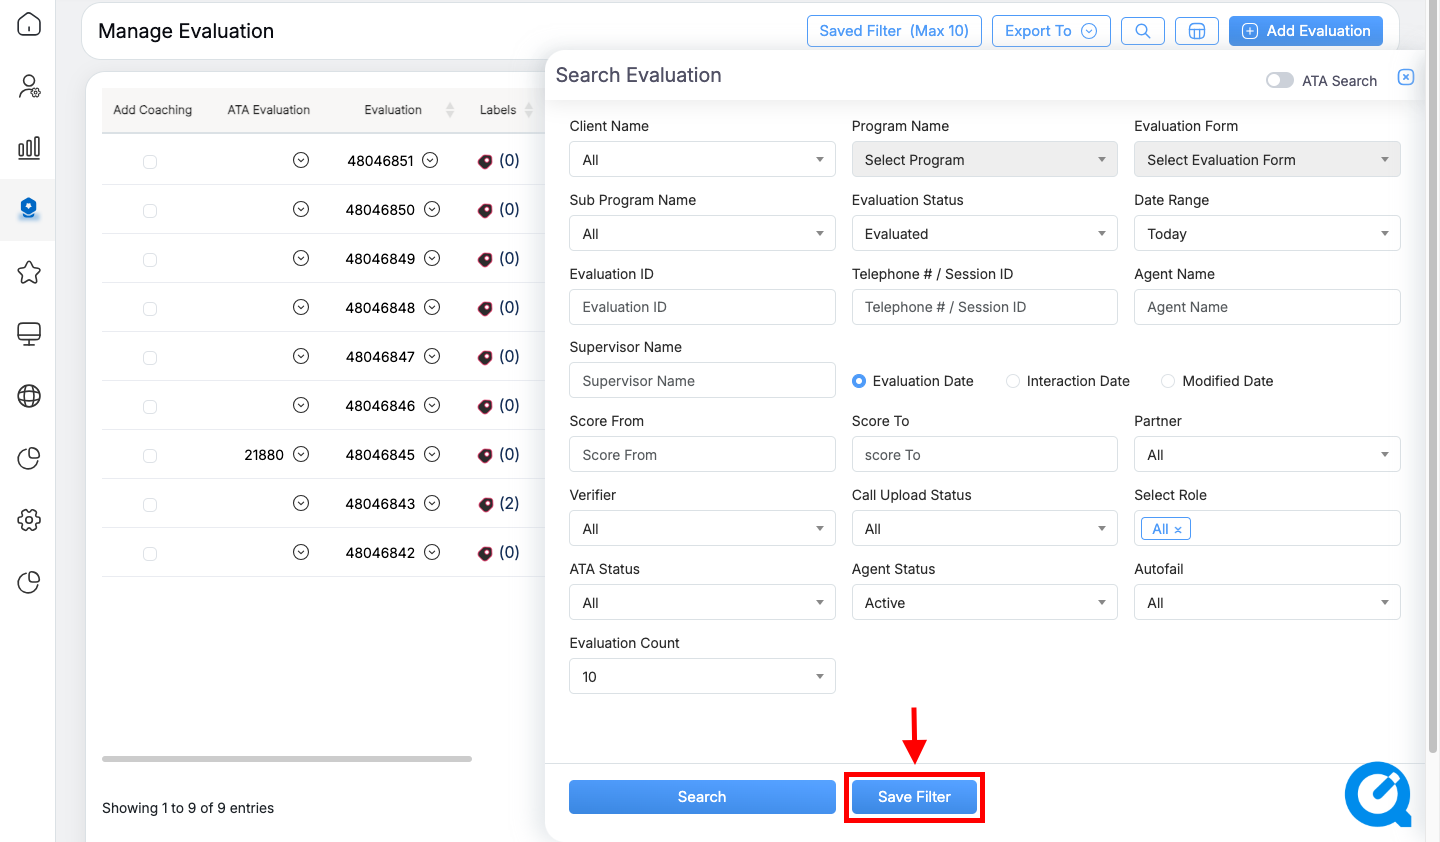
Enter a Filter Name in the pop-up window. Review the filter configuration and toggle On/Off if you want to set it as the Default Filter, which will be automatically applied whenever you log in and access the Manage Evaluation section. Make the required selections as needed.
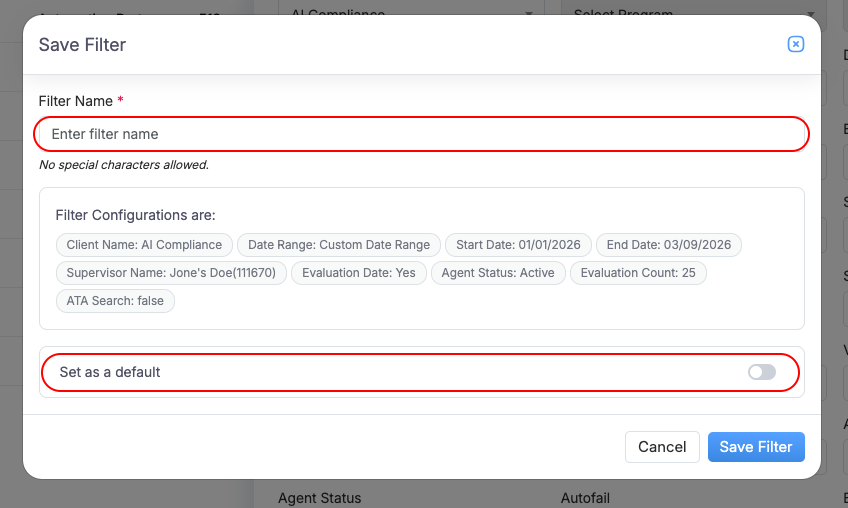
Click Save to store the filter configuration.
Important Notes
- A filter name can contain up to 50 characters.
- Special characters are not allowed in the filter name.
- Each user can save up to 10 filters per module.
- If the limit is reached, you must delete an existing filter before creating a new one.
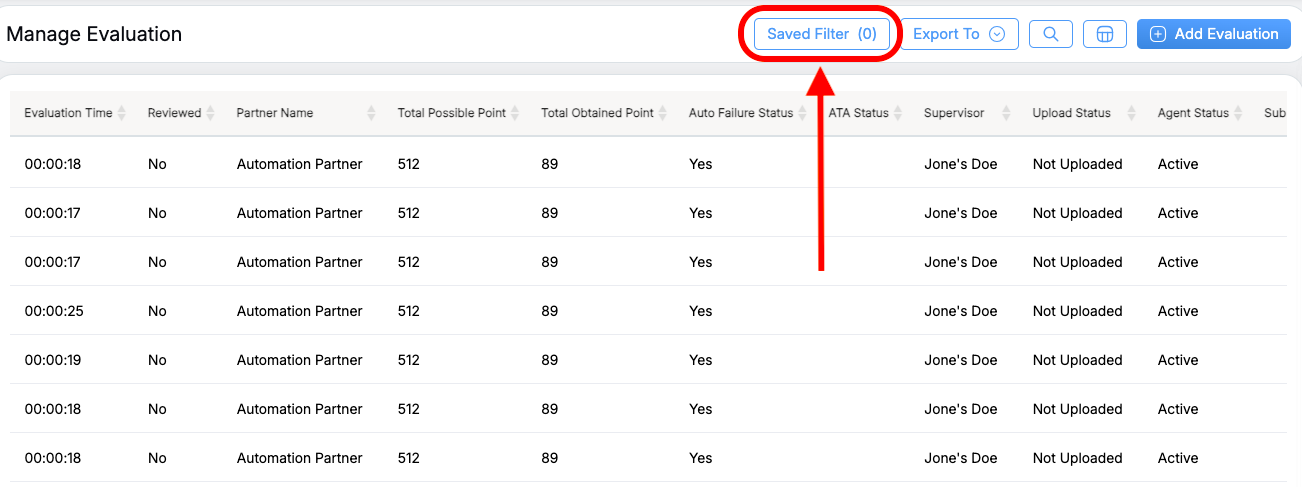
2. Viewing and Applying Saved Filters
Saved filters can be accessed from the Saved Filter option at the top of the page. The number shown in parentheses reflects the current count of saved filters for that module, with a maximum limit of 10.
When you open the Saved Filters panel, you can:
- View all saved filters along with their filter criteria.
- See the creation date or last modified date.
- Click a filter to automatically apply the saved search conditions and refresh the results.
3. Managing Saved Filters
Edit Filter
- Click the Edit icon next to a saved filter. The Search Evaluation panel opens with the existing filter criteria. Update the required filter values, then click Save Filter. An Update Filter pop-up will appear, as shown below.

- Edit the filter name, review the filter configuration, and toggle On/Off to set it as the default filter if required.
- Save the changes to update the filter.
Delete Filter
- Click the Delete icon next to the filter.
- Confirm the deletion to permanently remove the filter.
Default Filter
- One saved filter can be marked as the Default.
- The default filter is automatically applied when you open the module.
4. Access Validation
When applying a saved filter, the system verifies whether you still have access to the selected Client, Program, or Evaluation Form.
If access has been removed or an entity no longer exists, the system will display a message indicating the issue, such as:
- Client access removed
- Program access removed
- Evaluation form access removed
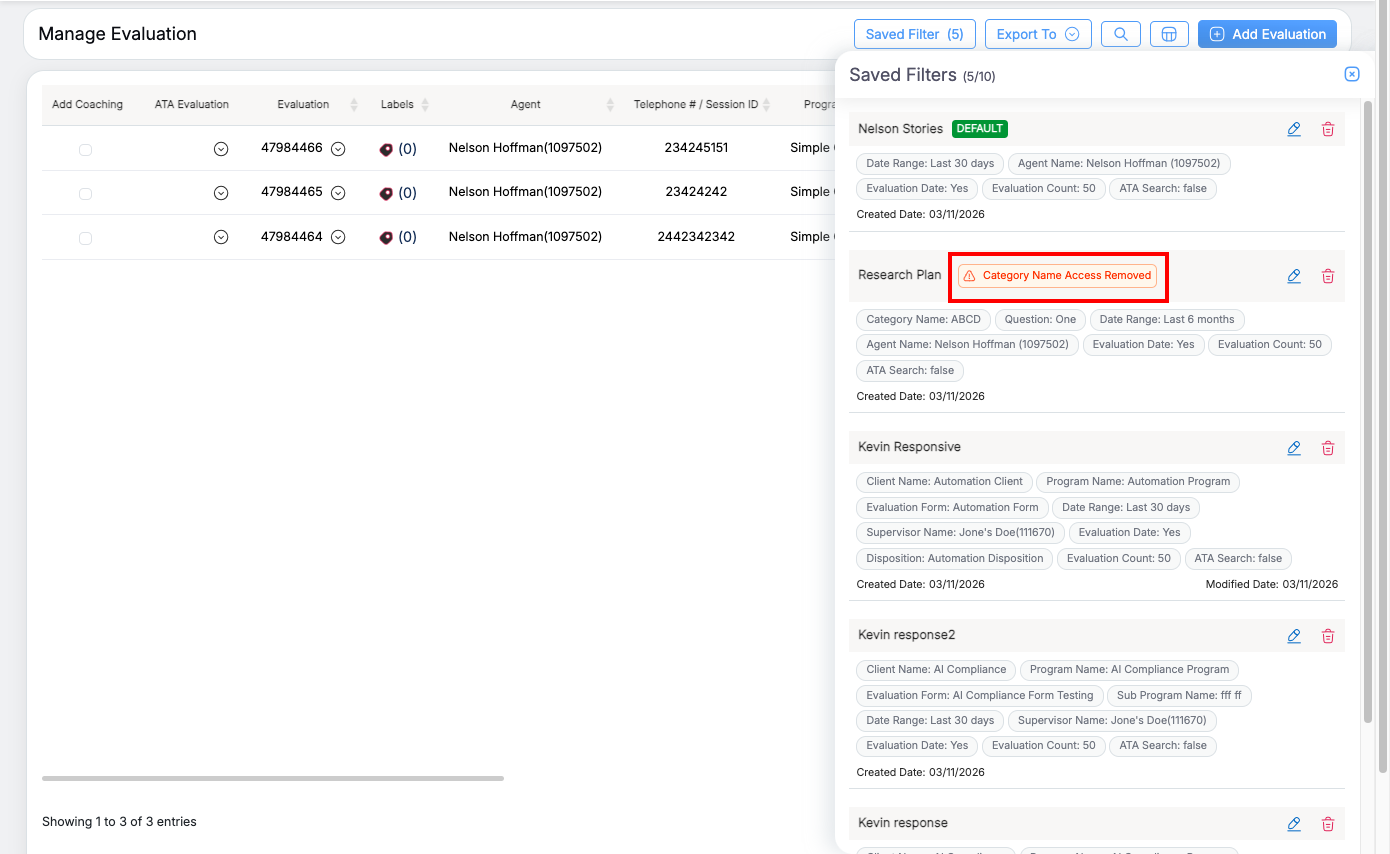
This helps ensure that saved filters only apply to valid and accessible data.
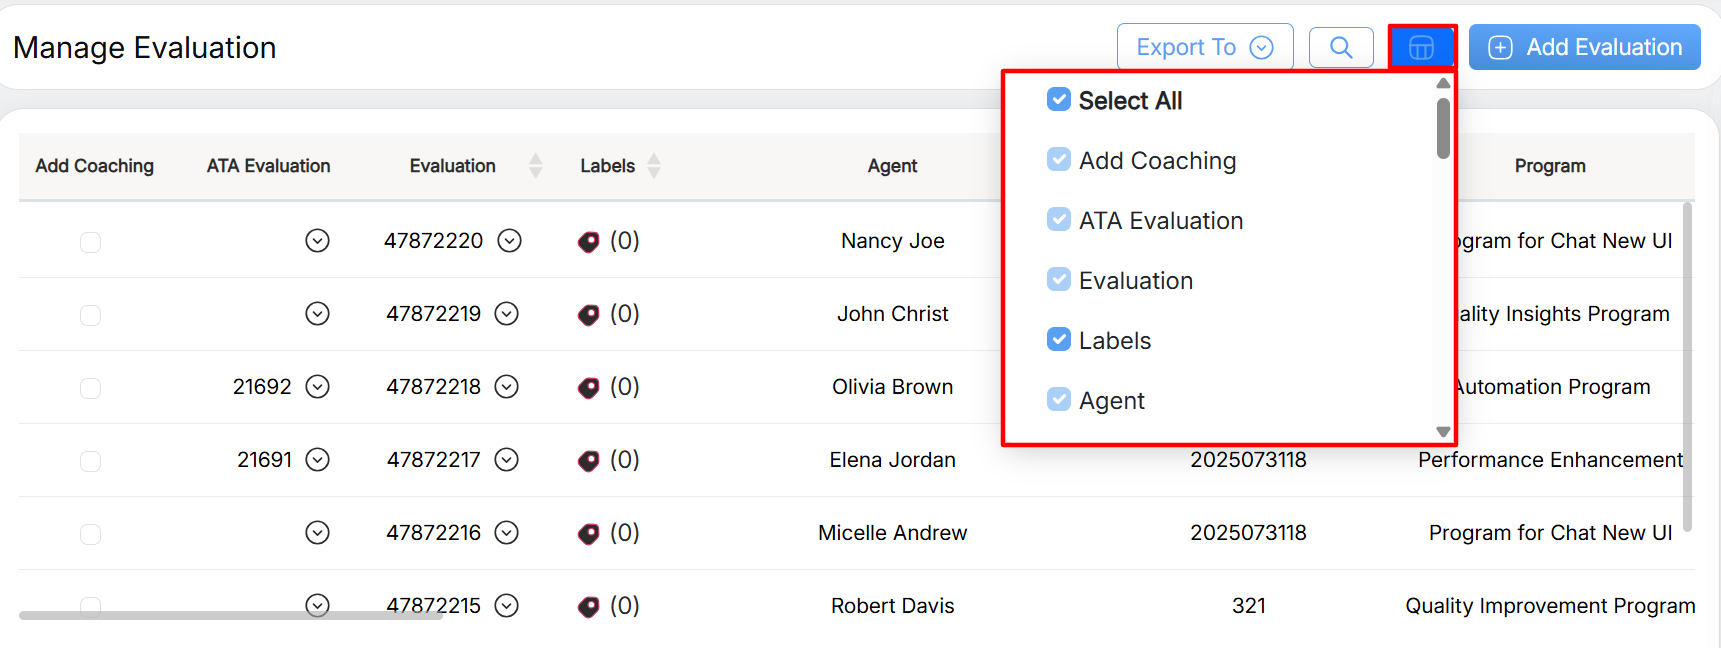
Displayed Column
The Displayed Columns icon in the table header on the Manage Evaluation page opens a menu where the user can select which columns are visible: the user can check the columns that should be displayed and uncheck those that they want hidden, and the table updates immediately. The user can restore any hidden column by rechecking it in the menu.
Note: Default-selected items cannot be unchecked; to prevent the table from being left empty. The disabled items Add Coaching, ATA Evaluation, Evaluation, Agent cannot be unchecked.
Export
One can export the evaluations in Excel and CSV format. To do so, click on the Export To button.

Export To
Select the format from the dropdown list – Excel or CSV. The file will be exported to the local system in the selected format.
Video