The User features allow the authorized users to efficiently manage all the users within the QEval system. The authorized users can seamlessly add and import the new users, effortlessly modify, search, export, and delete the existing users of various roles – Admin, Agent, Supervisor, QA Manager, QA Supervisor, QA Verifier, and VP – within the QEval system.
To access this feature, click on the Menu ![]() button or move the mouse on the left side of the page to open the Menu Bar. Click on the Manage
button or move the mouse on the left side of the page to open the Menu Bar. Click on the Manage ![]() and then select User option as shown below:
and then select User option as shown below:
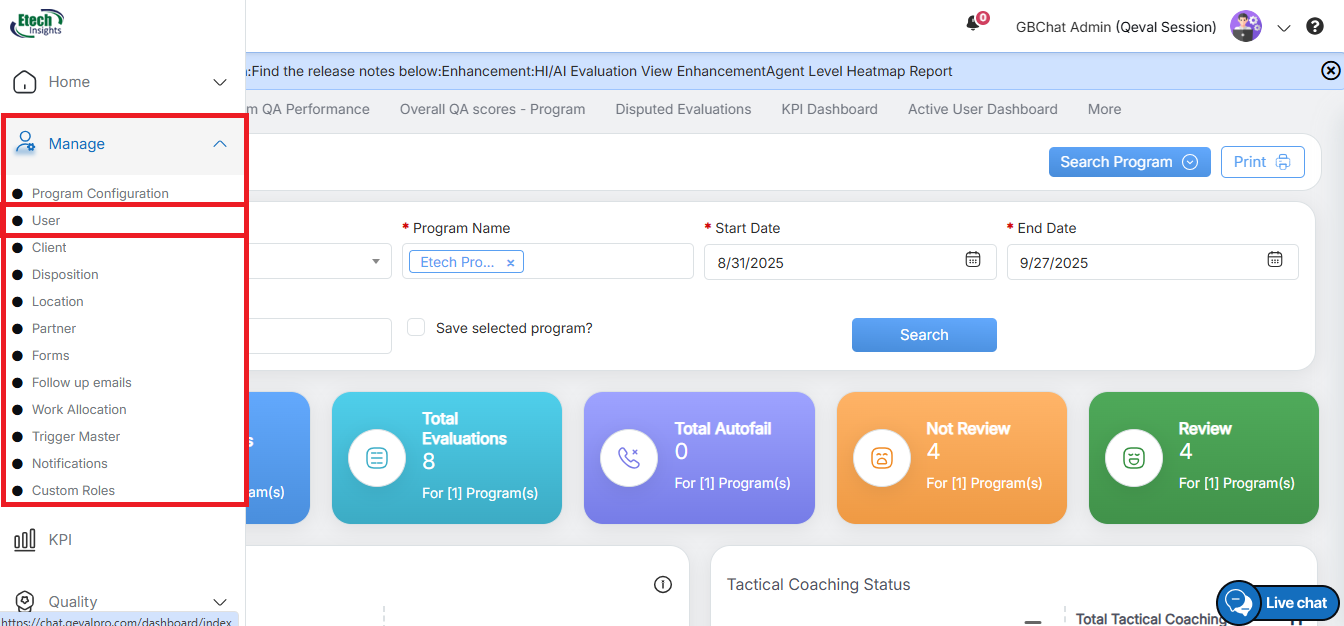
User
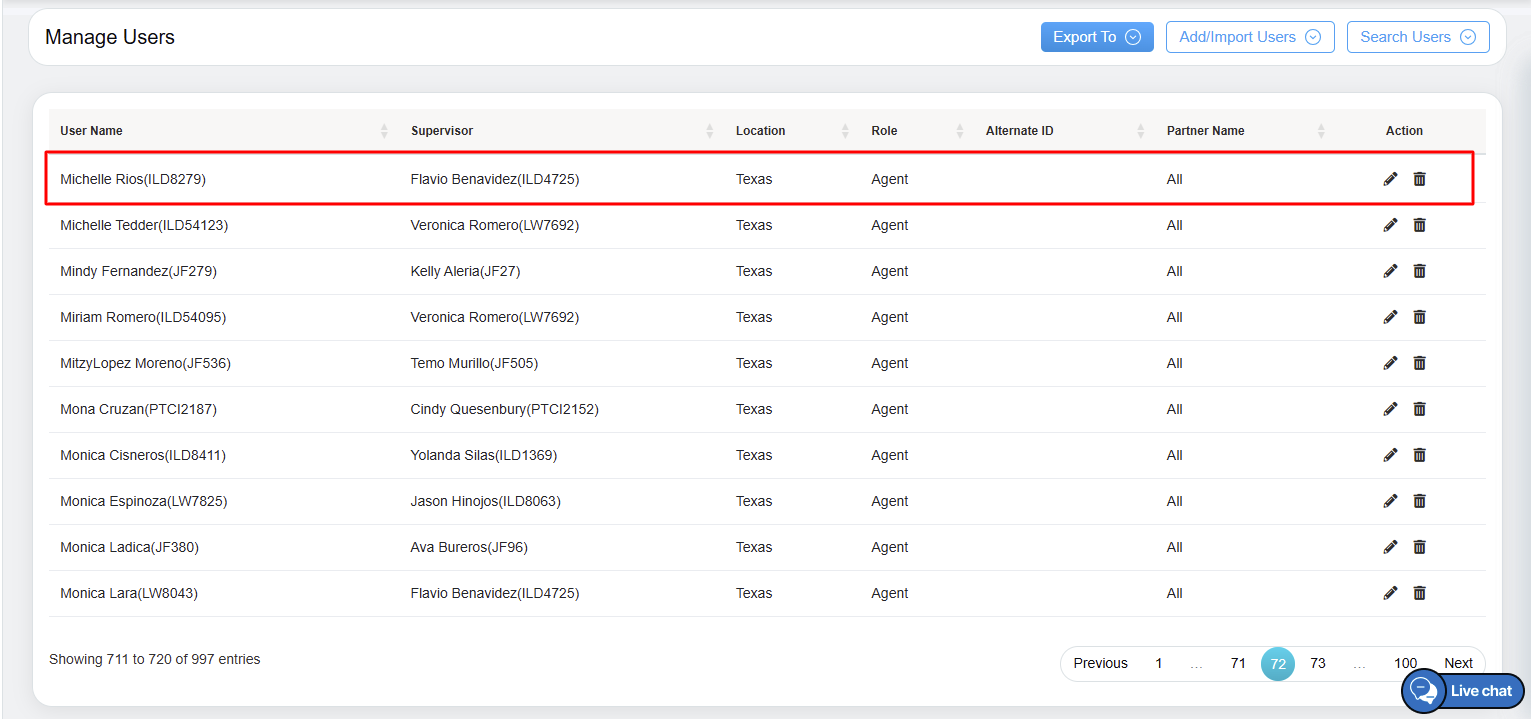
The user will be directed to the Manage Users page. This page displays the list of all added user details as shown below:
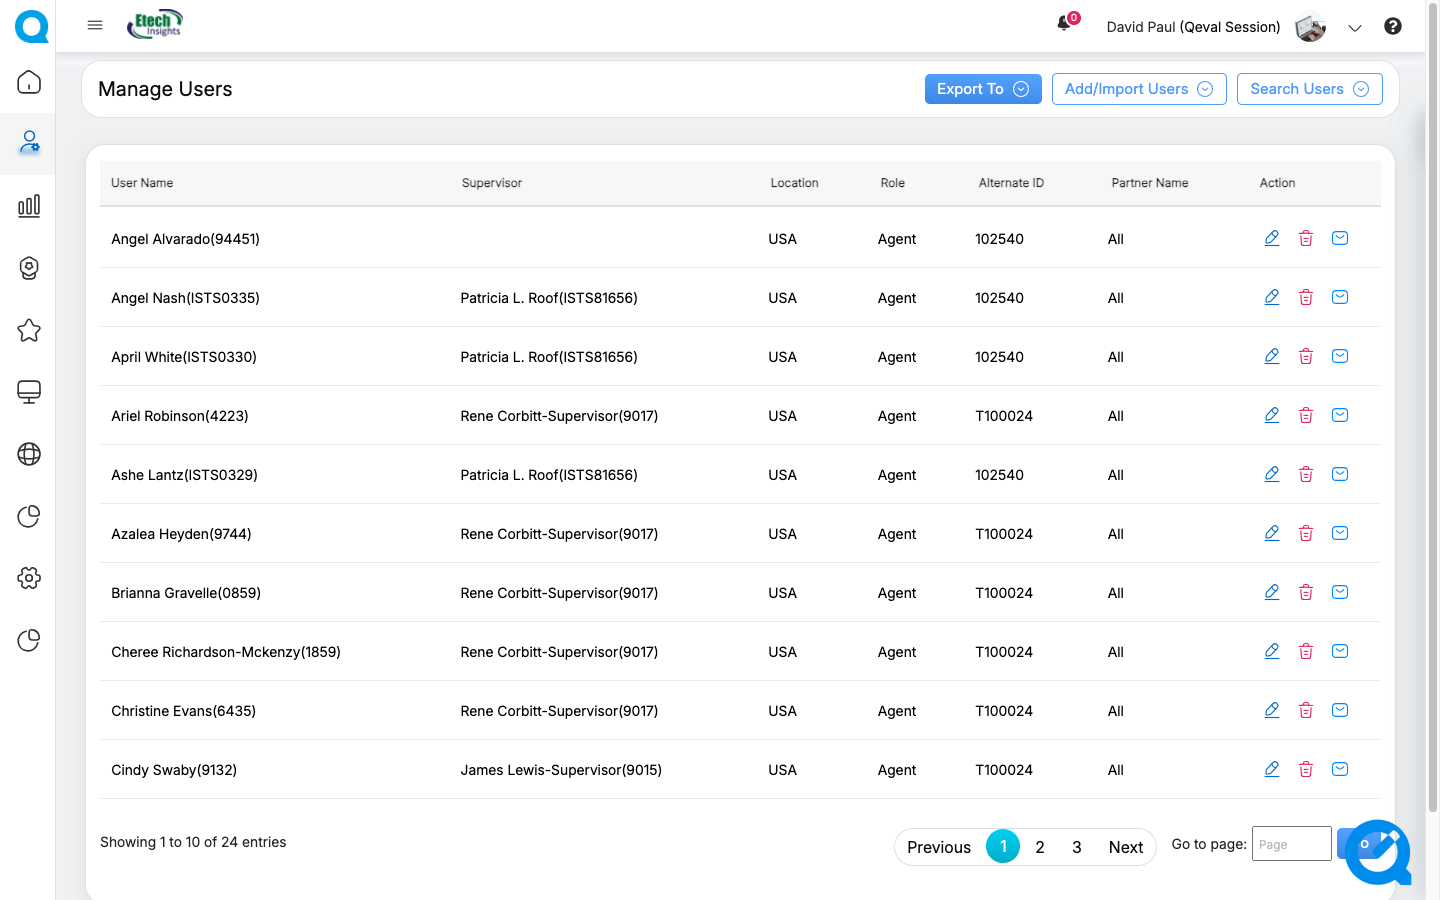
Manage Users Page
On the Manage Users page, the logged-in user will be able to access the mentioned below functionalities:
Add/Import Users
The Add/Import Users functionality allows the logged-in user to add new user details or even can import and add users in bulk to the QEval system. The logged-in user can assign various access roles, including Admin, Agent, Supervisor, QA Manager, QA Supervisor, QA Verifier, or VP, to the new user based on the requirement.
To access this feature, click on the Add/Import Users button as highlighted in the screen below:
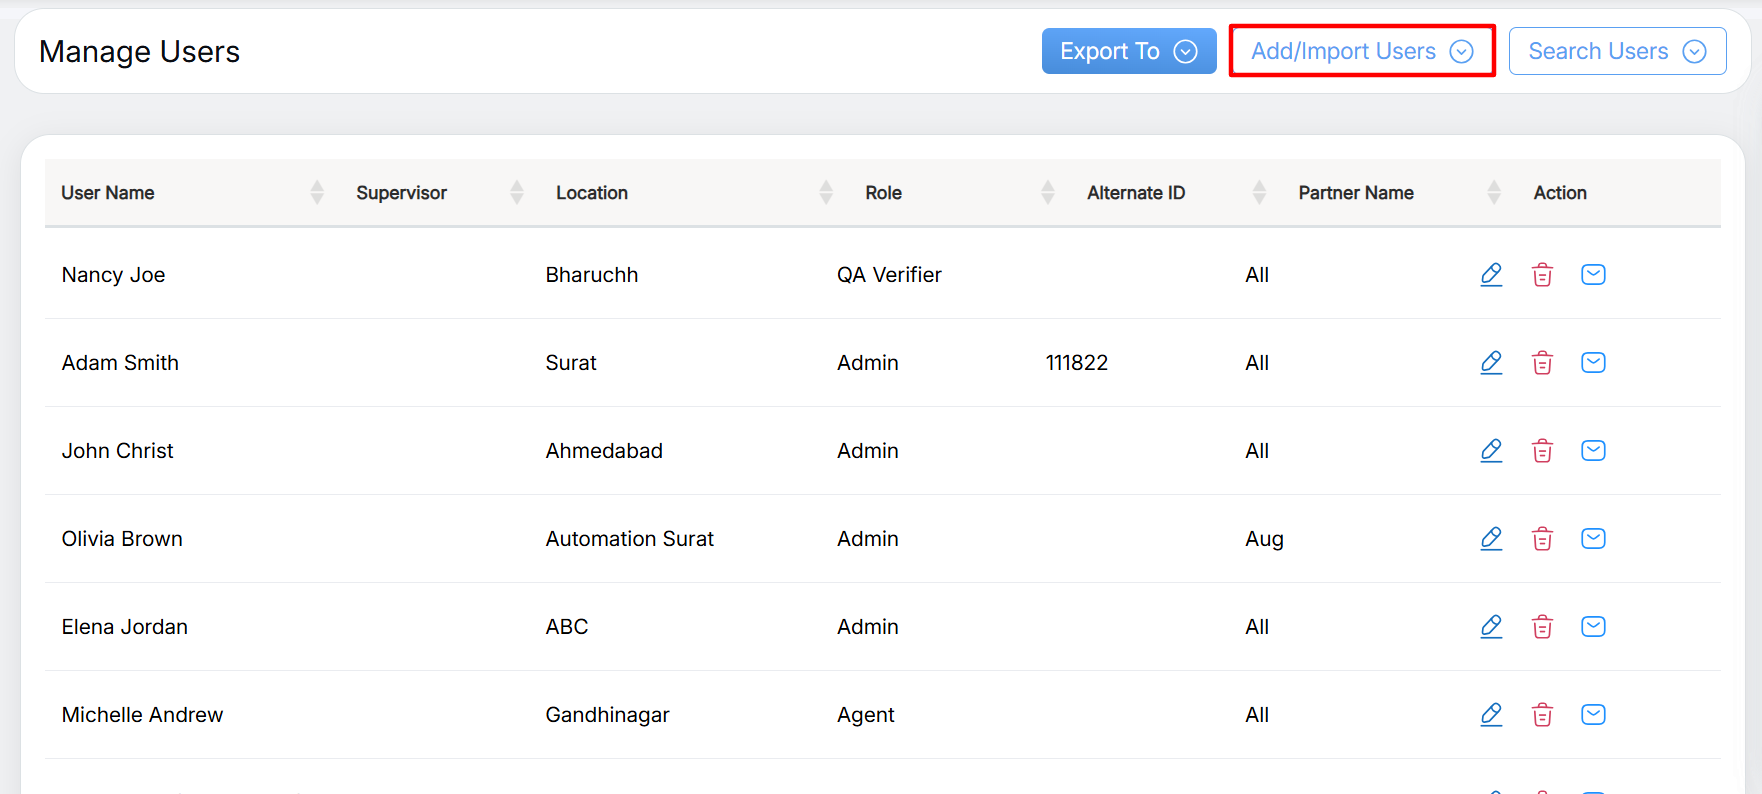
Add/Import Users
The Add/Import User window will be opened on the same page. The logged-in user will have Add User , Import User and Bulk User Update options to add new user details in the system.
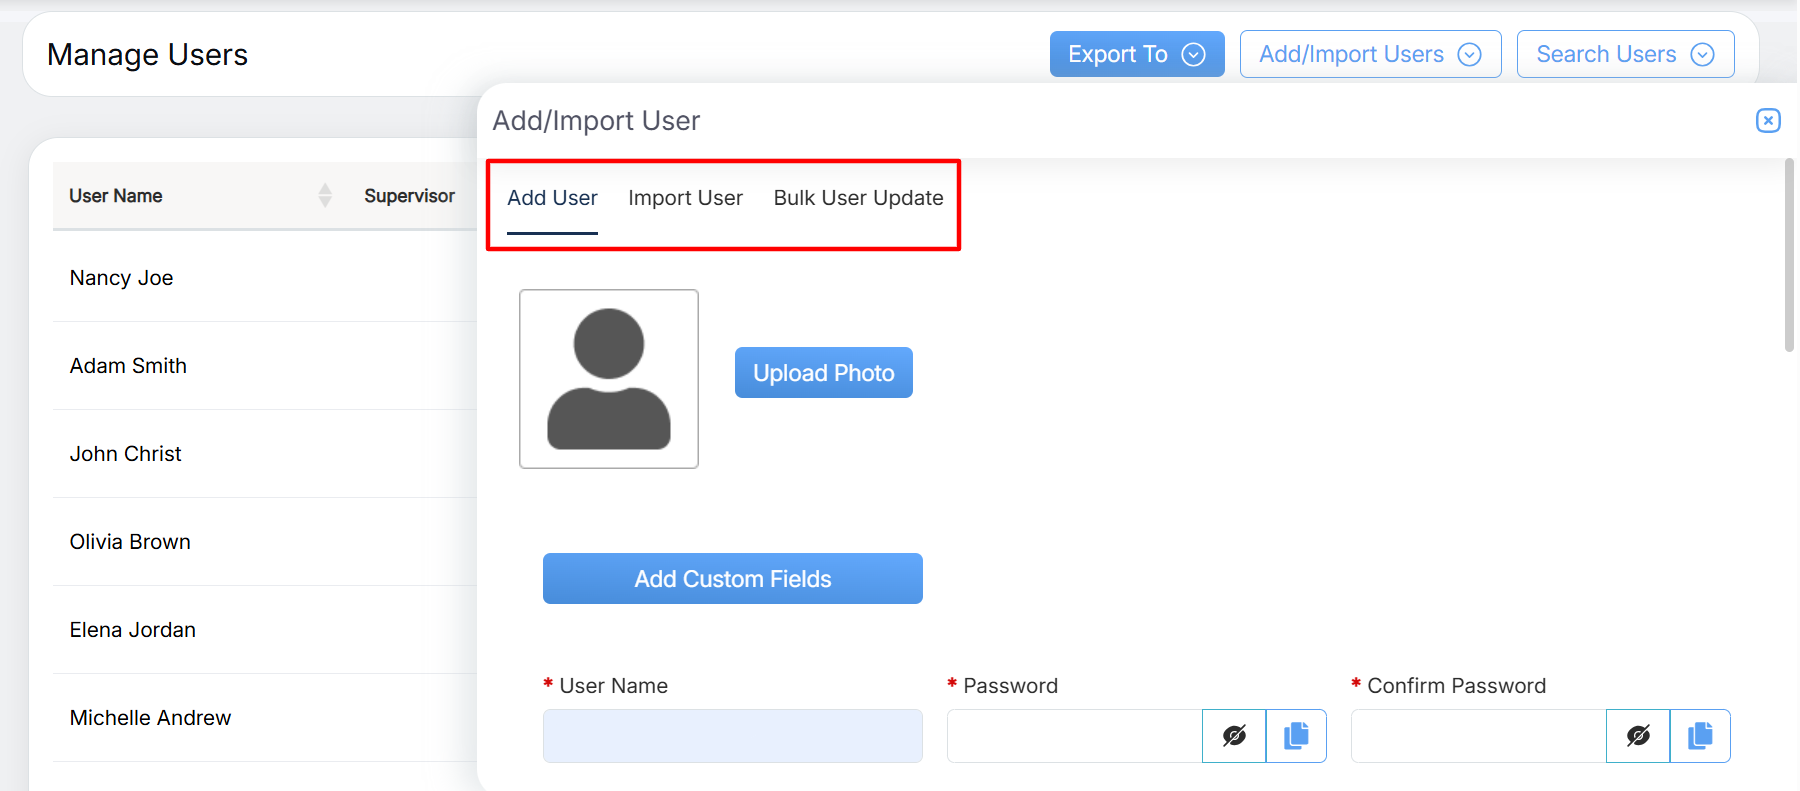
Add/Import User
Add Users
The Add User functionality allows to add the new user details and assign the required role. It is mandatory for the logged-in user to enter the authorized credentials in the required fields to add a new user to the QEval system.
Provide the following details to add new user in the system.
User Details
- Upload the new user’s photo available under the Upload Photo field.
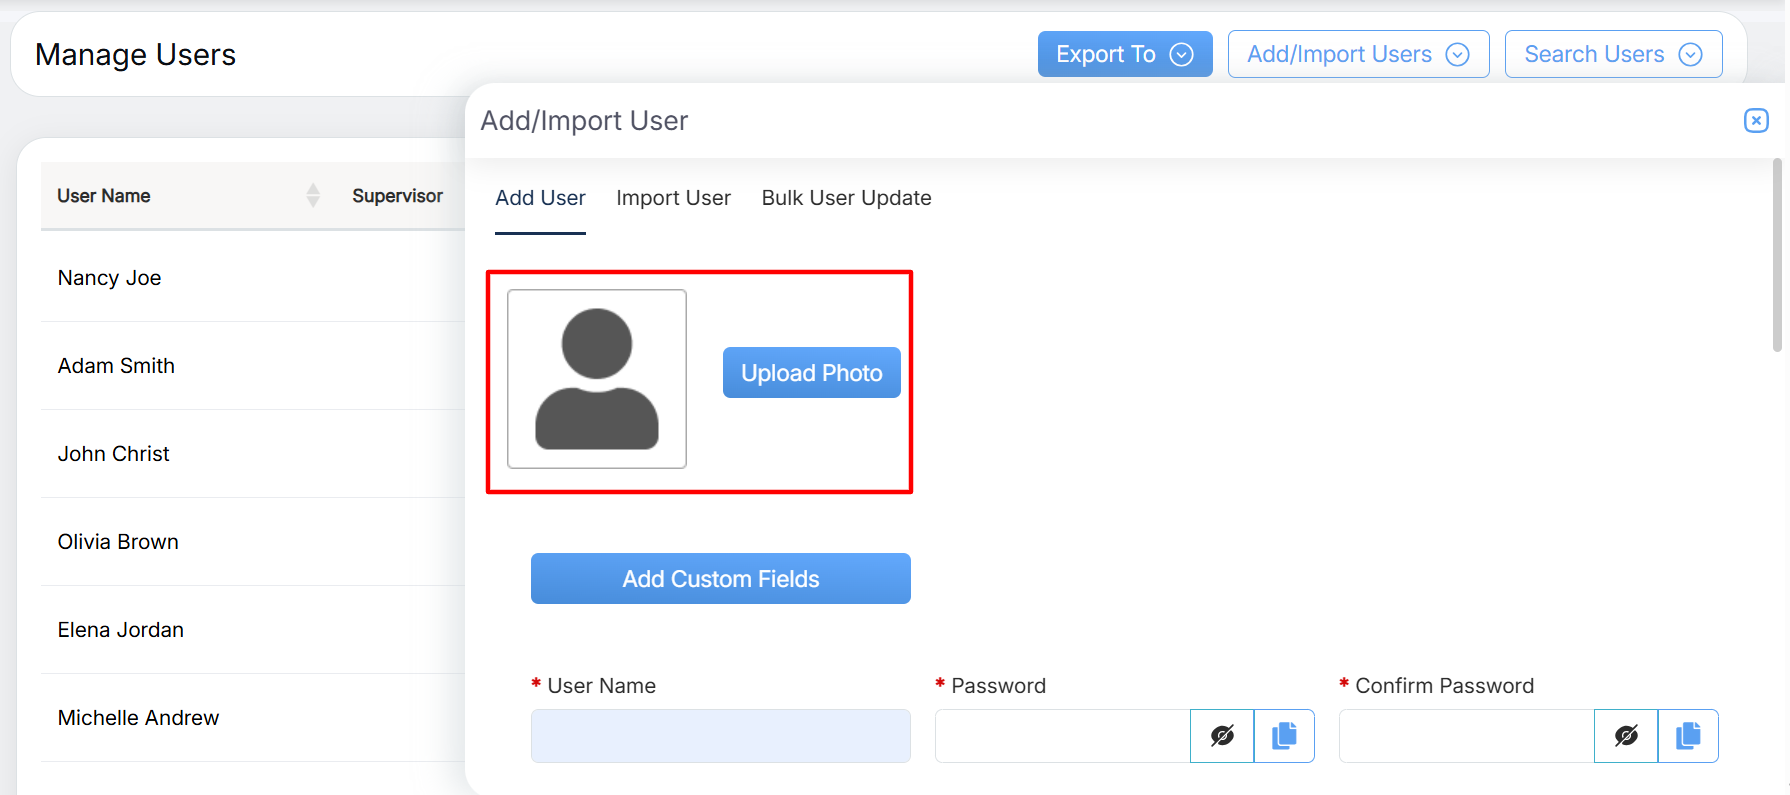
Upload Photo
Enter the new user’s username in the textbox available under the Username field. The username can be the combination of name of the user and employee id example jamesT11101.
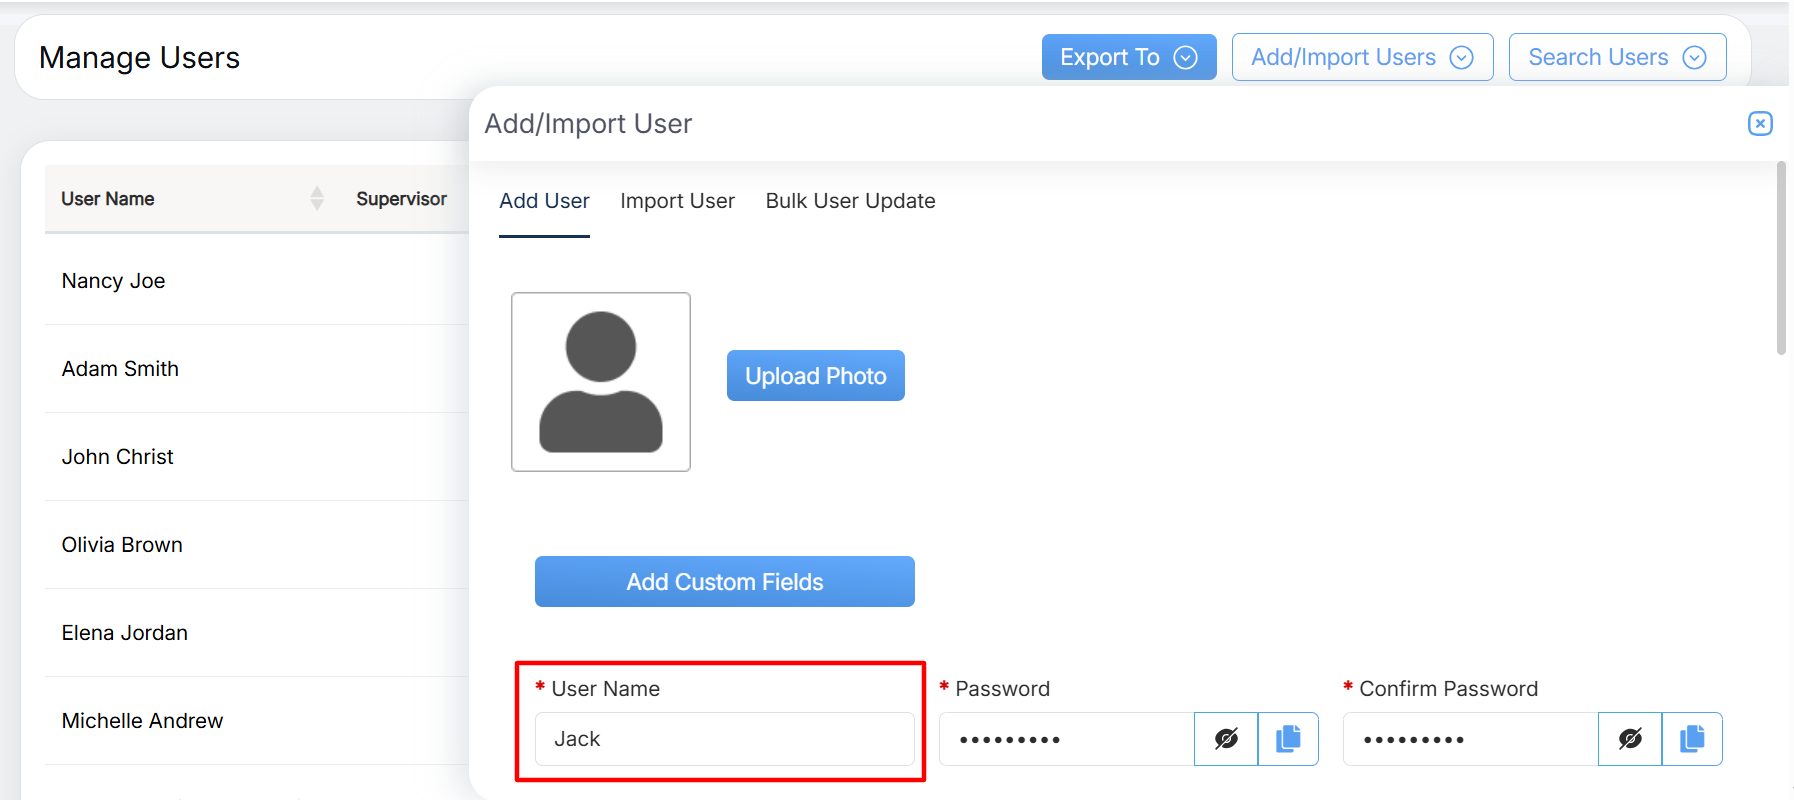
Username
Note: The username should not contain any special character. If the logged-in user has used any special character in the username, then while submitting the details the system will generate the error message “Invalid Characters in UserName”.
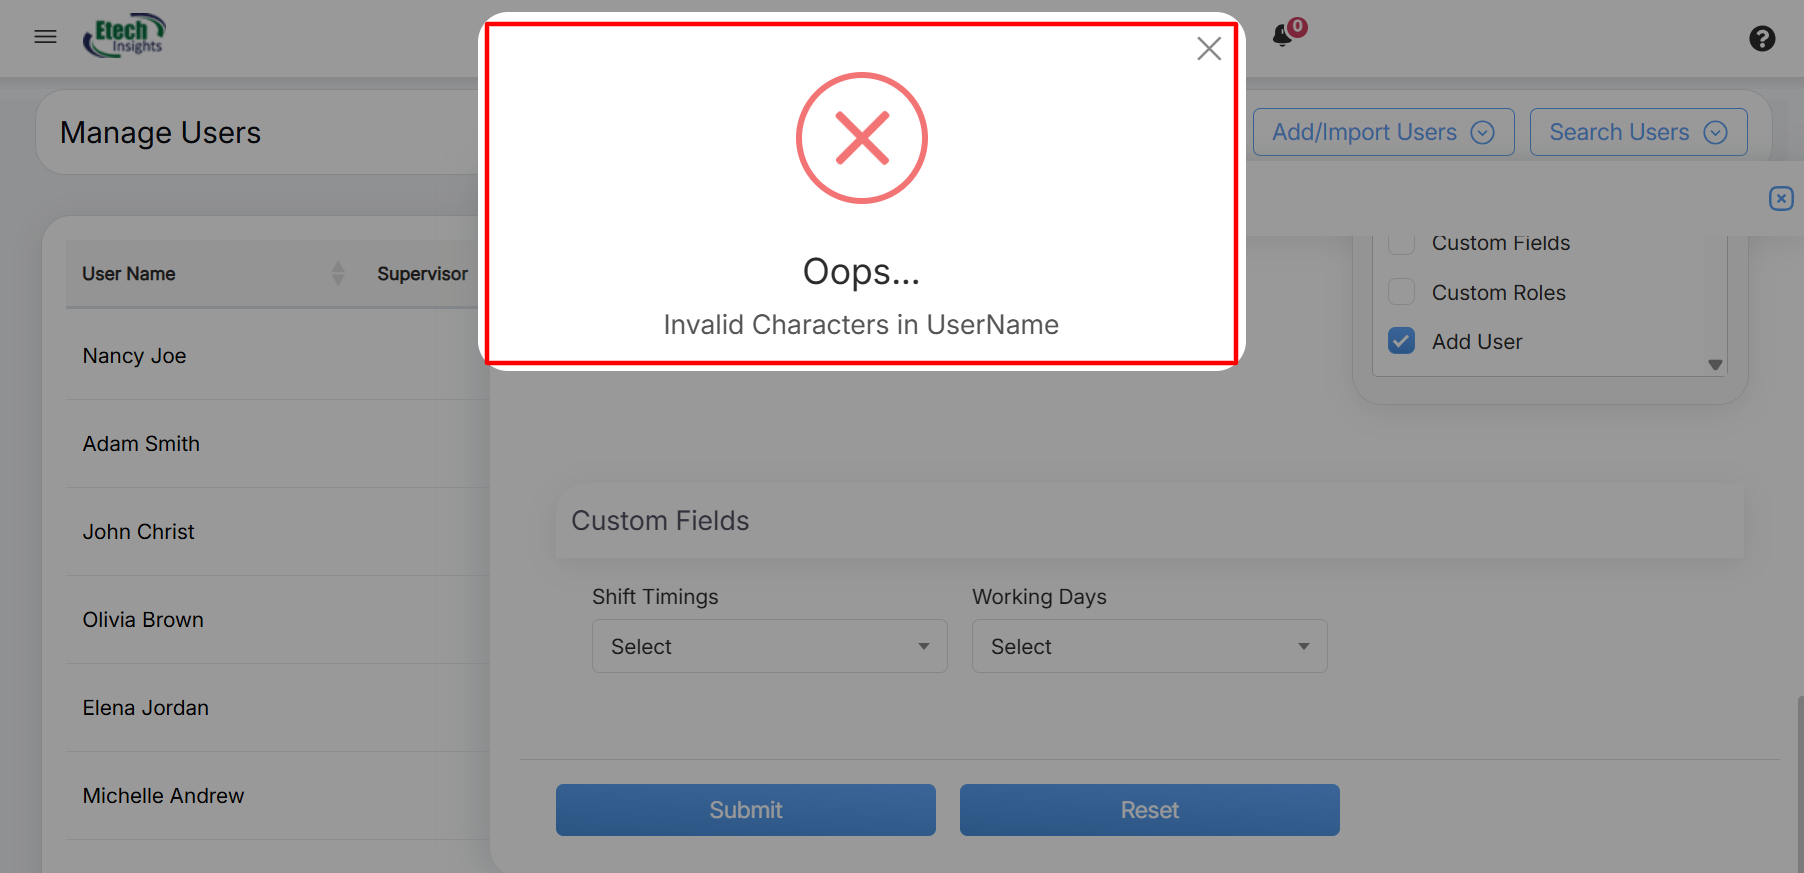
Error Pop up
- Enter the desired password and re-enter the same password under the respective Password and Confirm Password text-boxes.
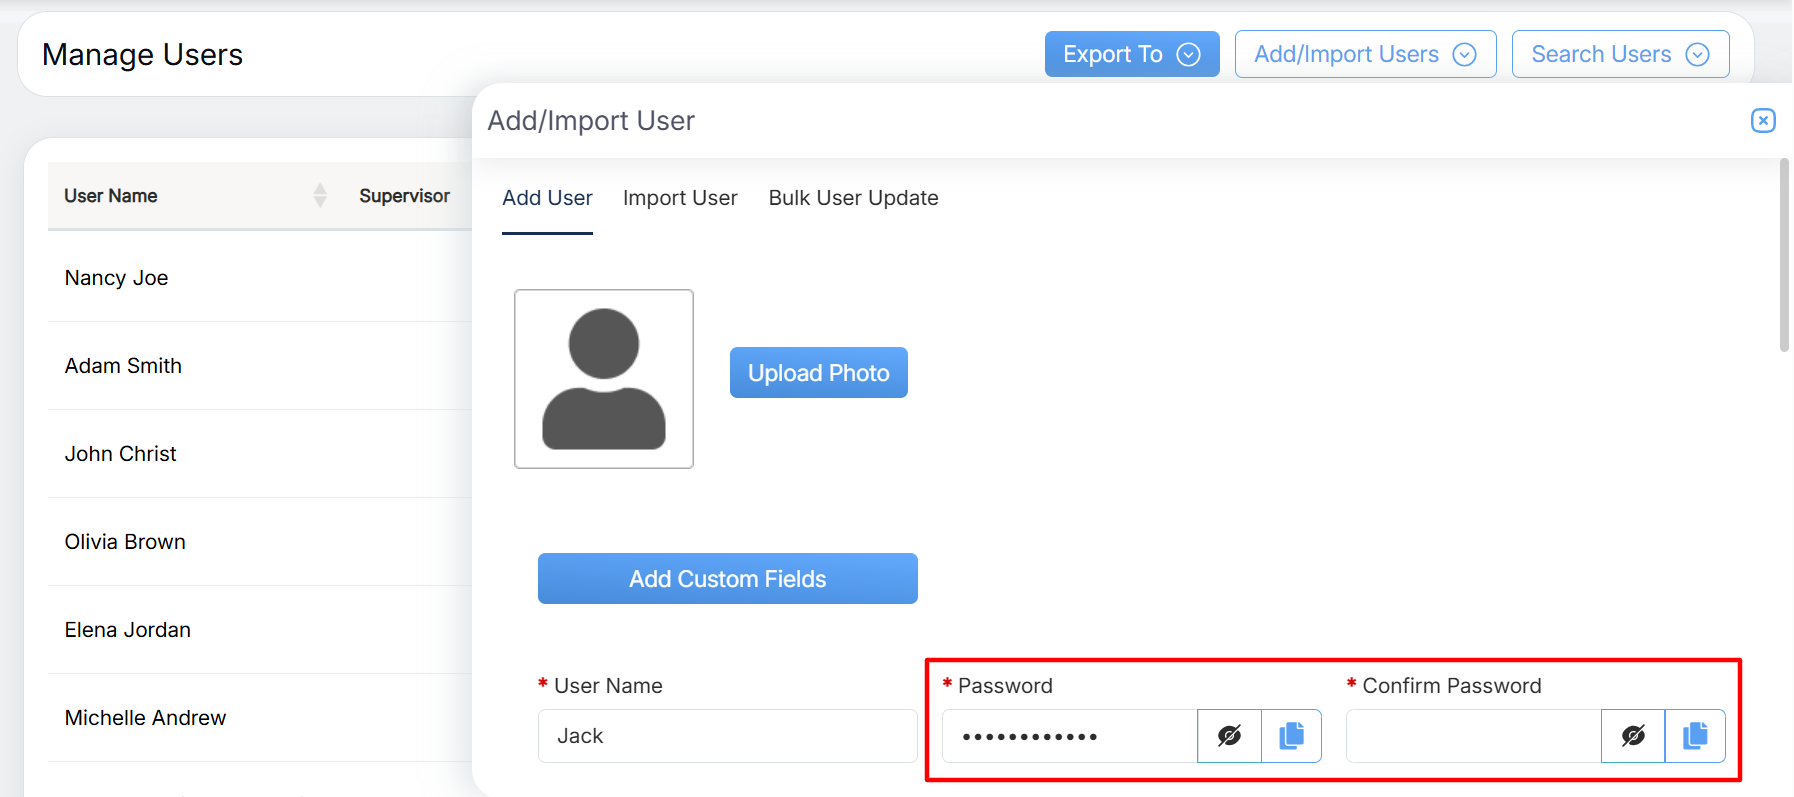
Password
Notes: The password should meet the below requirements:
-
- The entered password and re-entered confirm password should match.
- The length of the password should be at least 12 characters and not more than 128 characters.
- To generate strong and unbreakable password, it is advisable to use the combination of capital letters, lowercase letters, special characters, and numbers. For example: Effective@12?
- Enter the ID of the employee in the textbox available under the Employee ID field. The user can also add alphanumeric value as employee ID, for example T11102.
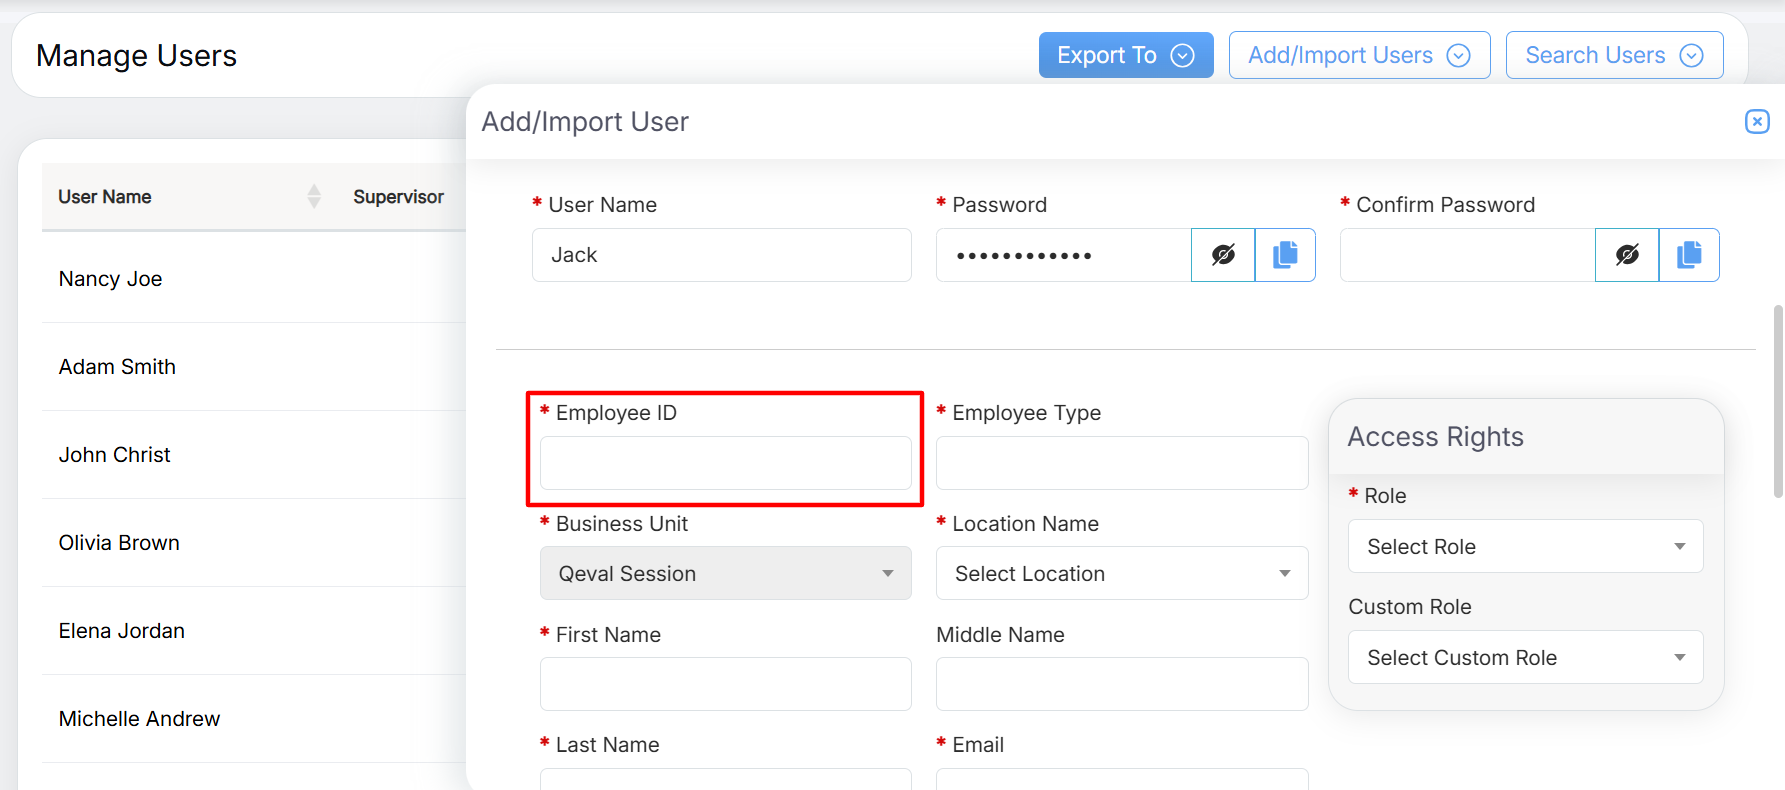
Employee ID
- Enter the type of employee in the textbox available under the Employee Type field. For example: FTE (Full Time Employee), PTE (Part Time Employee), CSO etc.
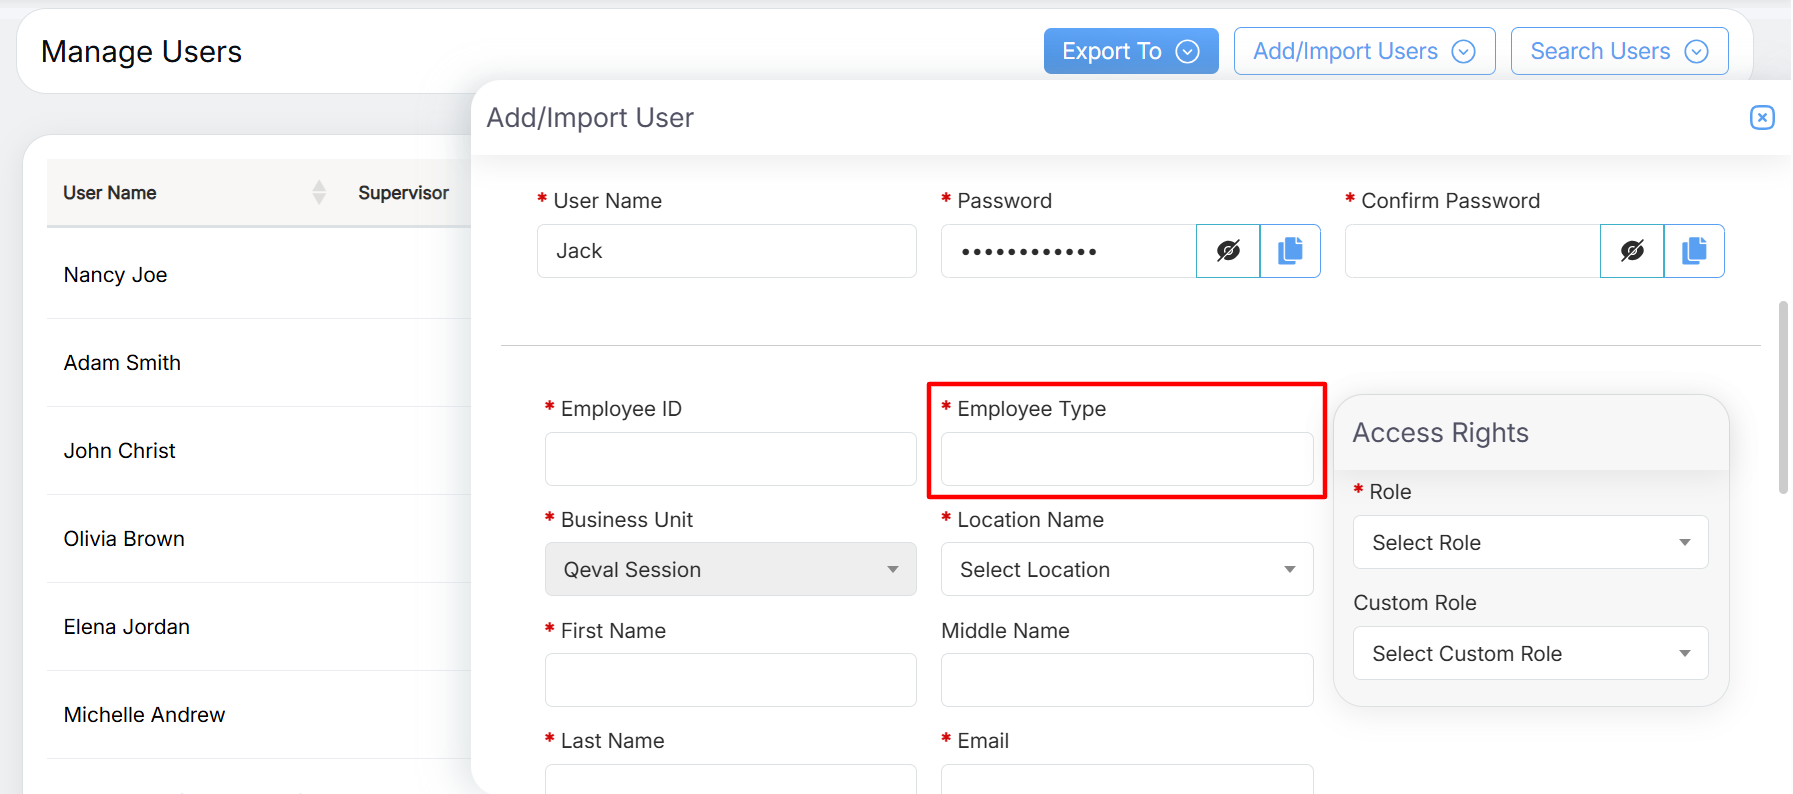
Employee Type
- The Business Unit field is pre-selected and disabled by default. It represents the client’s name associated with the user.
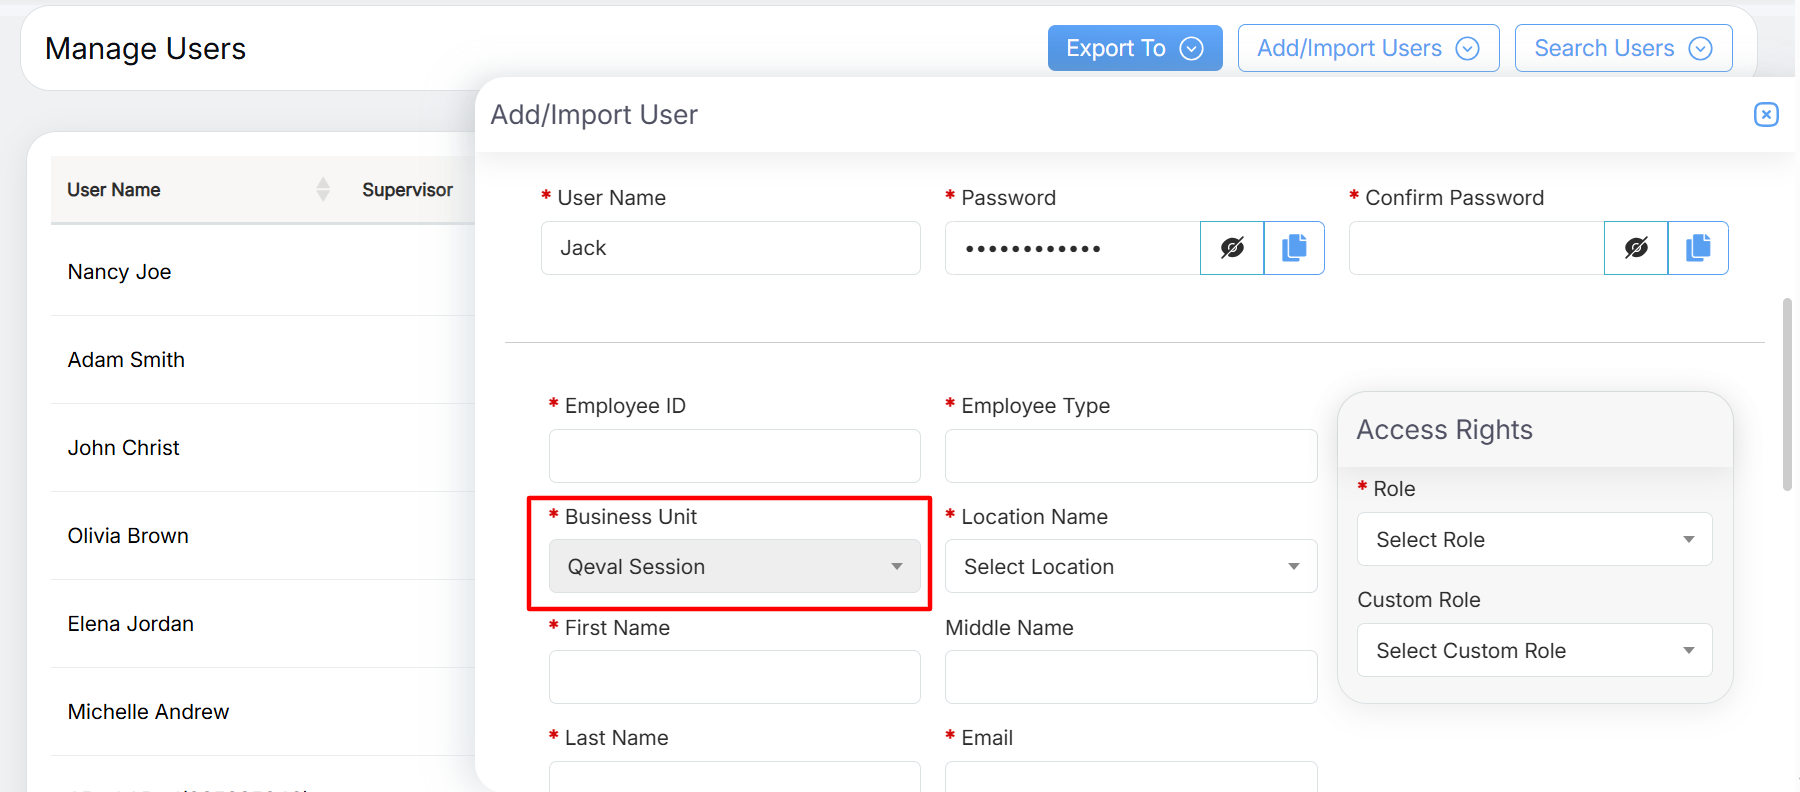
Business Unit
- Select the name of the location assigned to the newly add user from the Location Name drop-down menu. One can even search the name of the location by entering the keywords in the Search Bar text-box displayed under the field.
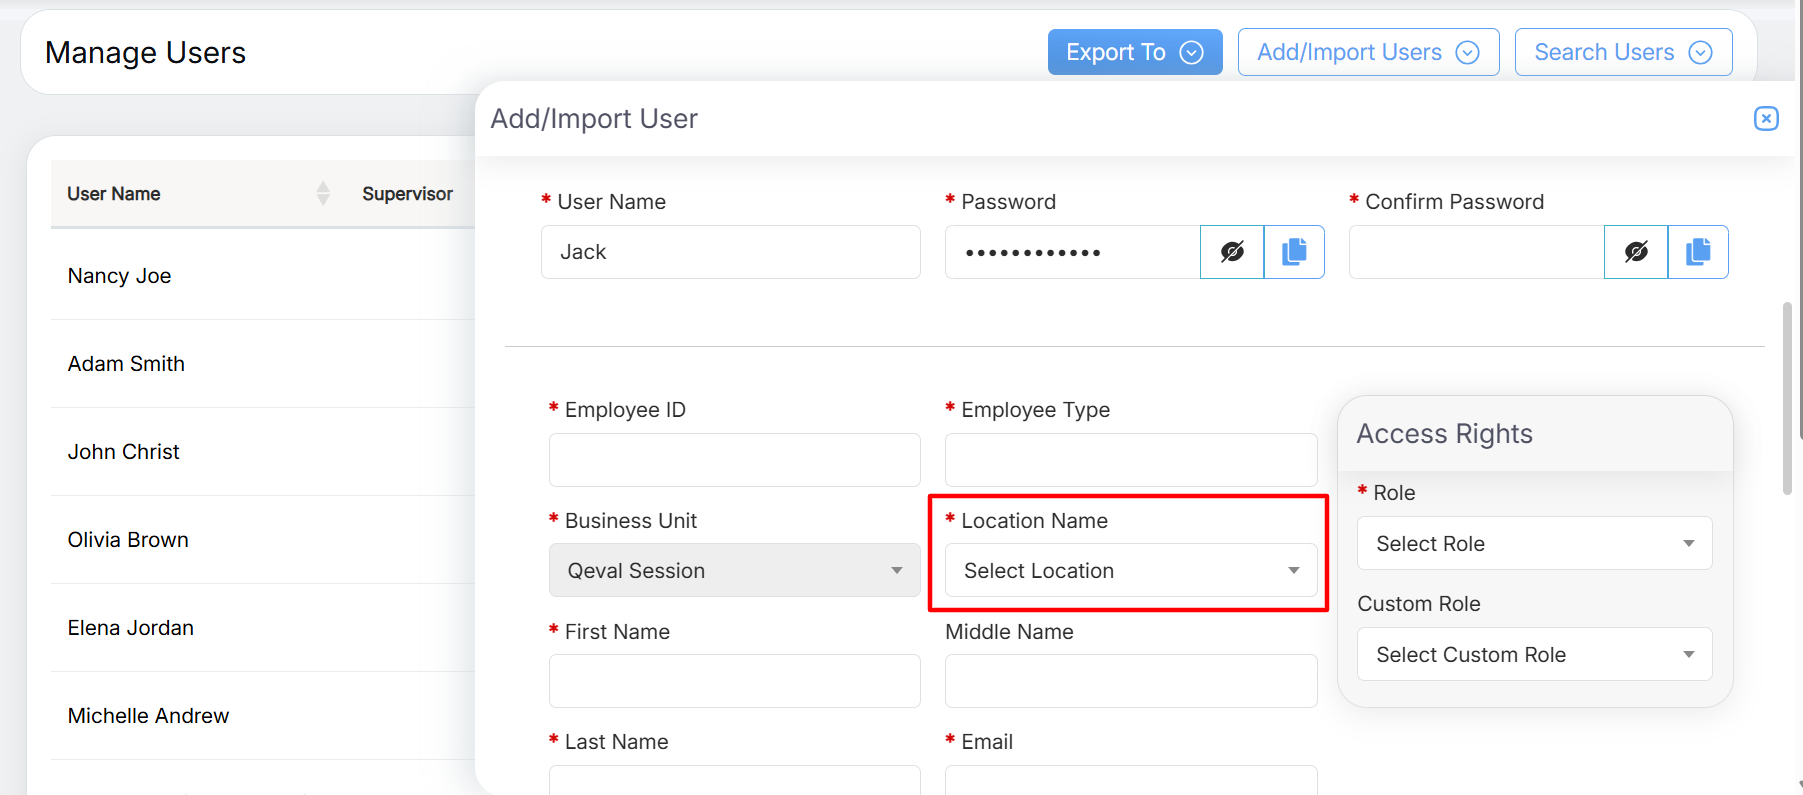
Location Name
- Enter the first name, middle name, and last name of the user in the textboxes displayed under First Name, Middle Name, and Last Name fields respectively. Enter the unique email address of the user in the text-box displayed under Email field.
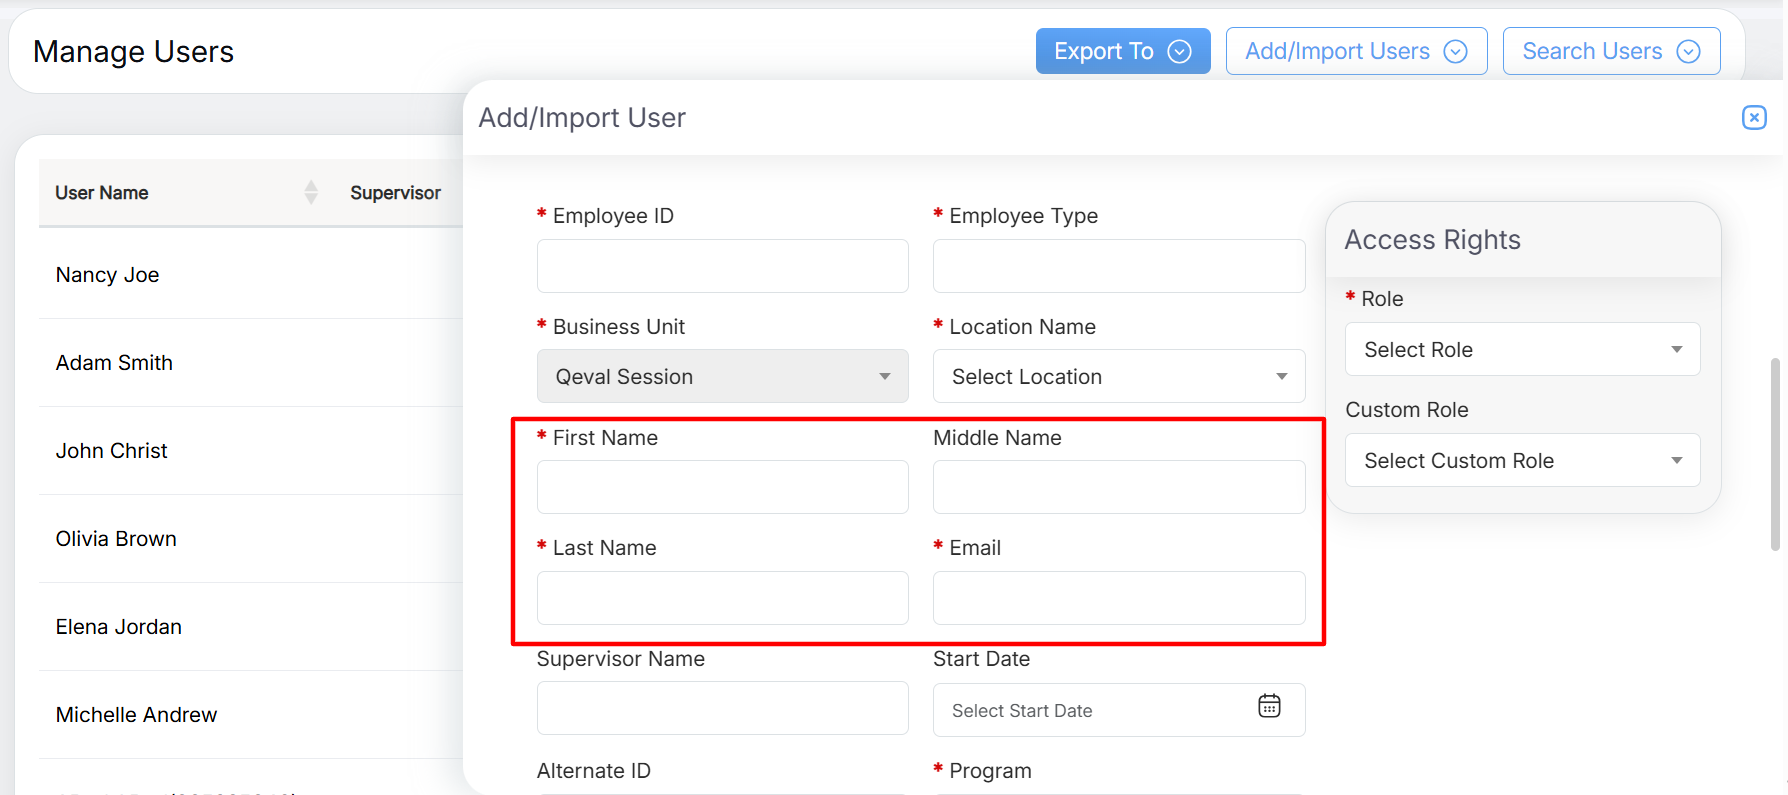
Details of user
Notes:
-
- The first letter of first name and last name should be capital.
- The first letter of the middle name should be capital and can be initial letter of the name.
- The email address needs to be unique and if the email address is already available then, the system will generate an error message.
- The email address should be correct and in proper format as the newly added user will receive the email notification.
- By entering the name in the textbox, a list of supervisors matching the keyword will be displayed under the Supervisor Name field. Select a supervisor’s name to map the user to that supervisor.
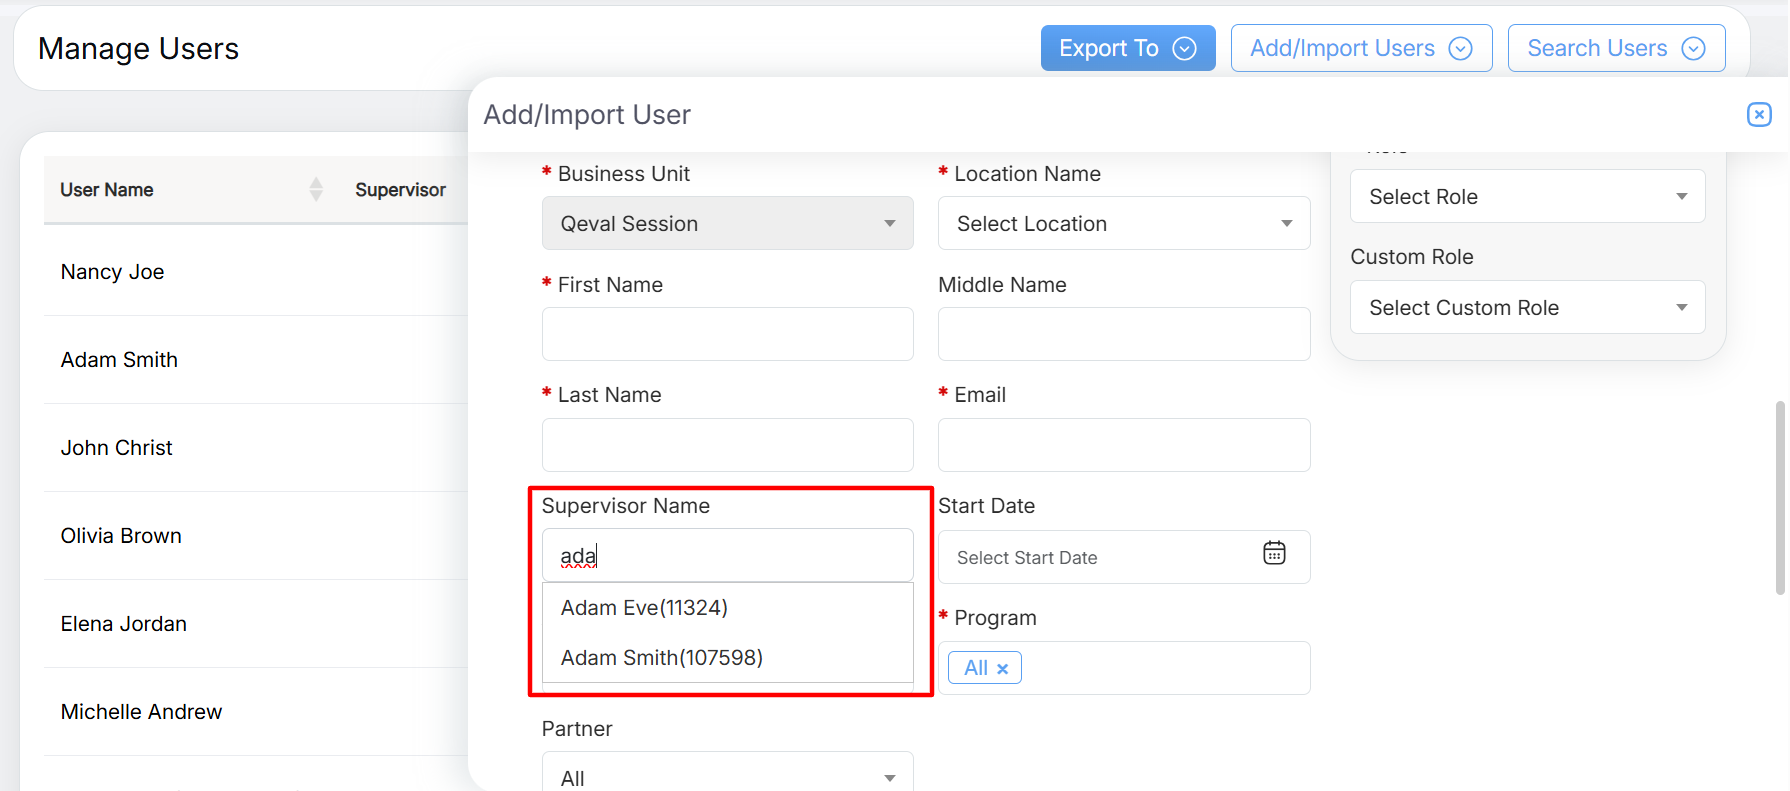
Supervisor Name
- In the Start Date field, use the date picker option to select the date when the user will start using this platform.
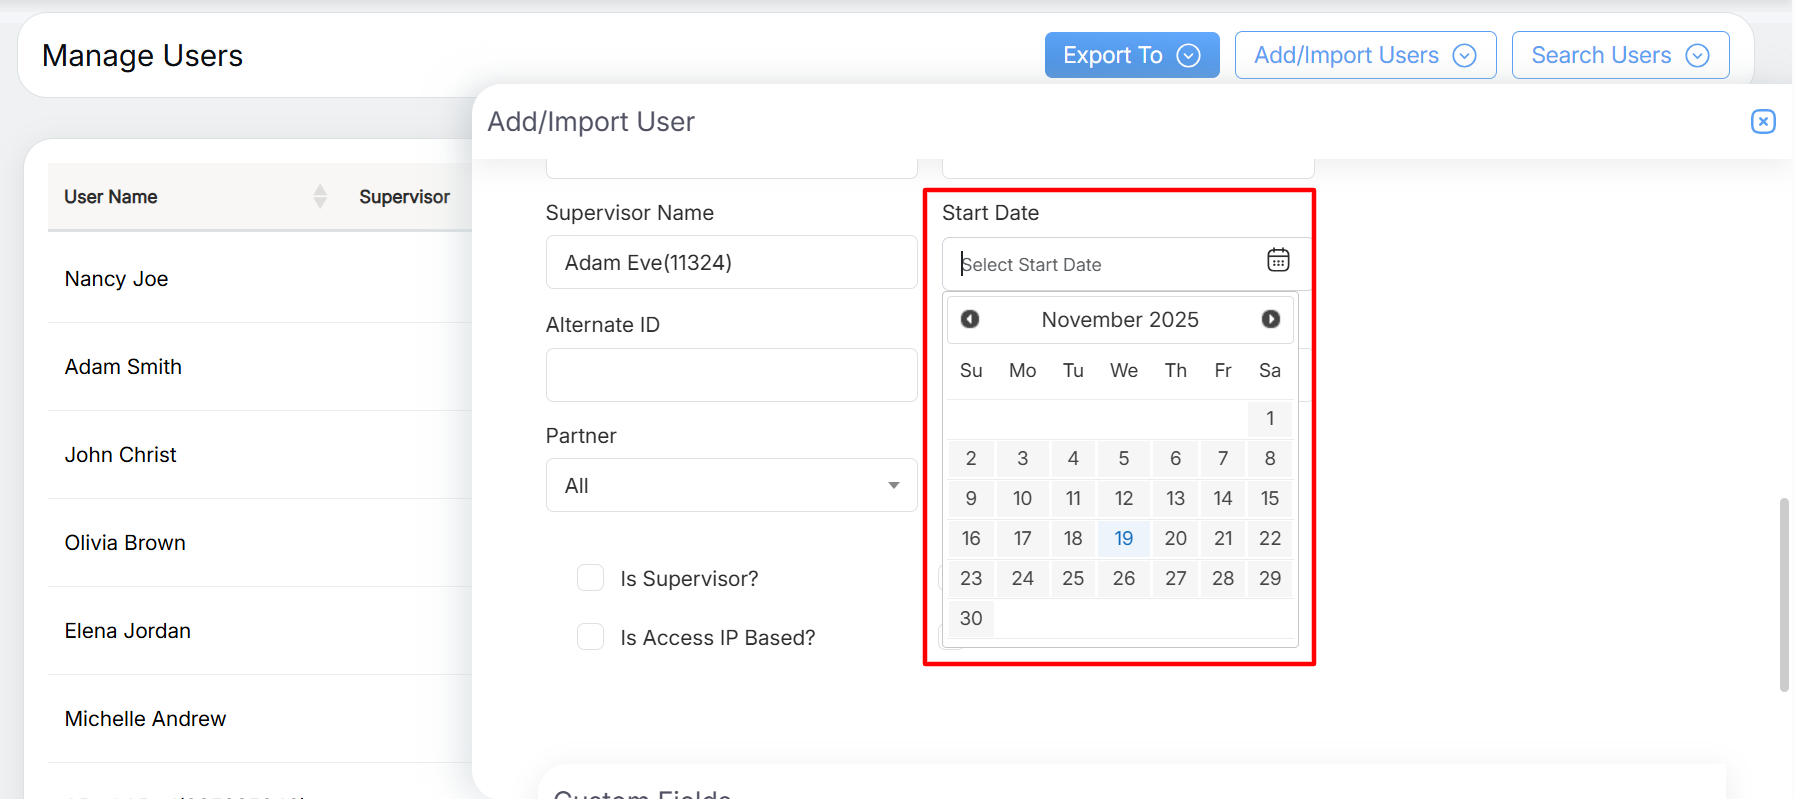
Start Date
- Enter the alternate ID of the new user in the textbox available under Alternate ID field. The alternate ID should include only numeric value.
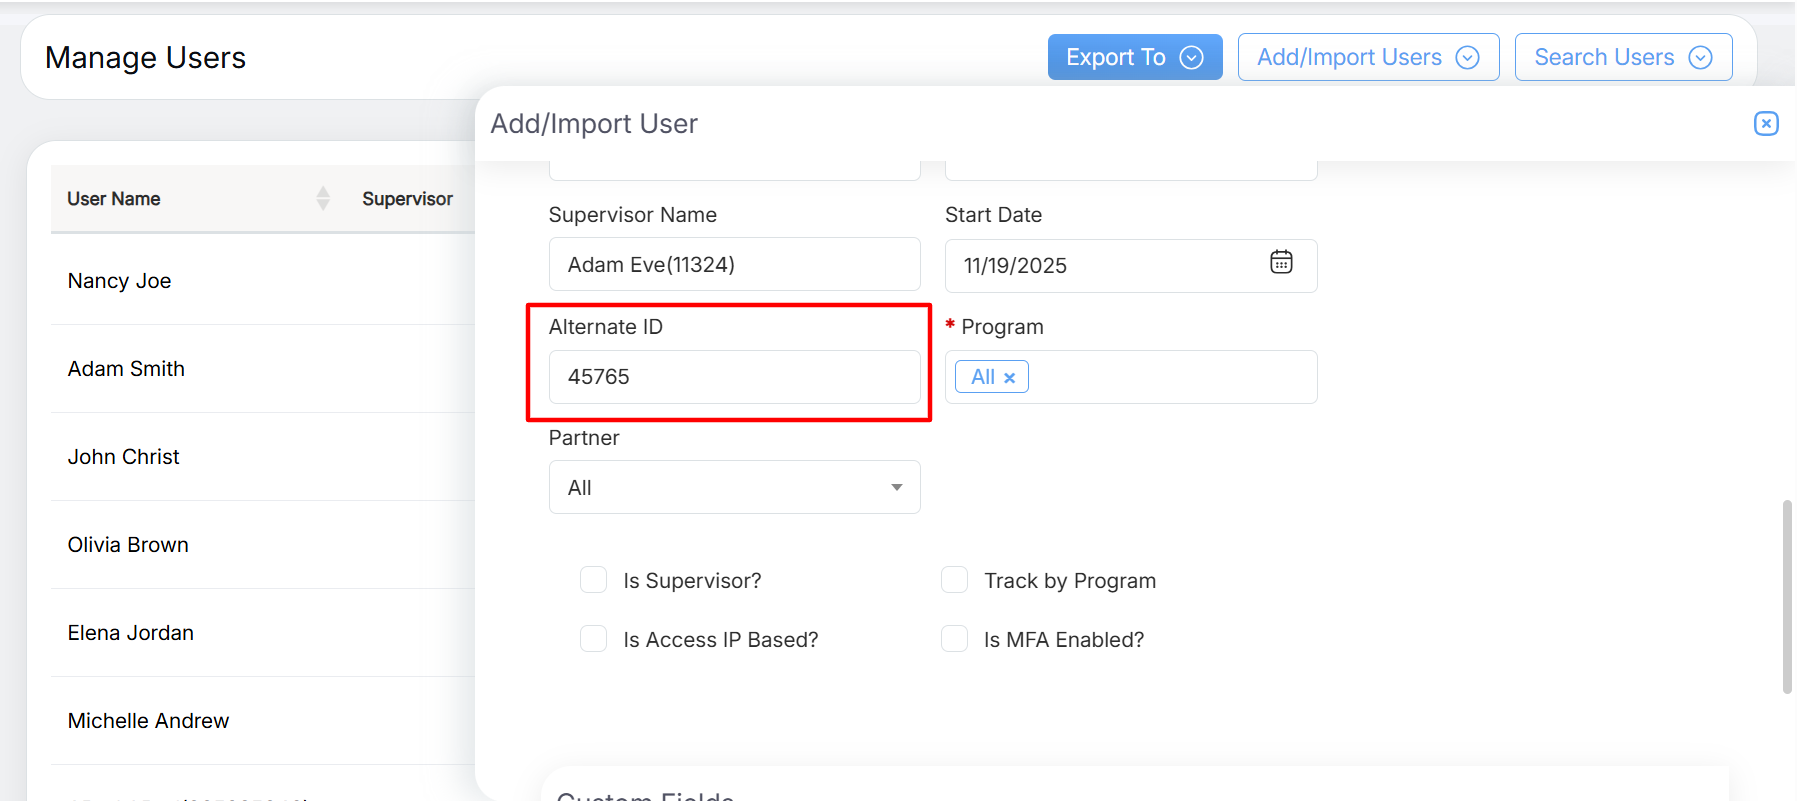
Alternate ID
- The Program drop-down menu displays the name of programs. Select one or multiple or all programs from the list. One can even search for specific program by entering the keywords in the Program field.
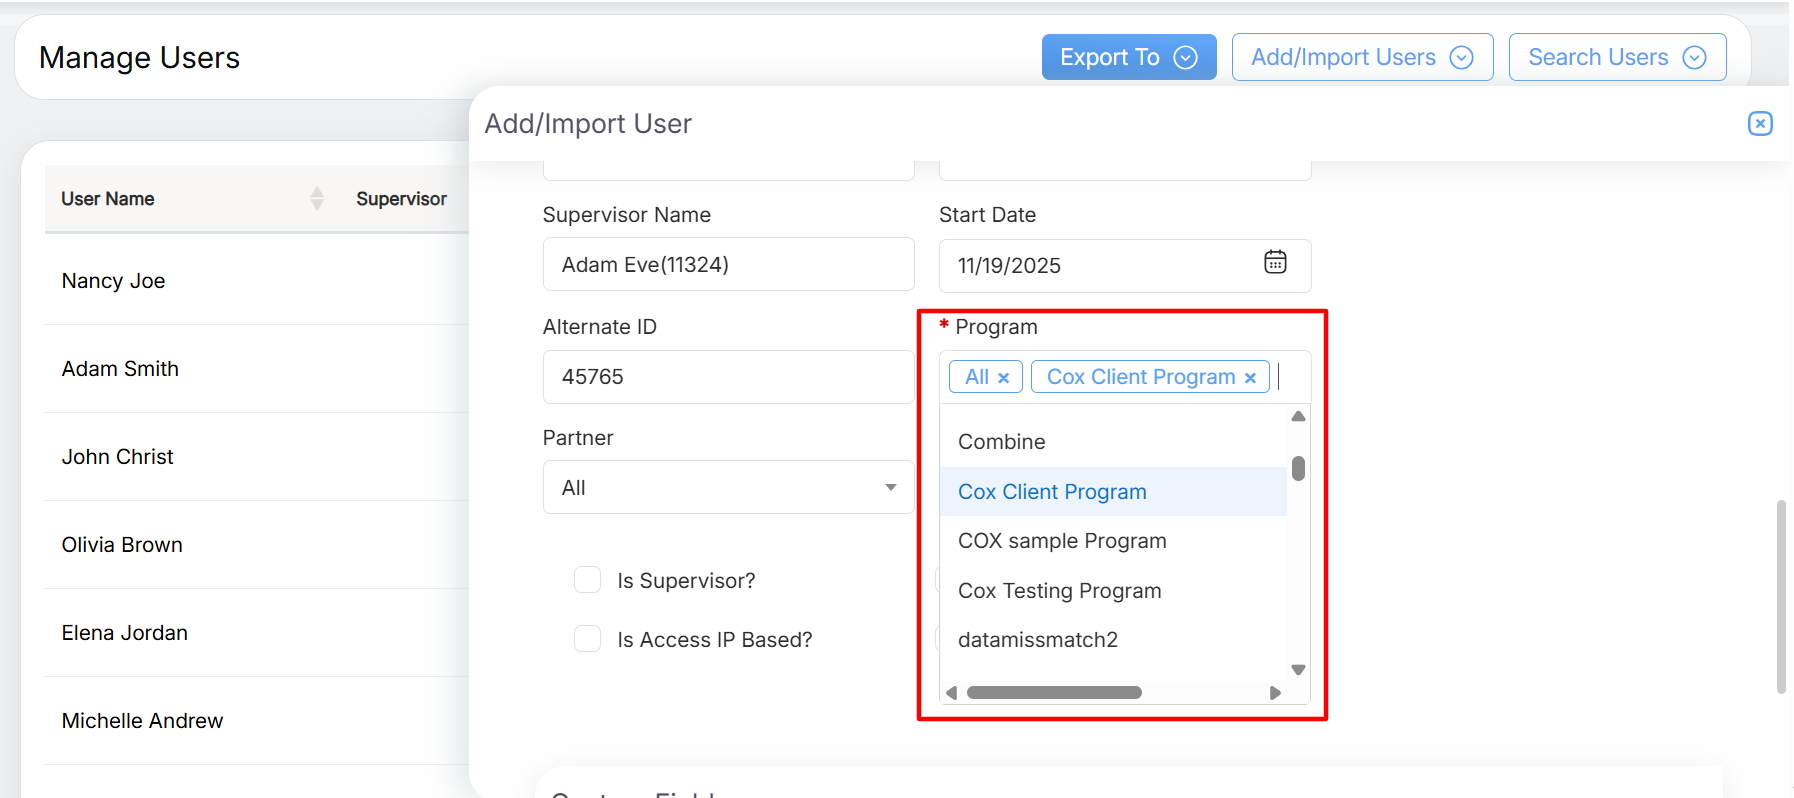
Program Drop-Down Menu
Note: The new user will have access to the selected programs only.
-
- To remove the selected Program then click on the Cross button displayed beside the program name.
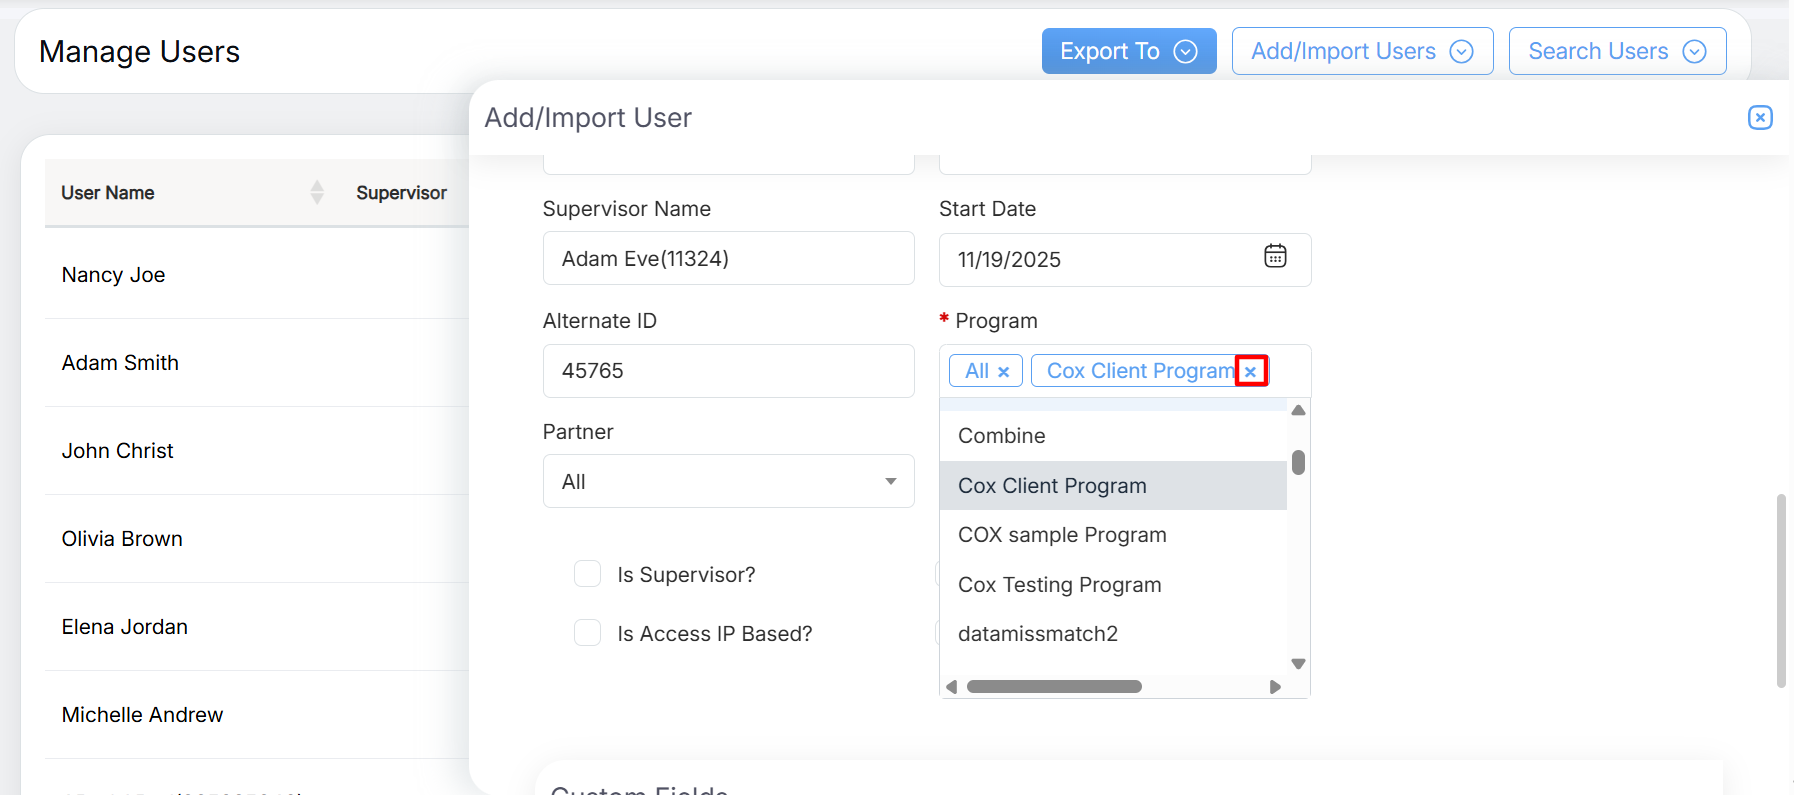
Cross Button
Based on the requirement, from the Partner drop-down menu, the authorized user can select and assign the partner to this new user.
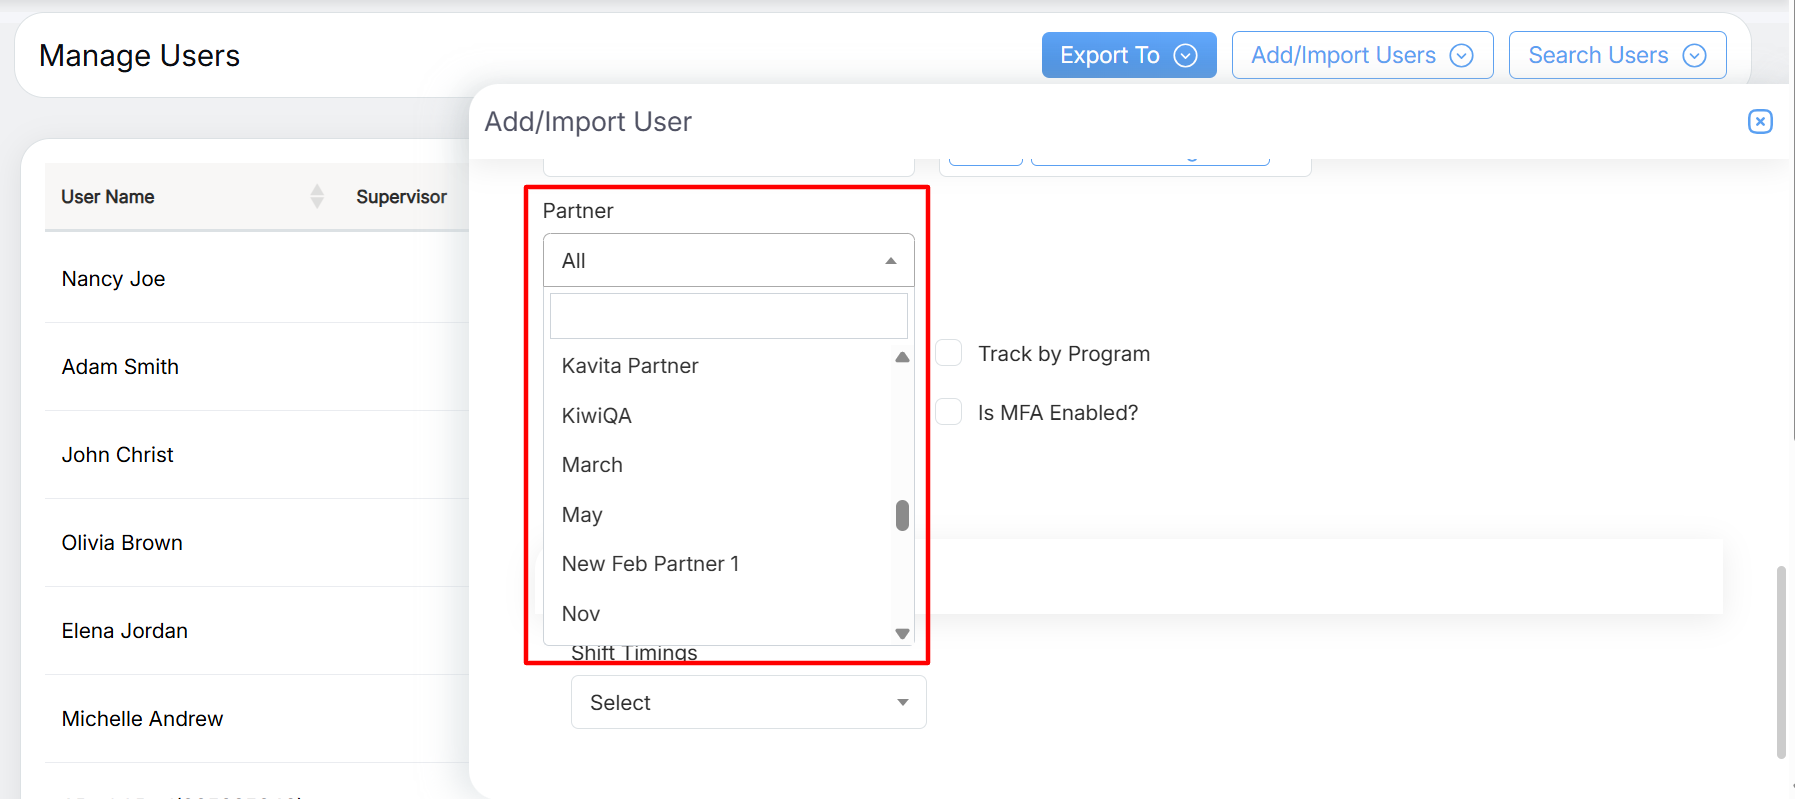
Partner
- The new user is the supervisor, then select Is Supervisor? checkbox. This allows the supervisor to have an option to be mapped for an agent.
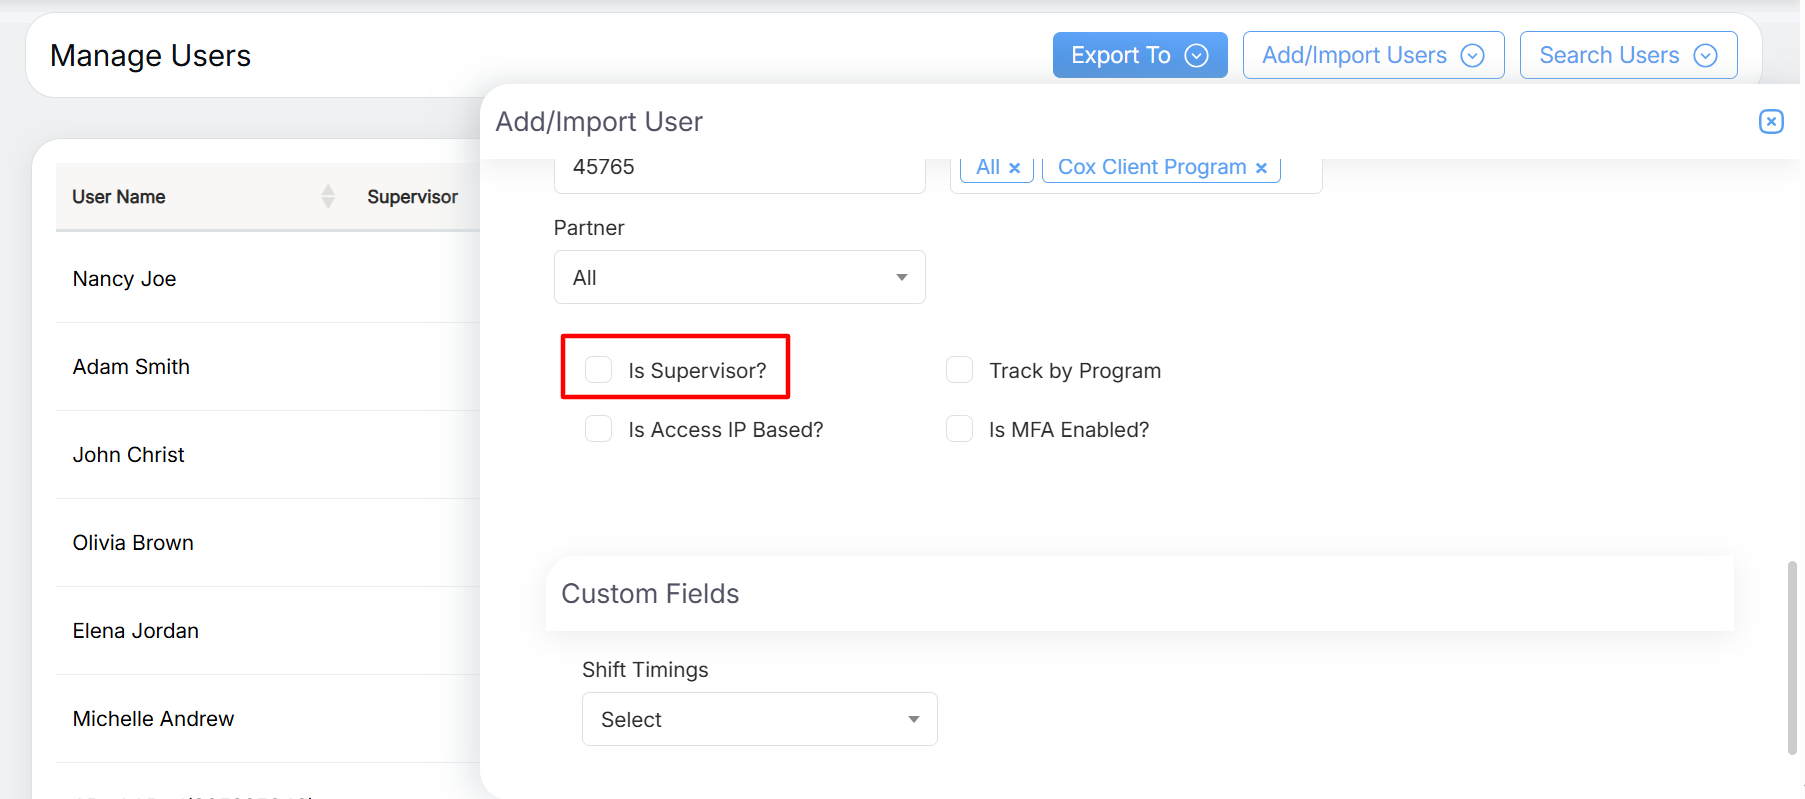
Is Supervisor Checkbox
Note: If this option is not selected, then in the evaluation the name of the supervisor will not pop-up to select.
- Select the Track by Program checkbox to track the new user by the program.
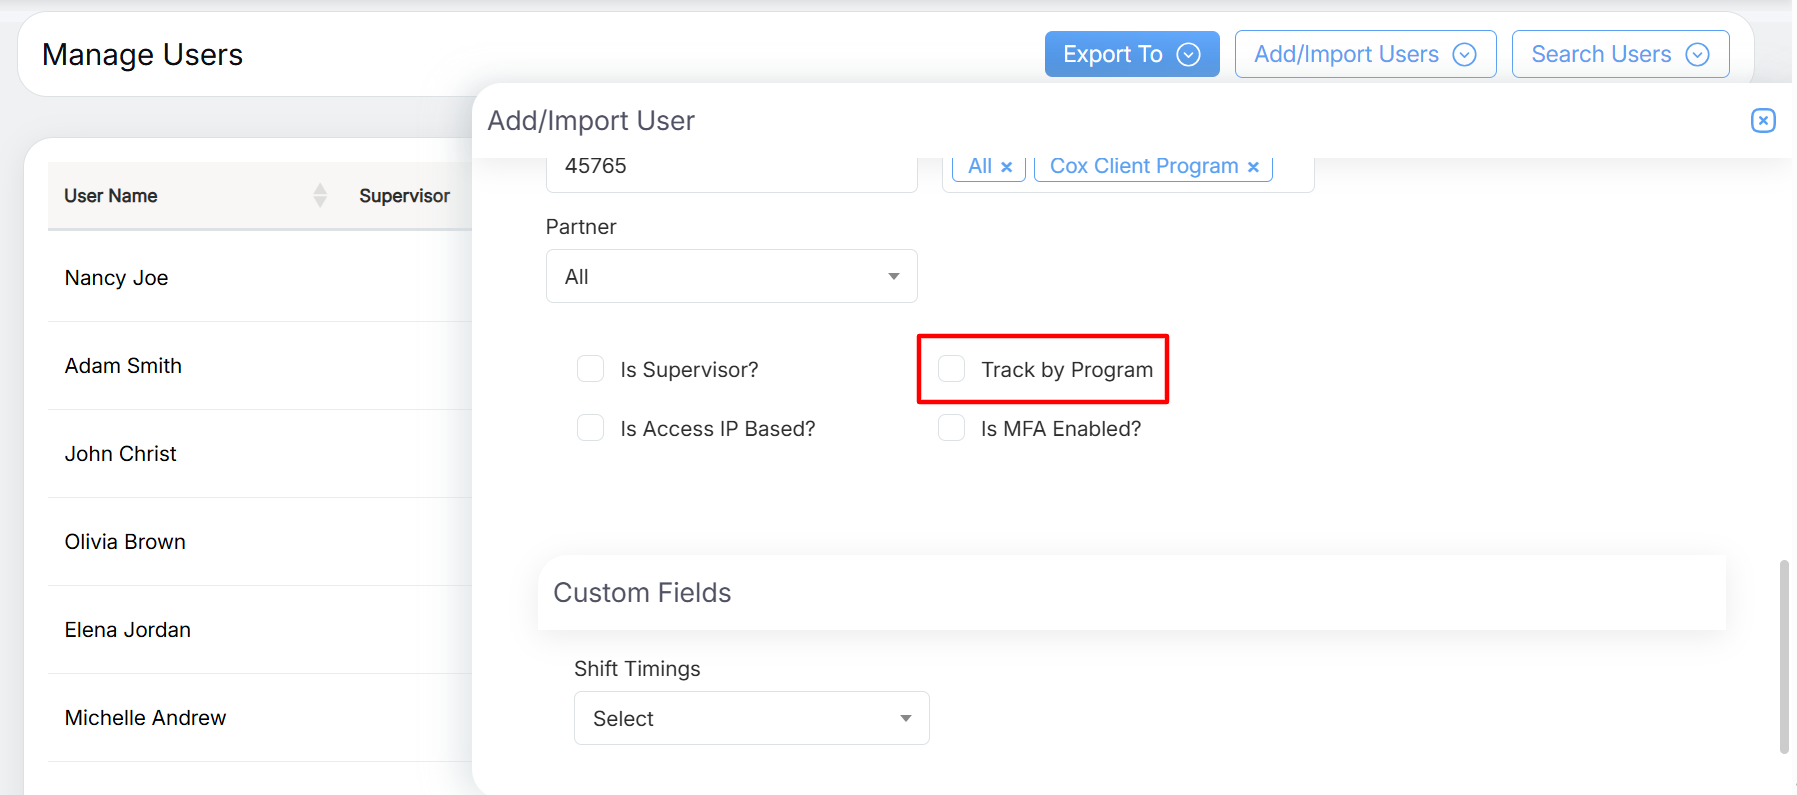
Track by Program
- Select the Is Access IP Based? checkbox to allow access to the users based on the IP Addresses.
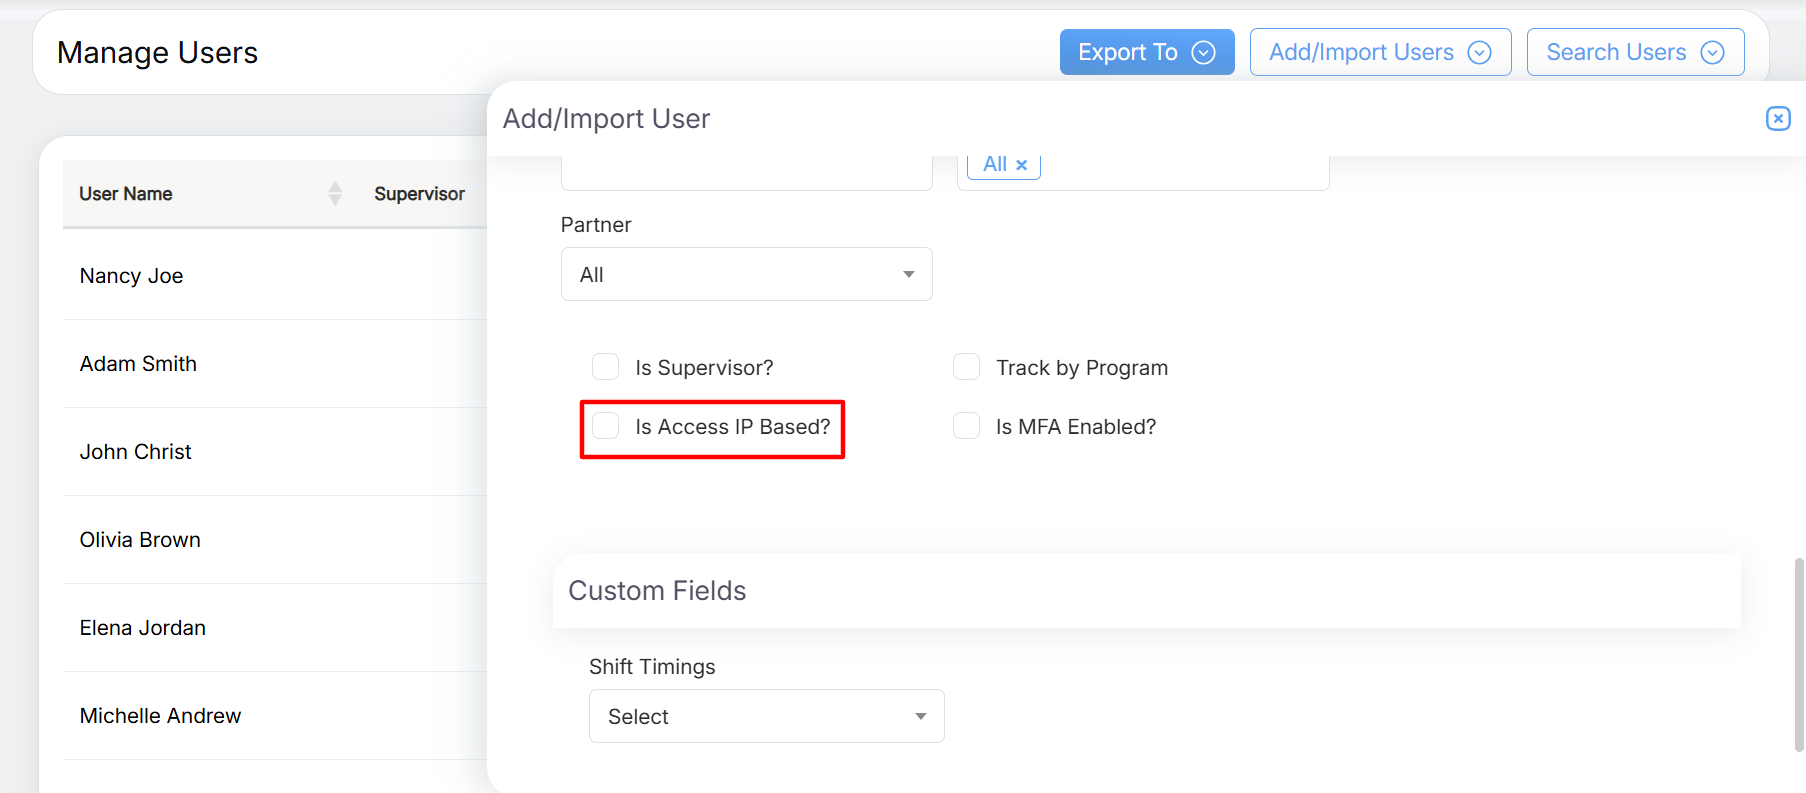
Is Access IP Based Checkbox
Note: Selecting this checkbox restricts the users from accessing QEval from any other IP Address.
- Select Is MFA Enabled? and set it to enable Multi-Factor Authentication (MFA).
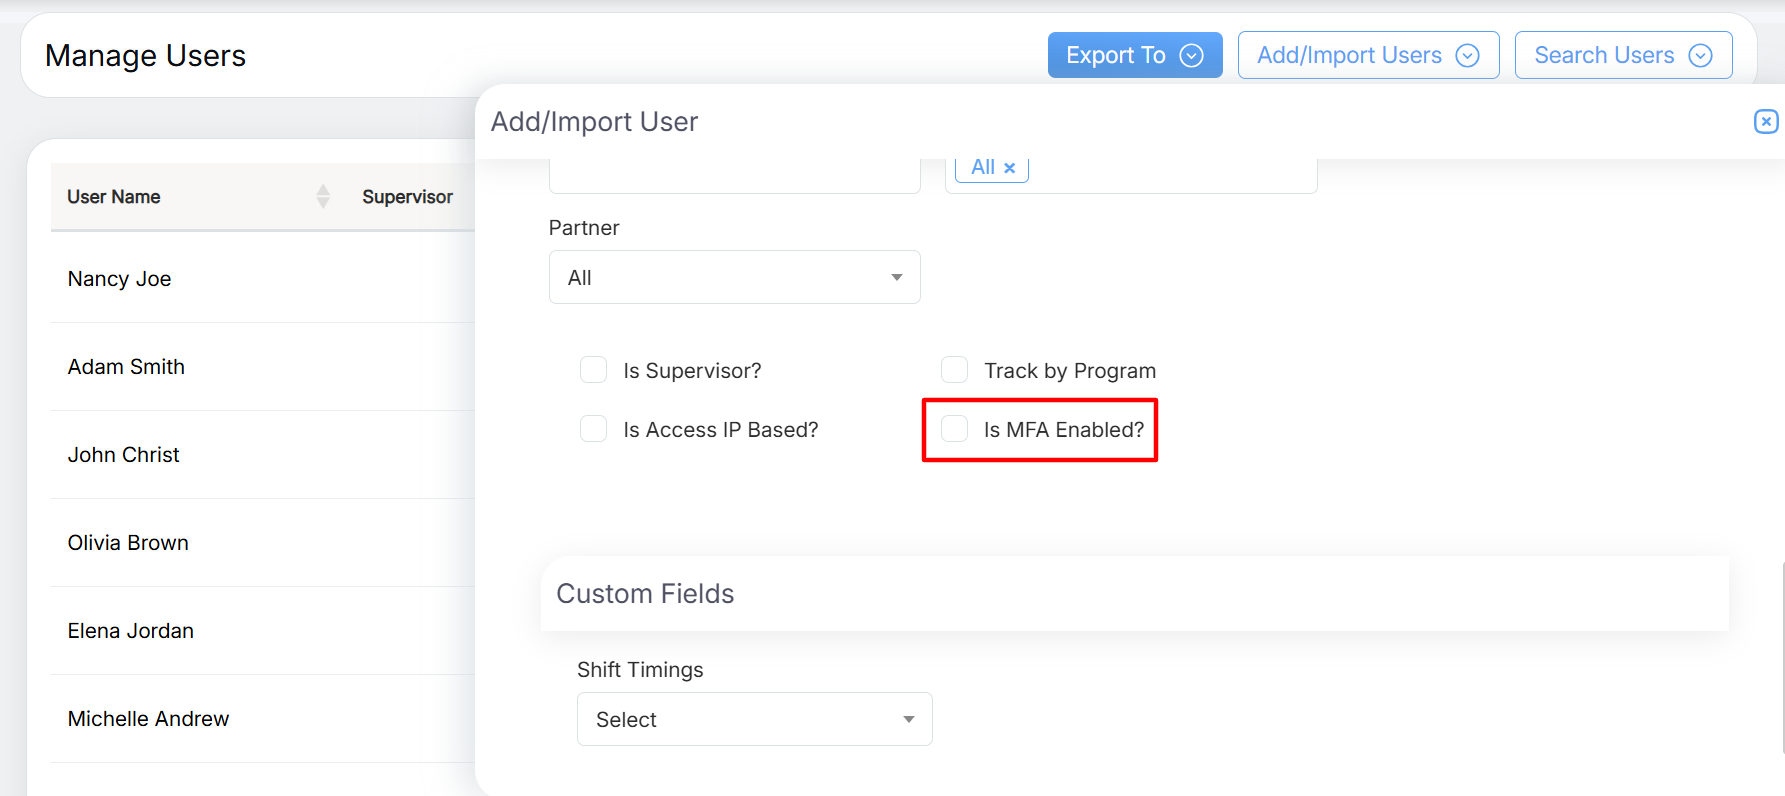
Is MFA Enabled Checkbox
Note: When enabled, users will be required to verify their login with an additional OTP step each time they sign in.
Access Rights
- The Role drop-down menu displays the list of user roles. Select the role of the user to restrict or allow the access rights. One can even search the specific role by entering keywords in the Search Bar text-box displayed under the Role field. (Refer to User Access Control to know details of each role.)
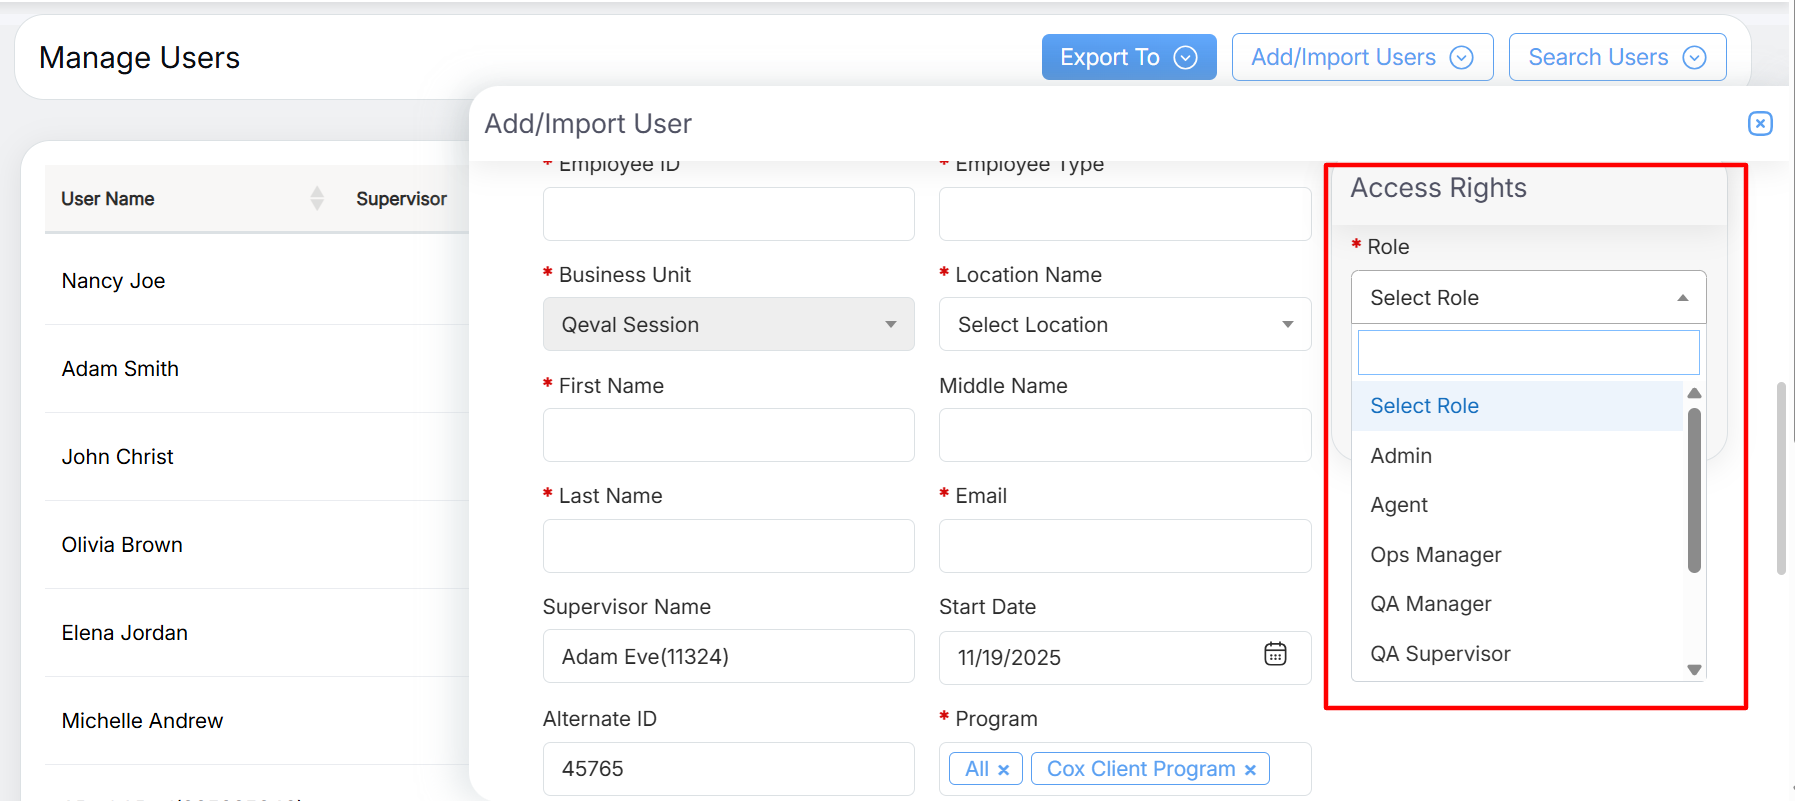
Access Rights
- After selecting the specific role, select the Custom Role, from the Custom Role drop-down option, to assign the selected user a custom role, based on the requirement, as demonstrated in the screen below –
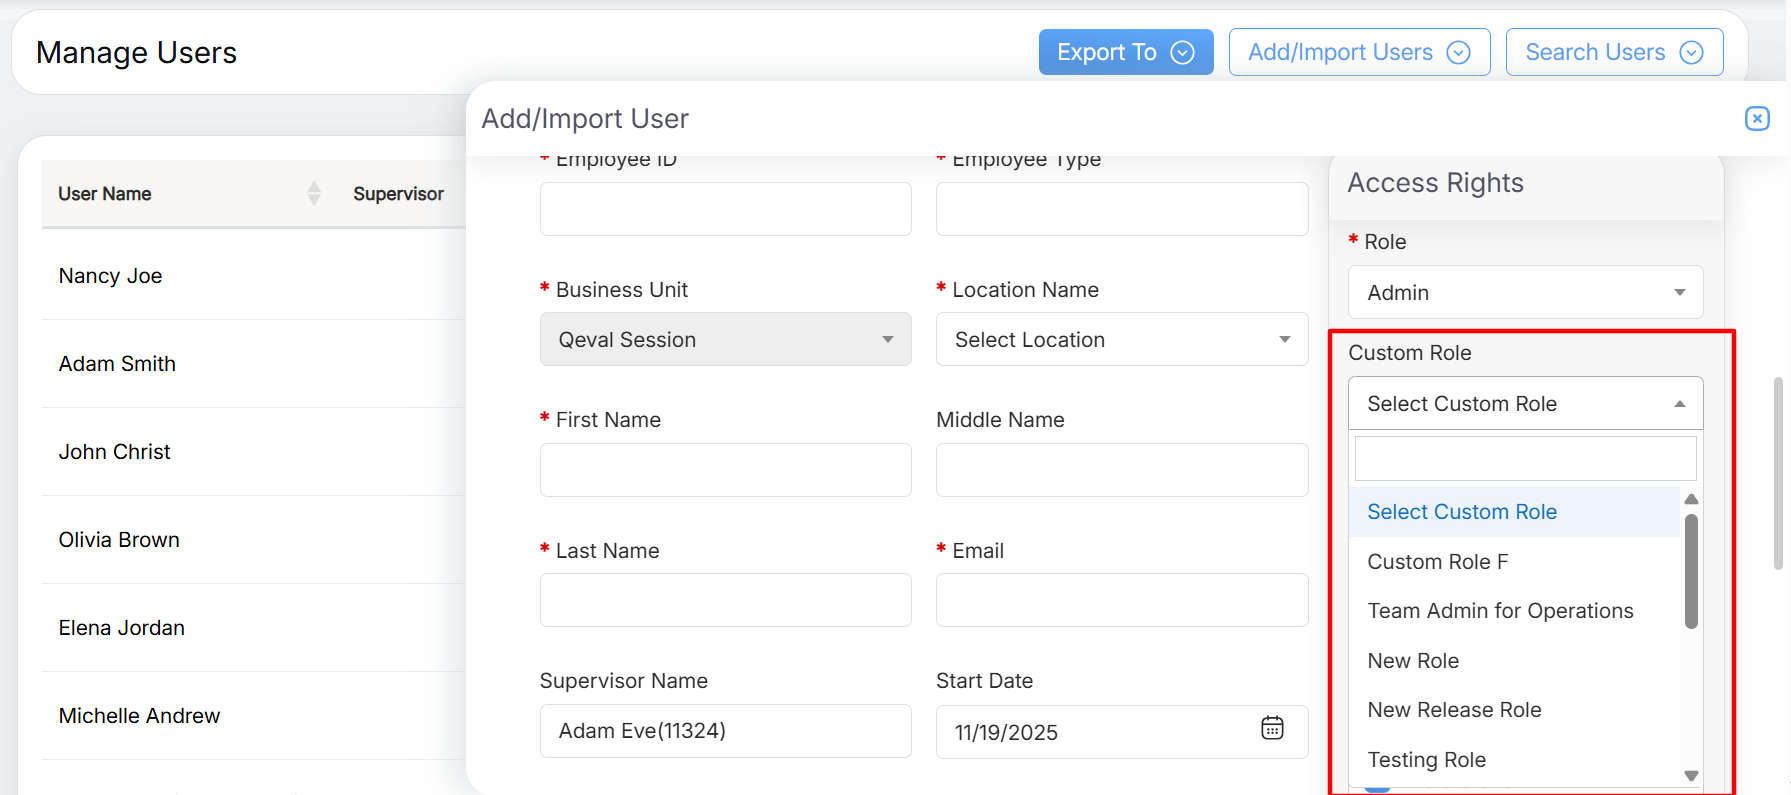
Custom Role
Note: Please click here, to know more about the Custom Roles functionality in details.
-
The Assign Roles section becomes visible once a role is selected from the drop-down menu. This section displays a list of associated rights, each accompanied by a checkbox. Users can assign or revoke rights for the newly added user by selecting or deselecting the respective checkboxes. Additionally, a search feature allows users to filter the list of rights based on the selected role, as demonstrated in the screen below –

Assign Roles
Note: Once the role is assigned, it is advisable not to change the role afterwards as it will affect the hierarchy and past data.
Custom Fields
- The Custom Fields section displays the already added fields. It helps to add more details other than available details.
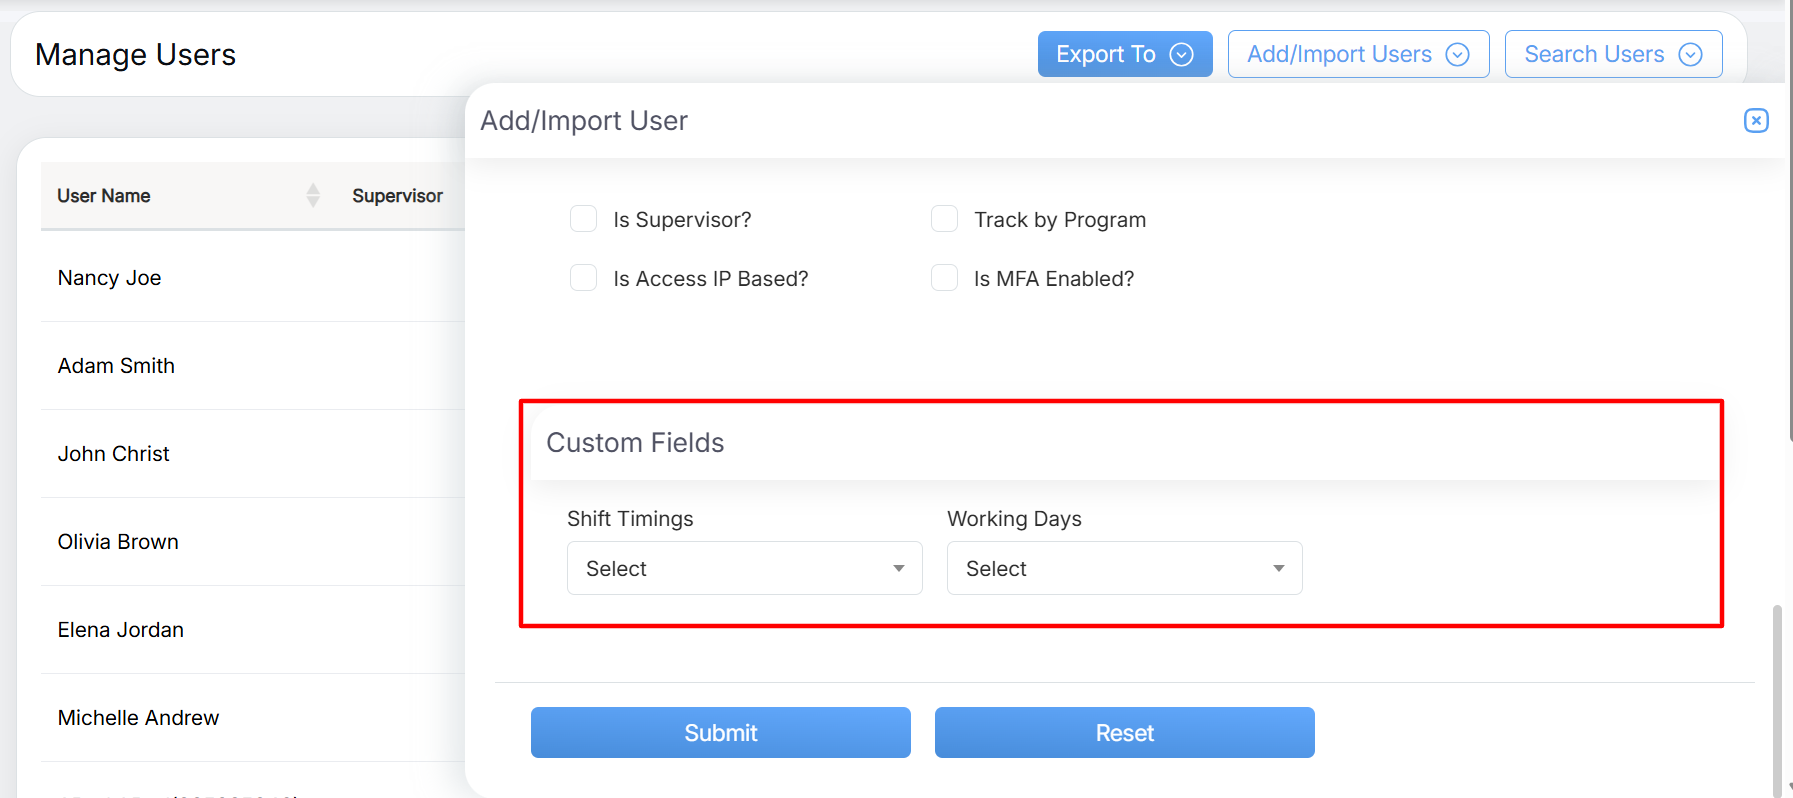
Already Added Custom Fields
- To add more details other than the available details, scroll up on the Add/Import User window and click on the Add Custom Fields button.
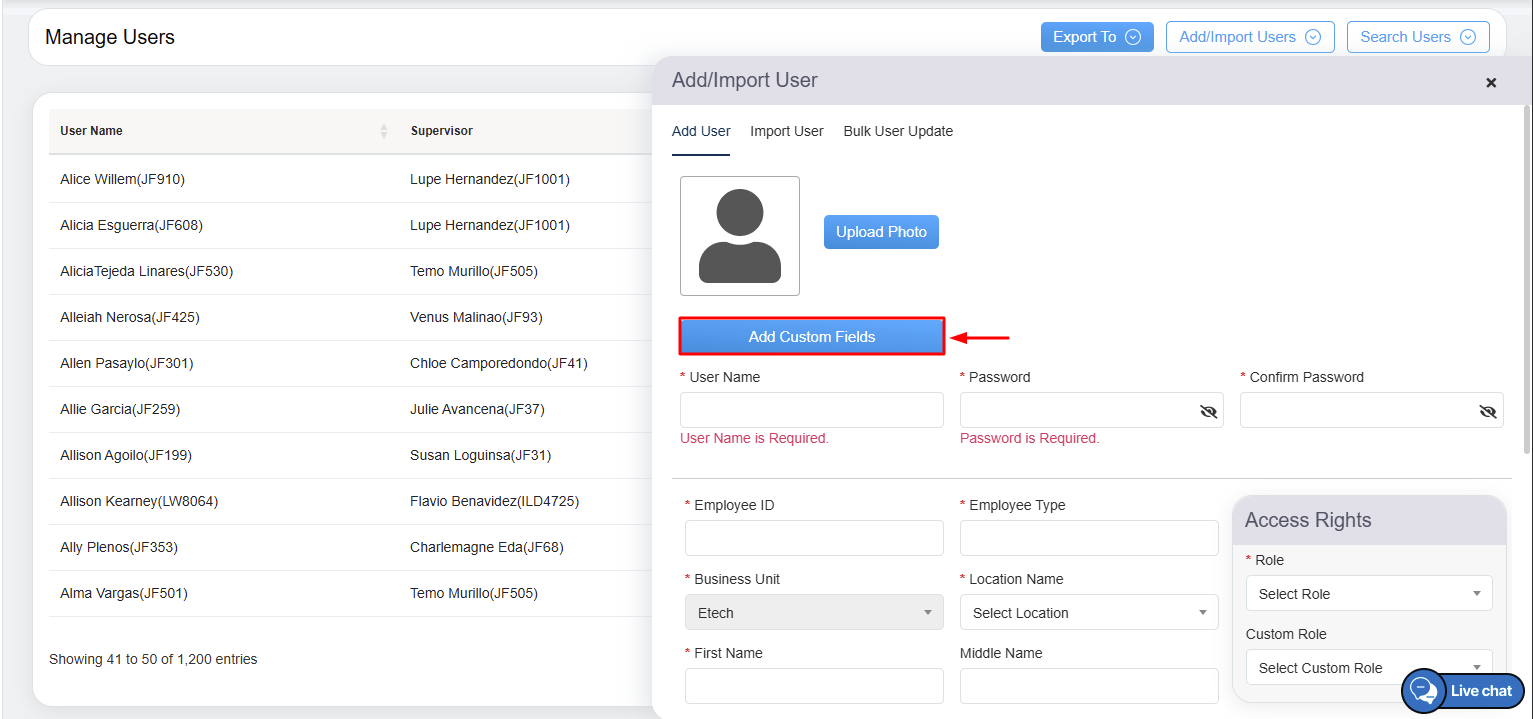
Add Custom Fields
- On the new browser tab, the Client Metadata Fields page will be opened where the already added custom fields details will be displayed in the table grid.
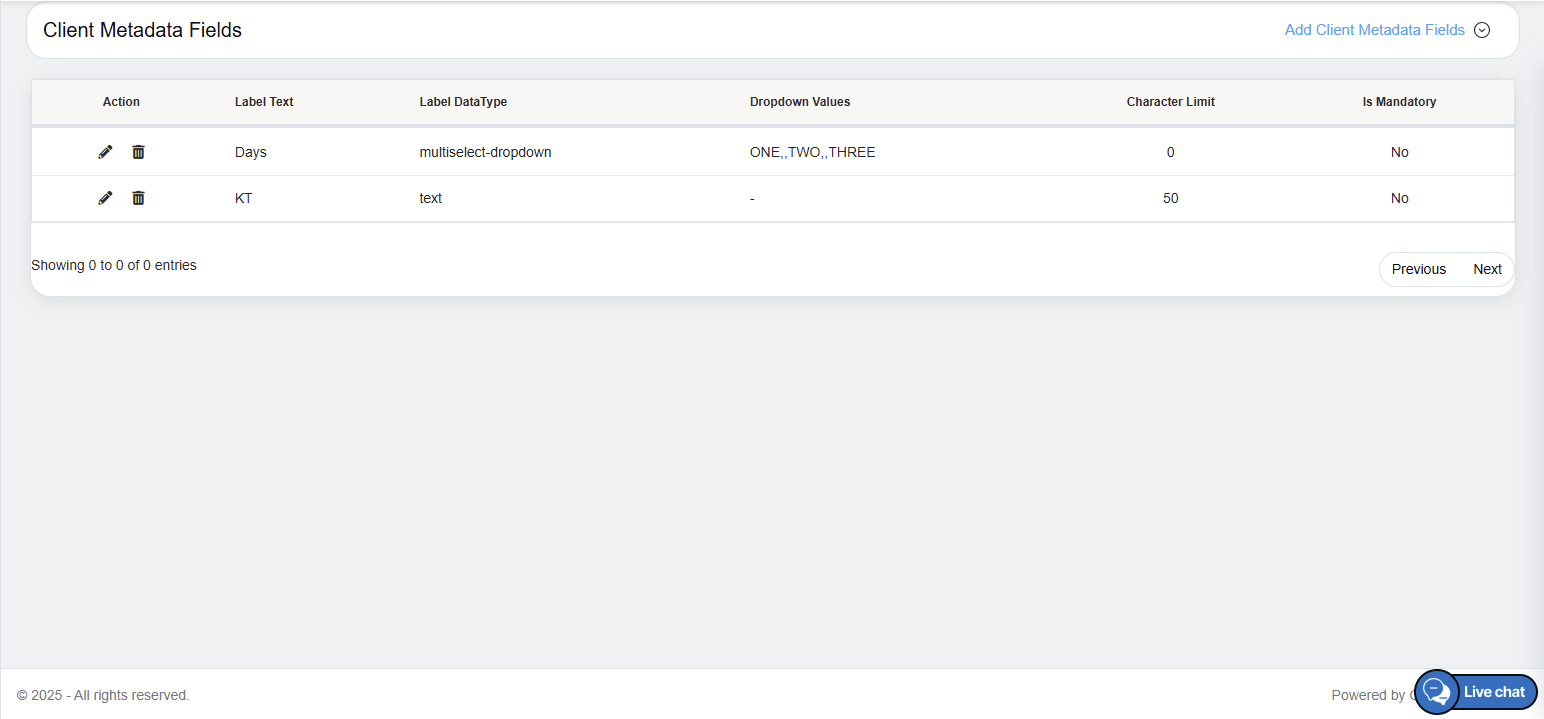
Client Metadata Fields Table
The data elements displayed in the table grid are explained below:
| Table Elements | Description |
| Action |
The Edit The Delete |
| Label Text | Displays the name of entered label. |
| Label Data Type |
Displays the selected data type depending on the requirement which includes:
|
| Drop-Down Values | Displays the already entered values when the Drop-Down or Multi-Select Drop-Down label data type is selected. |
| Character Limit | Displays the restricted character limit when the Integer or Text label data type is selected. |
| Mandatory | Displays whether the added custom field is mandatory or not, it displays Yes or No respectively in the column. |
Add Client Metadata Fields
To add new custom fields, click on the Add Client Metadata Fields button displayed on the Client Metadata Fields page as shown below:
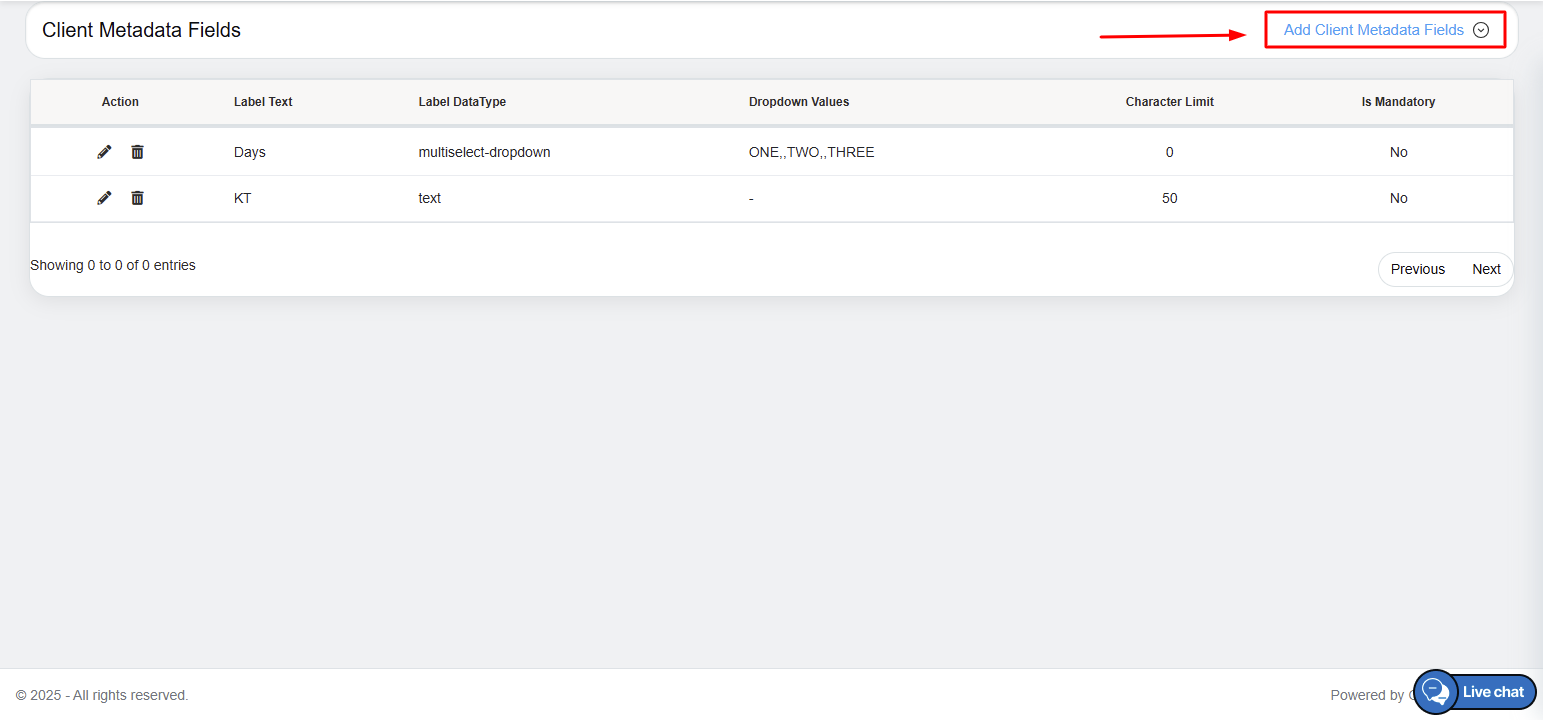
Add Client Metadata Fields button highlighted
The Add Client Metadata Fields window will be opened on the same page.
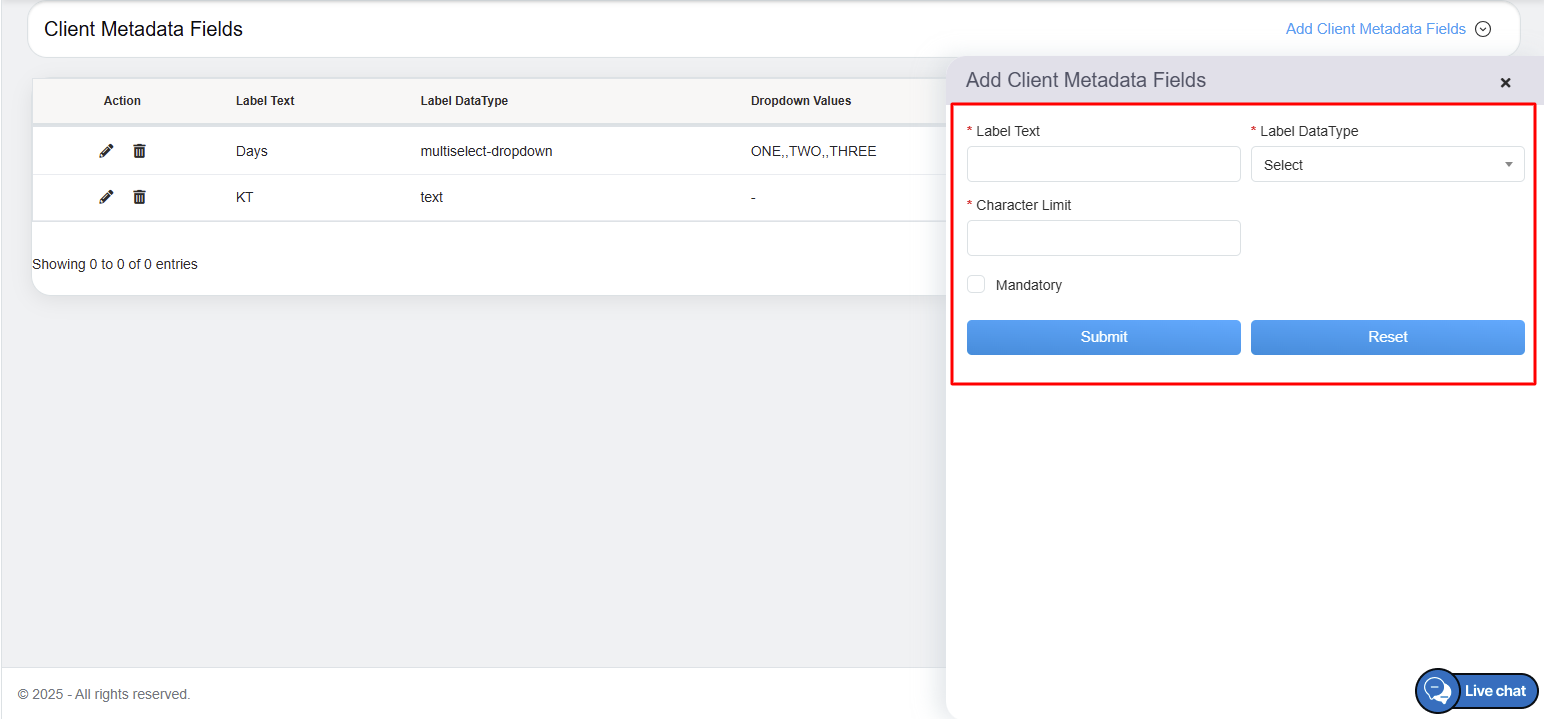
Add Client Metadata Fields Window
Provide the following details to add new custom fields.
- Enter the name of the label in the text-box displayed under Label Text field.
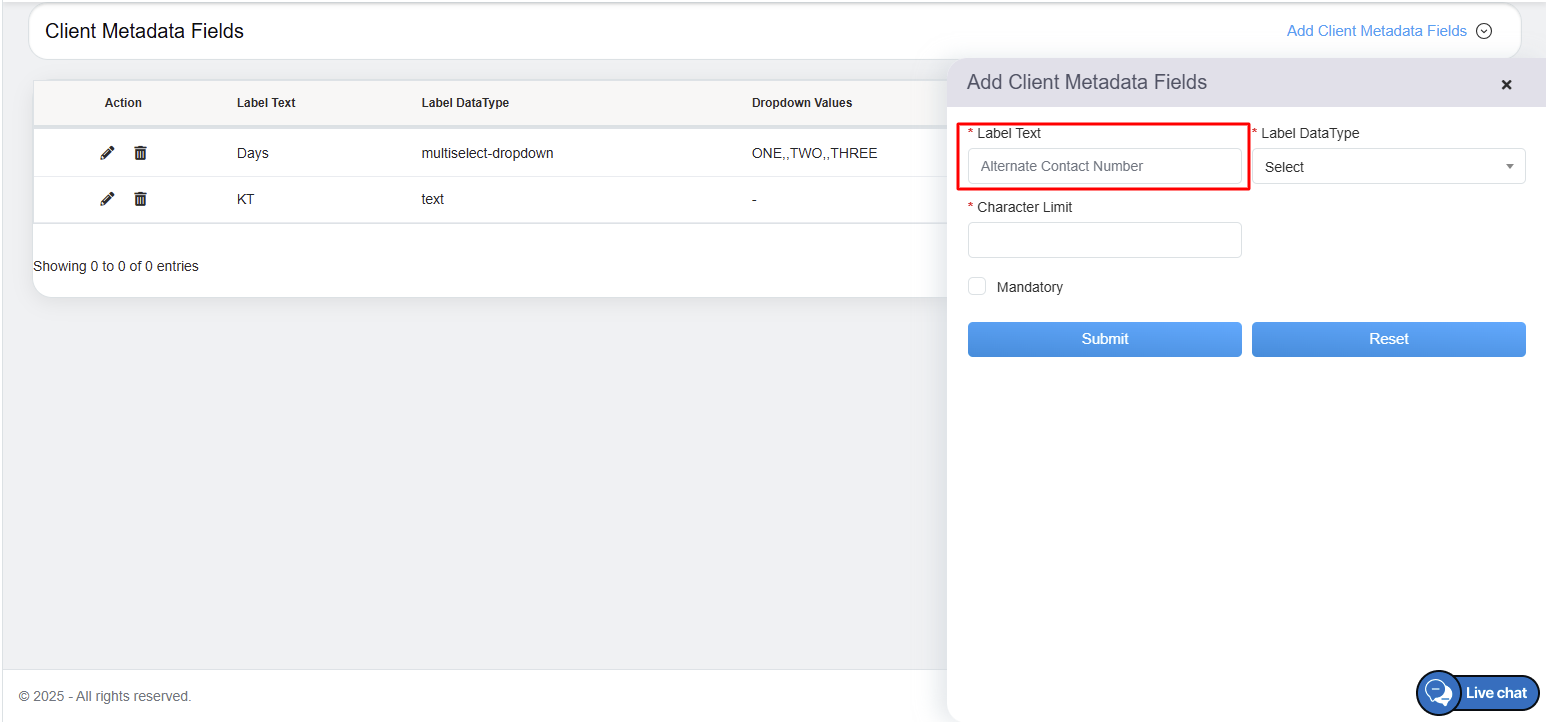
Label Text Field
- The Label Data Type drop-down menu displays the list of data type. Based on the label text the user can select the relevant data type from the list. One can even search a specific data type by entering keywords displayed under the Search Bar Text-box displayed under the field.
- Integer: Enter the numeric value based on the set character limit.
- Text: Enter the alphabets or numeric value based on the set character limit.
- Drop-Down: Select the value displayed in the drop-down menu.
- Multi-Select Drop-down: Select multiple value displayed in the drop-down menu.
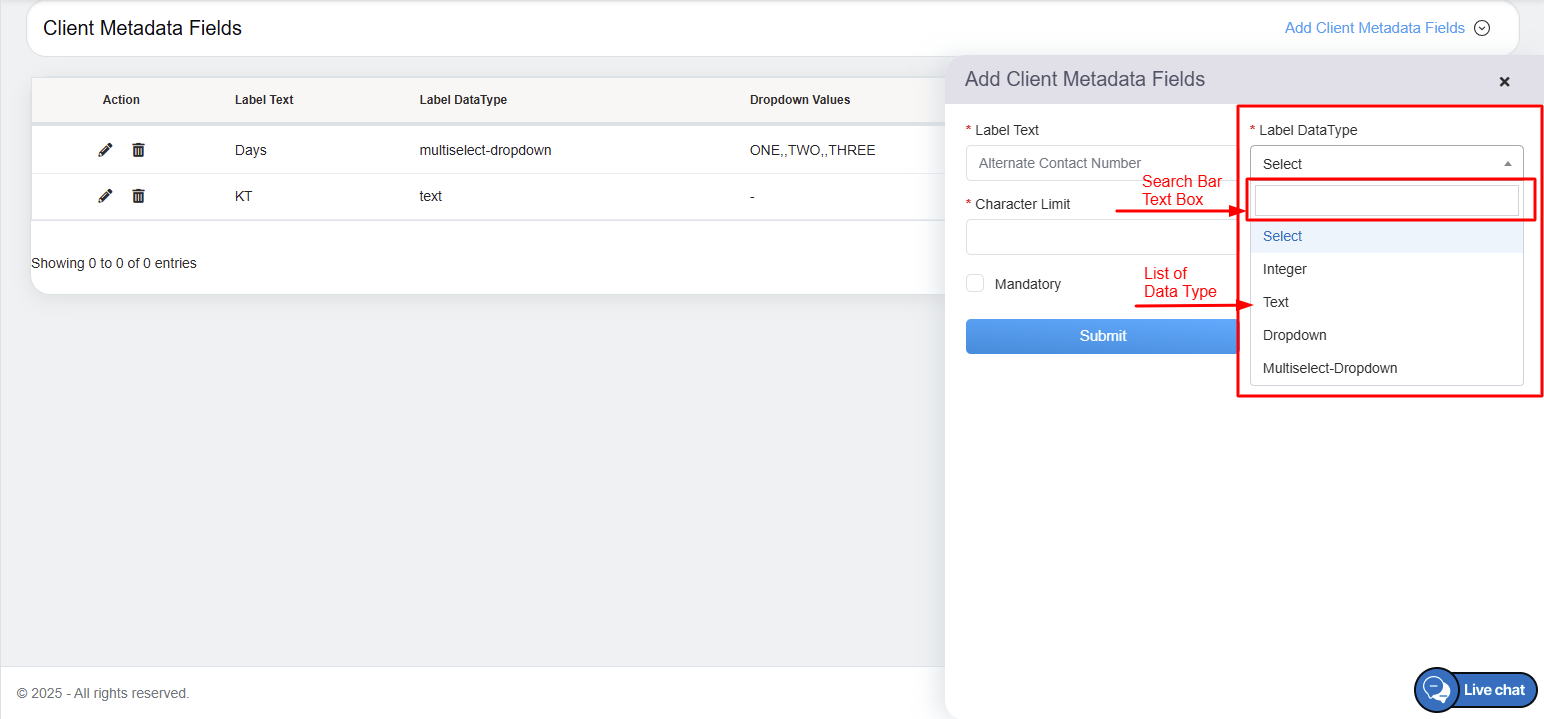
Label Data Type Drop-Down Menu
- The Character Limit field will be displayed when the user selects the Integer or Text data type. Enter the set character limit in this text-box, which restricts the user from entering data beyond the set limit.
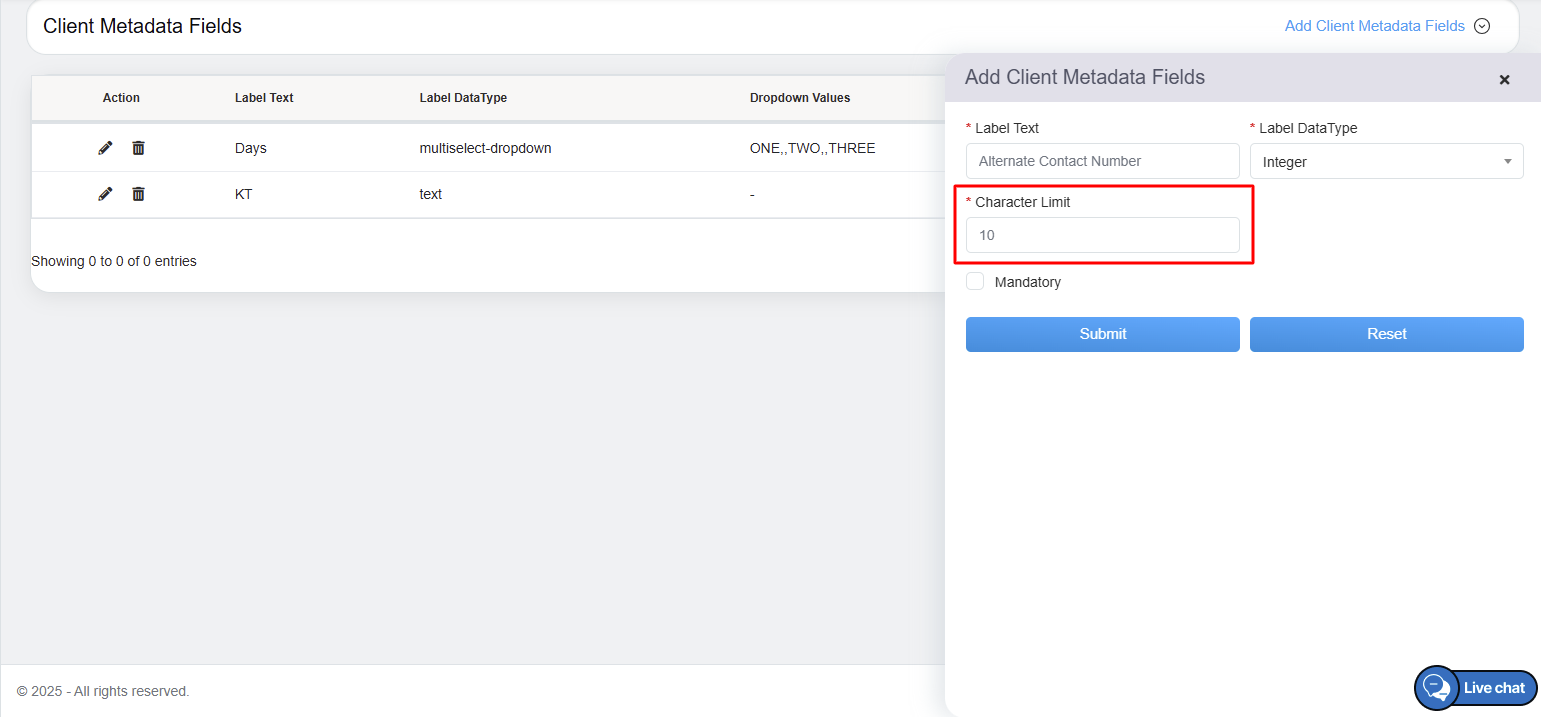
Character Limit
- The Dropdown Values field will be displayed when the user selects either Dropdown or Multi-Select-Dropdown data type. Enter the multiple values in comma-separated format that will be displayed in the list.
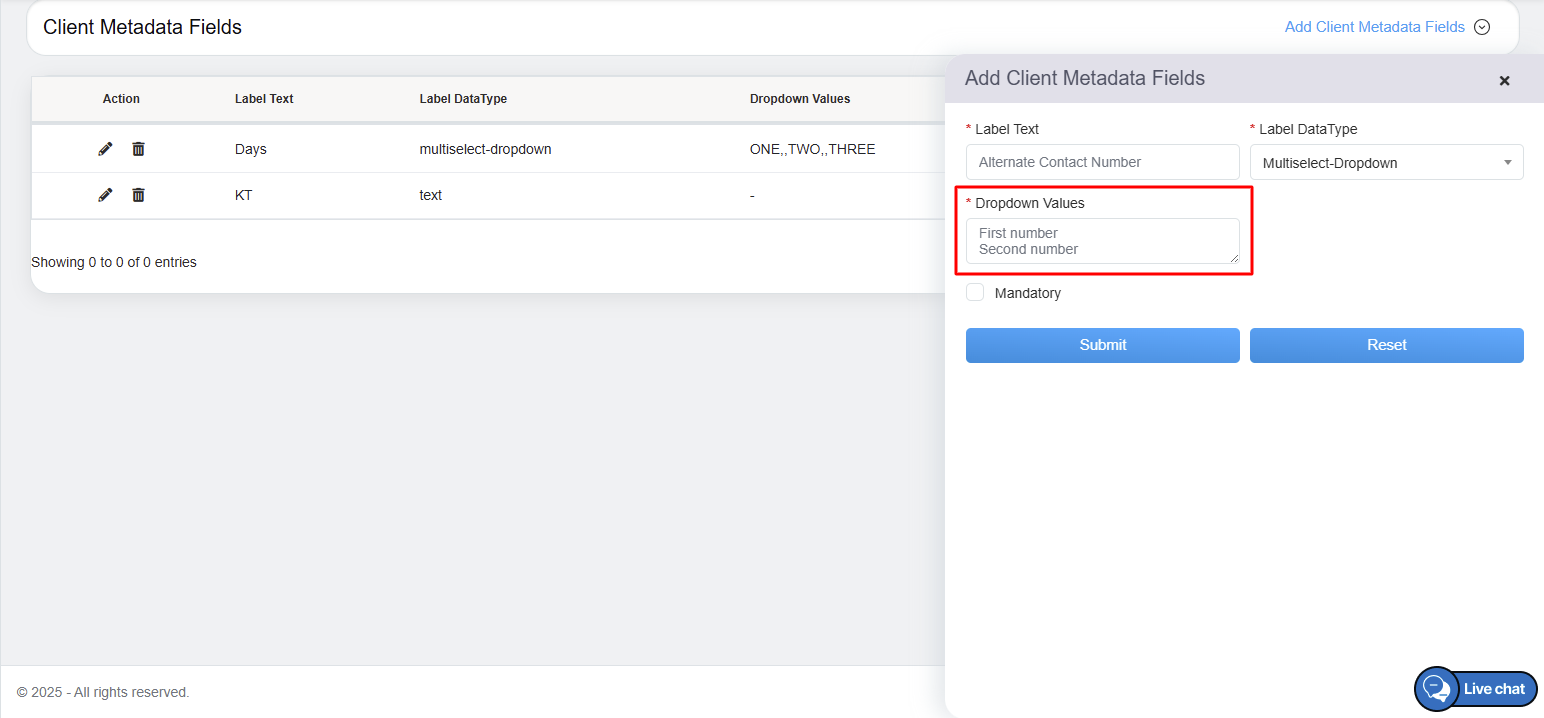
Drop-Down Values
- Select the Mandatory checkbox to make newly added custom fields to fill while creating new users.
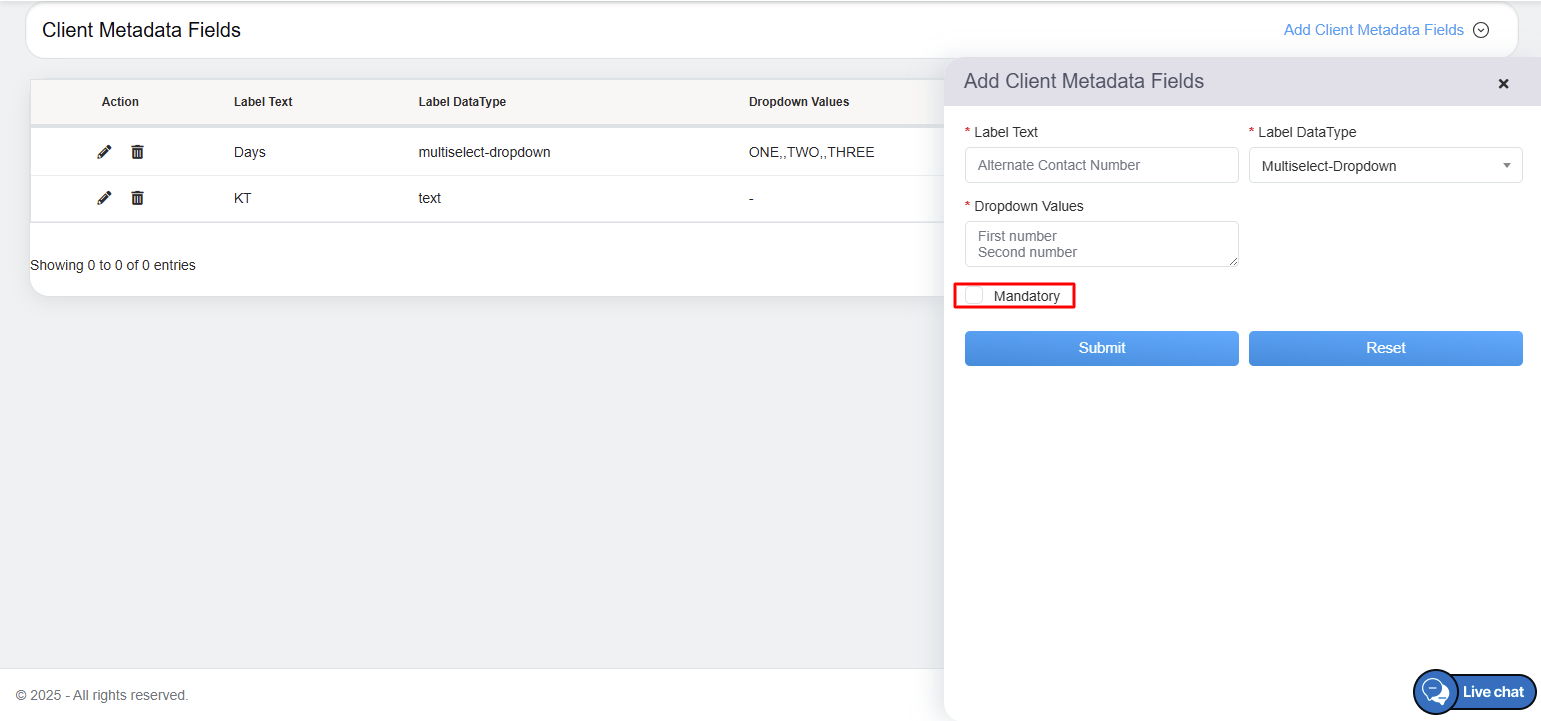
Mandatory Checkbox
Once the necessary fields are configured, click on the Submit button to add the custom fields. Click on the Reset button to reset the value.
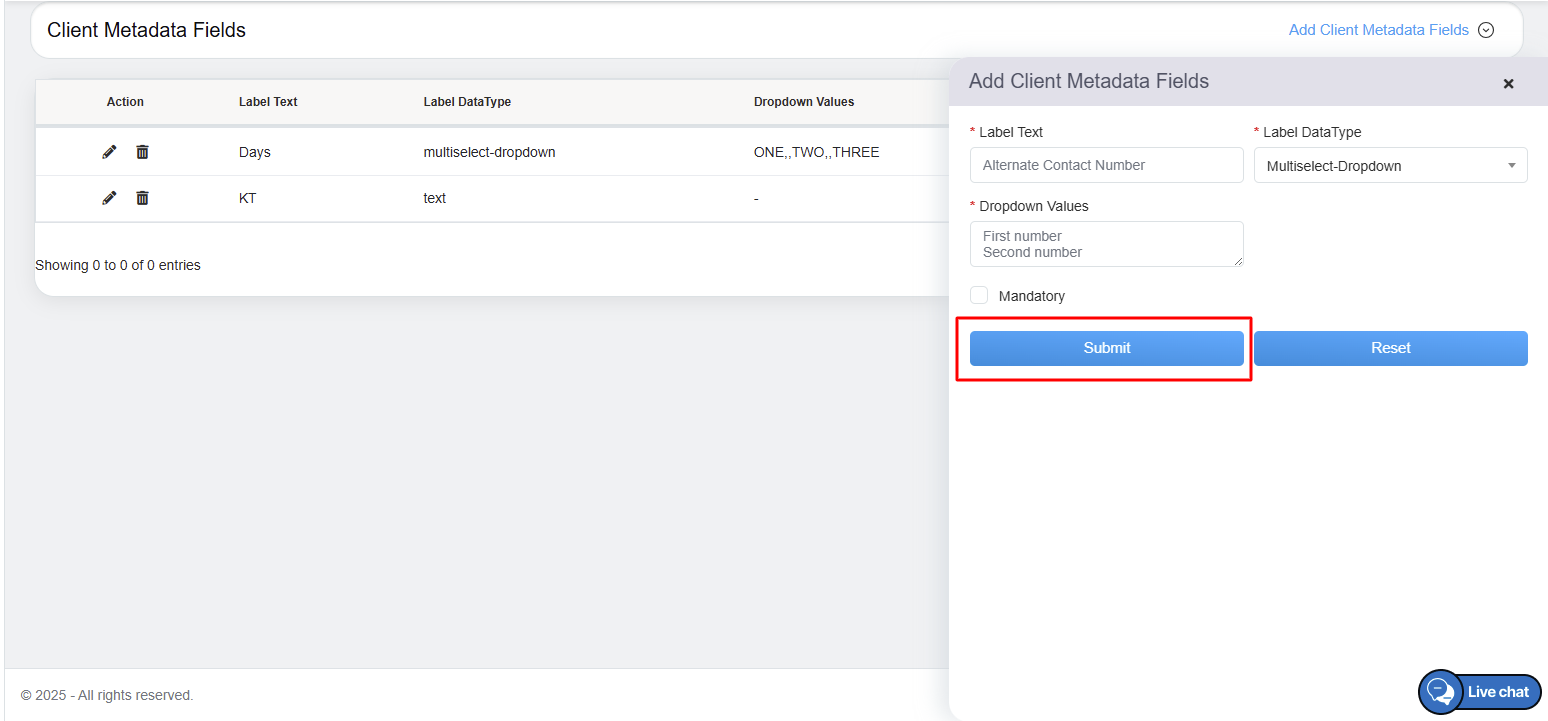
Submit Button
The newly added custom field details will be added on the Client Metadata Fields page.
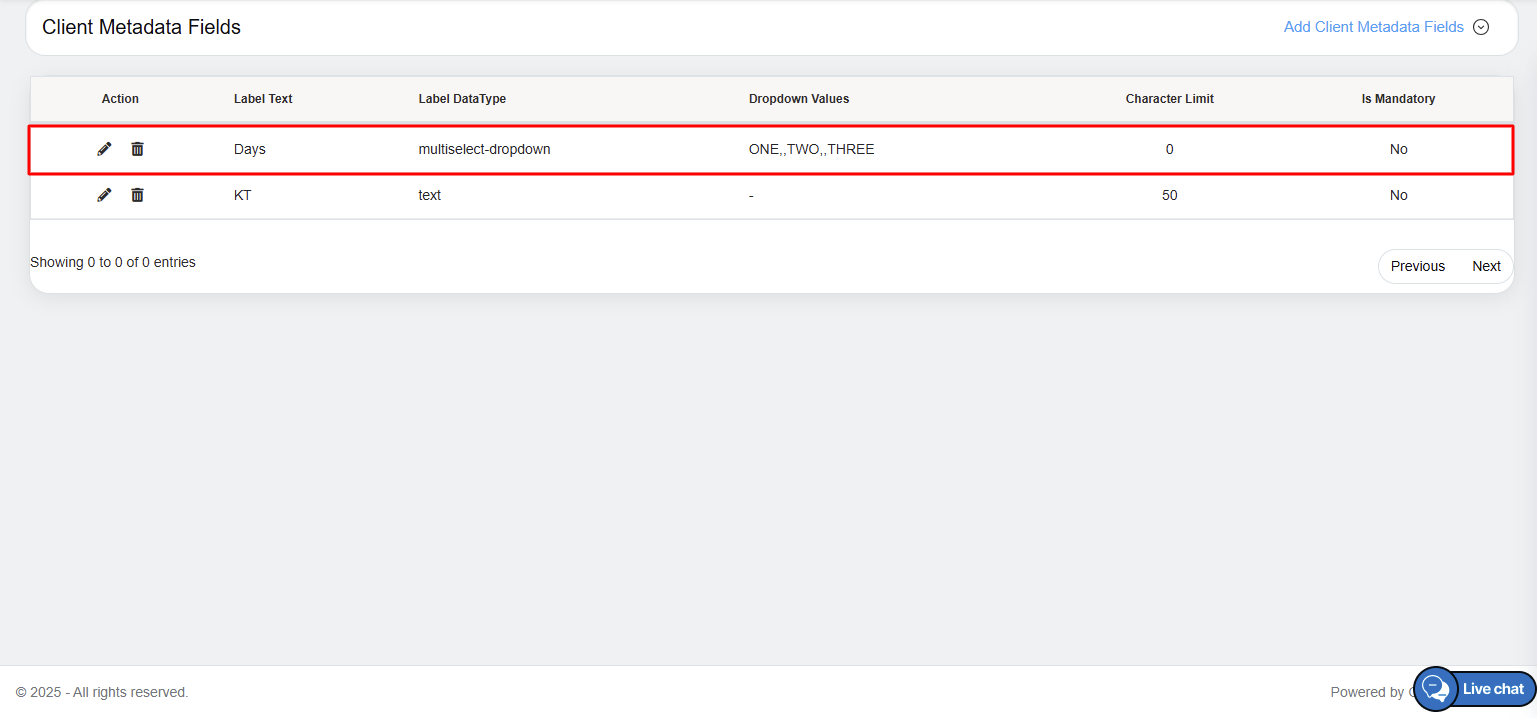
Newly Added Custom Fields
Edit Custom Fields
The user can edit the already edit custom field details by clicking on the Edit ![]() button displayed under the Action column.
button displayed under the Action column.

Edit Details Button
The Add Client Metadata Fields window will be opened on the same page. The user can modify and update the entered details. (Refer to Add Custom Fields for details.)
Click on the Update button to save the changes or click on the Cancel button to discard the changes.
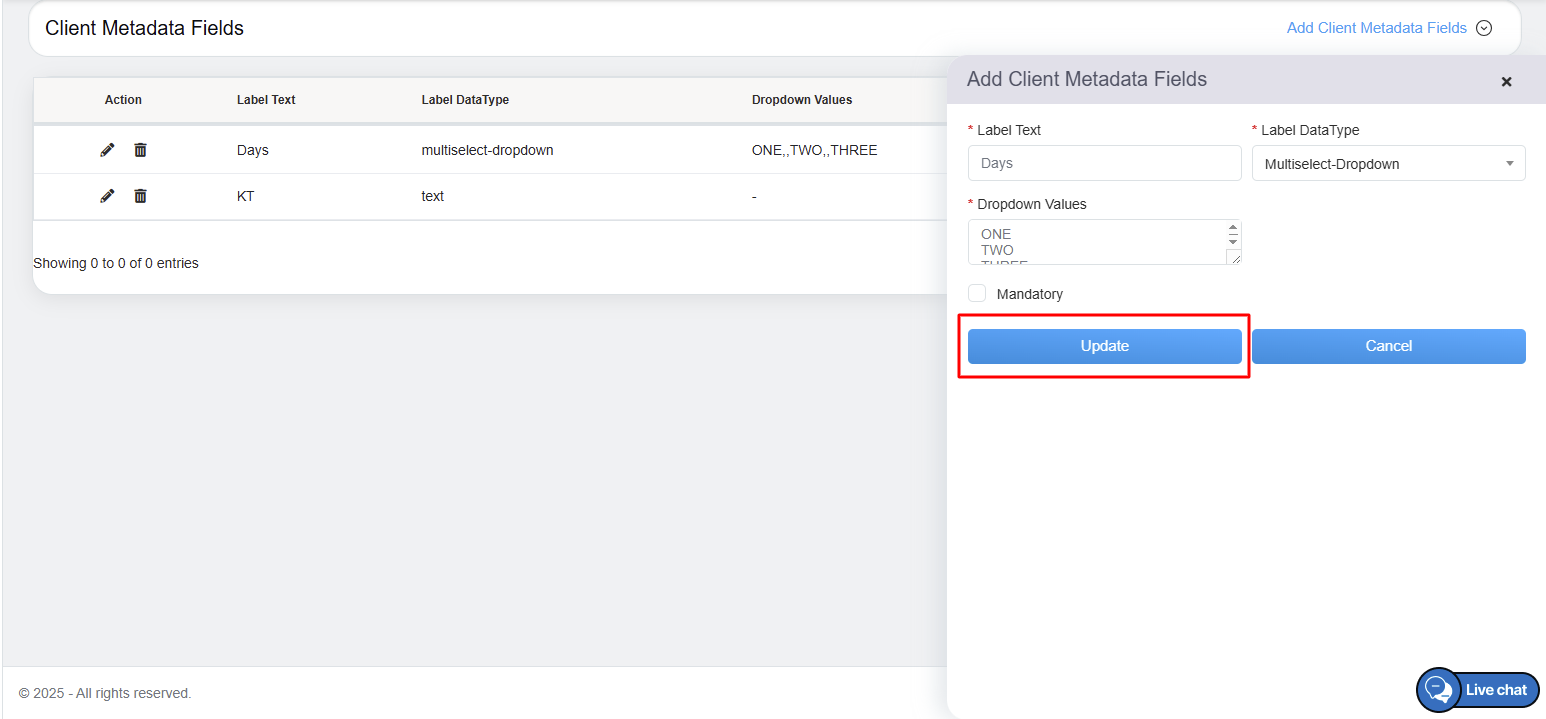
Update
An acknowledgment message will be displayed and the custom fields details will be updated.
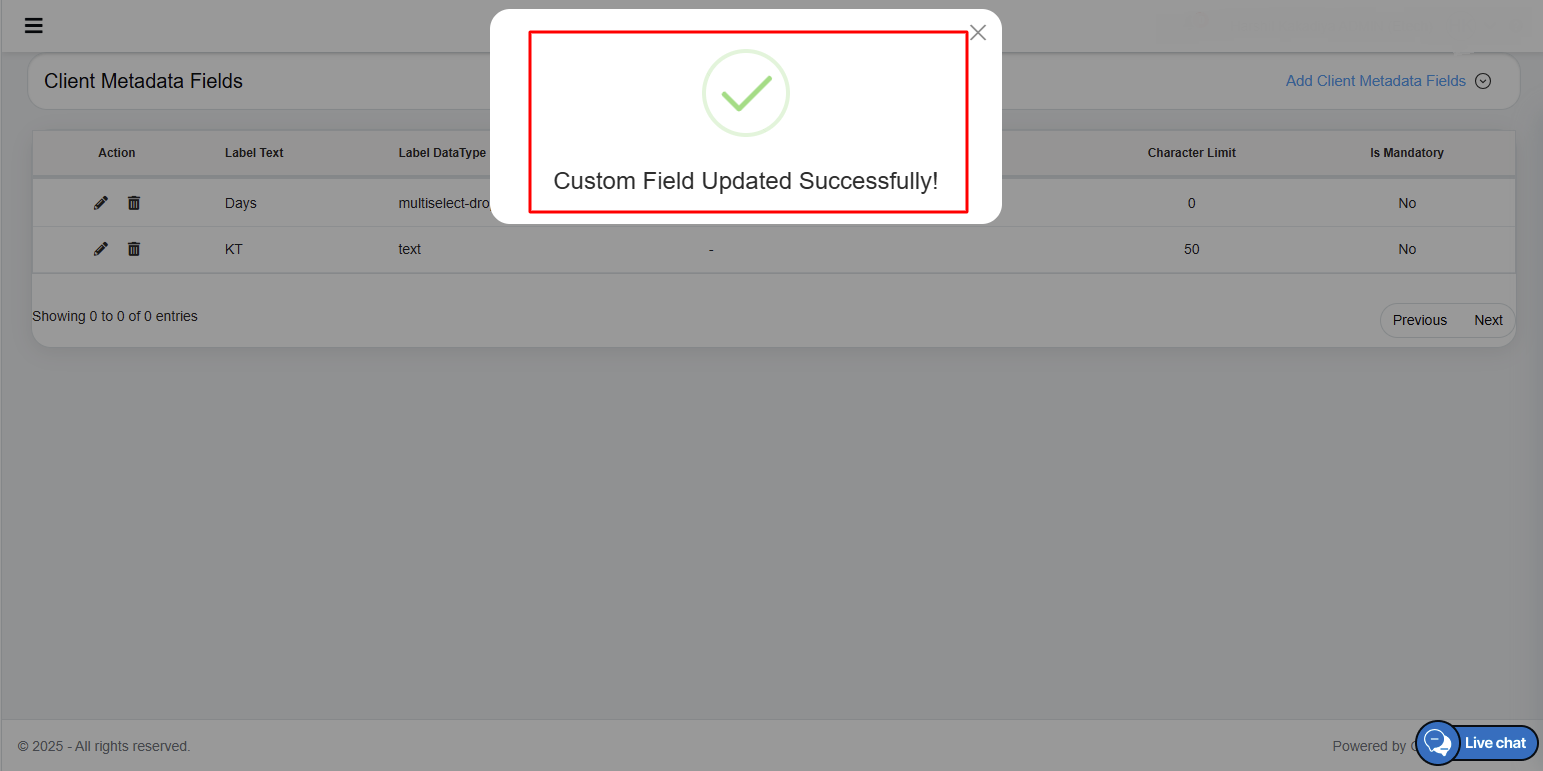
Acknowledgment Message
Delete Custom Fields
The user can delete the already entered custom fields by clicking on the Delete ![]() button displayed under the Action column.
button displayed under the Action column.
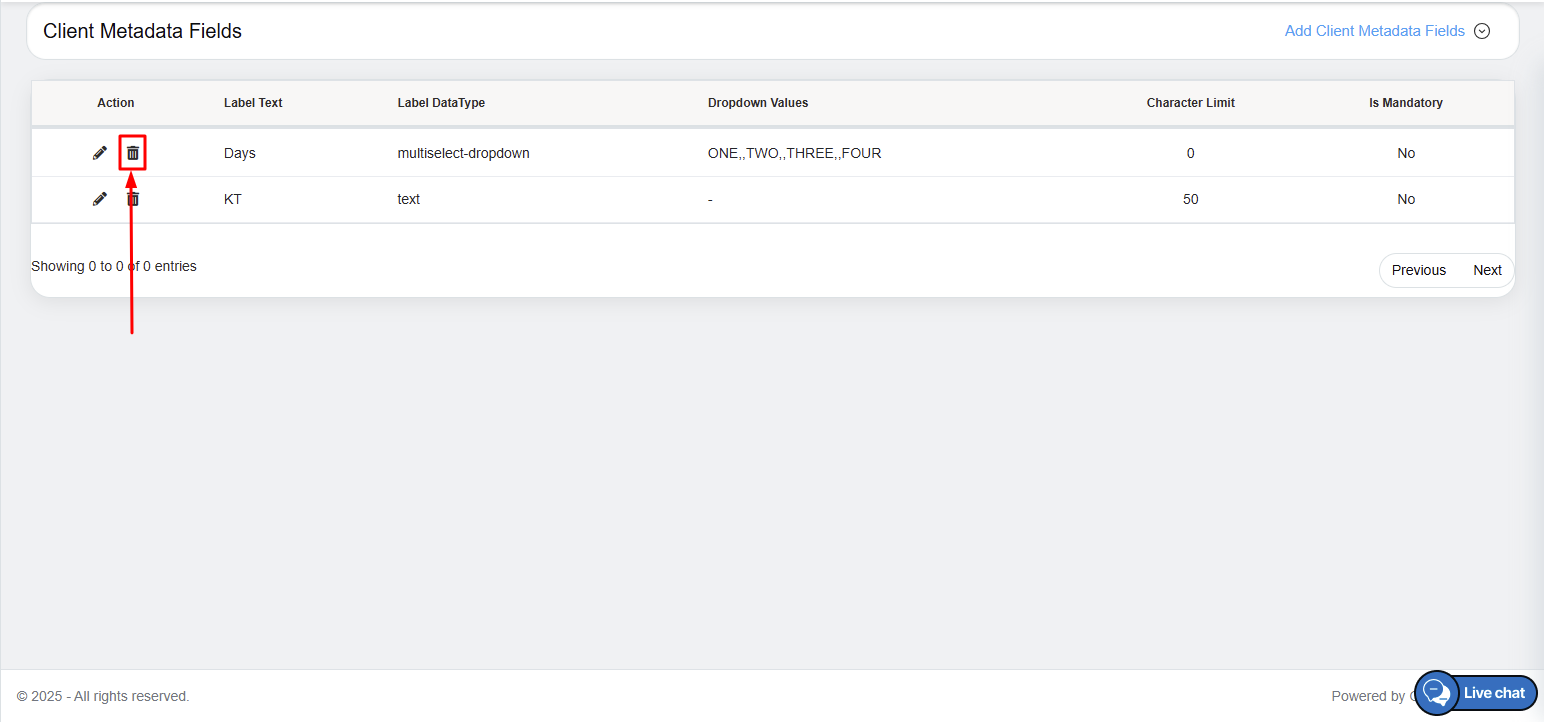
Delete Button
A confirmation message will be displayed on the screen. Click on the Yes option to delete the custom field or click on the No option to cancel the process.
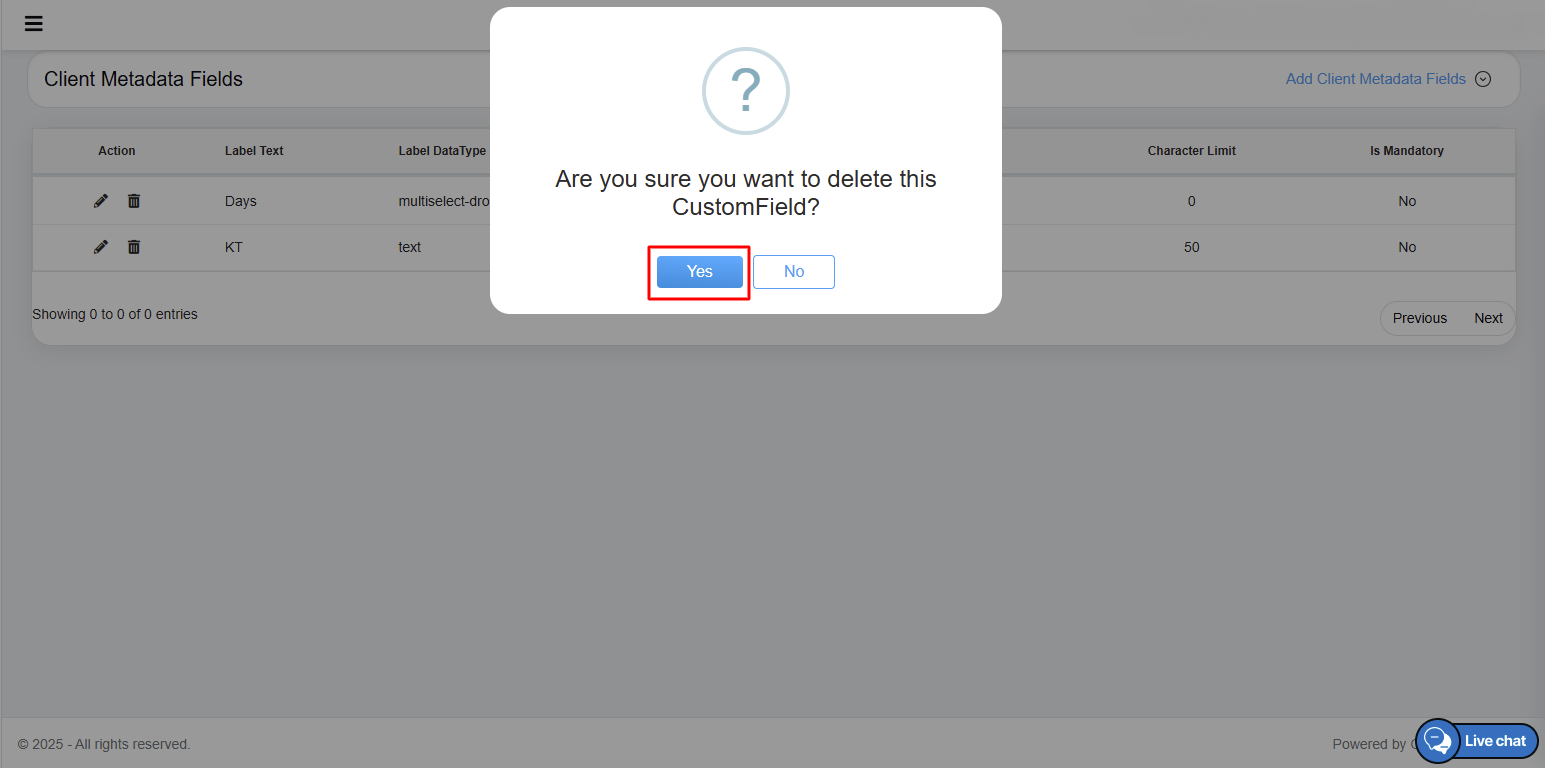
Confirmation Message to Delete the Fields
After clicking on the Yes button the selected custom fields will be deleted from the system.
Once all the necessary details are configured under User Details, Access Rights, and Custom Fields sections click on the Submit button to add the New User details in the QEval system or click on the Reset button to reset the configured fields.
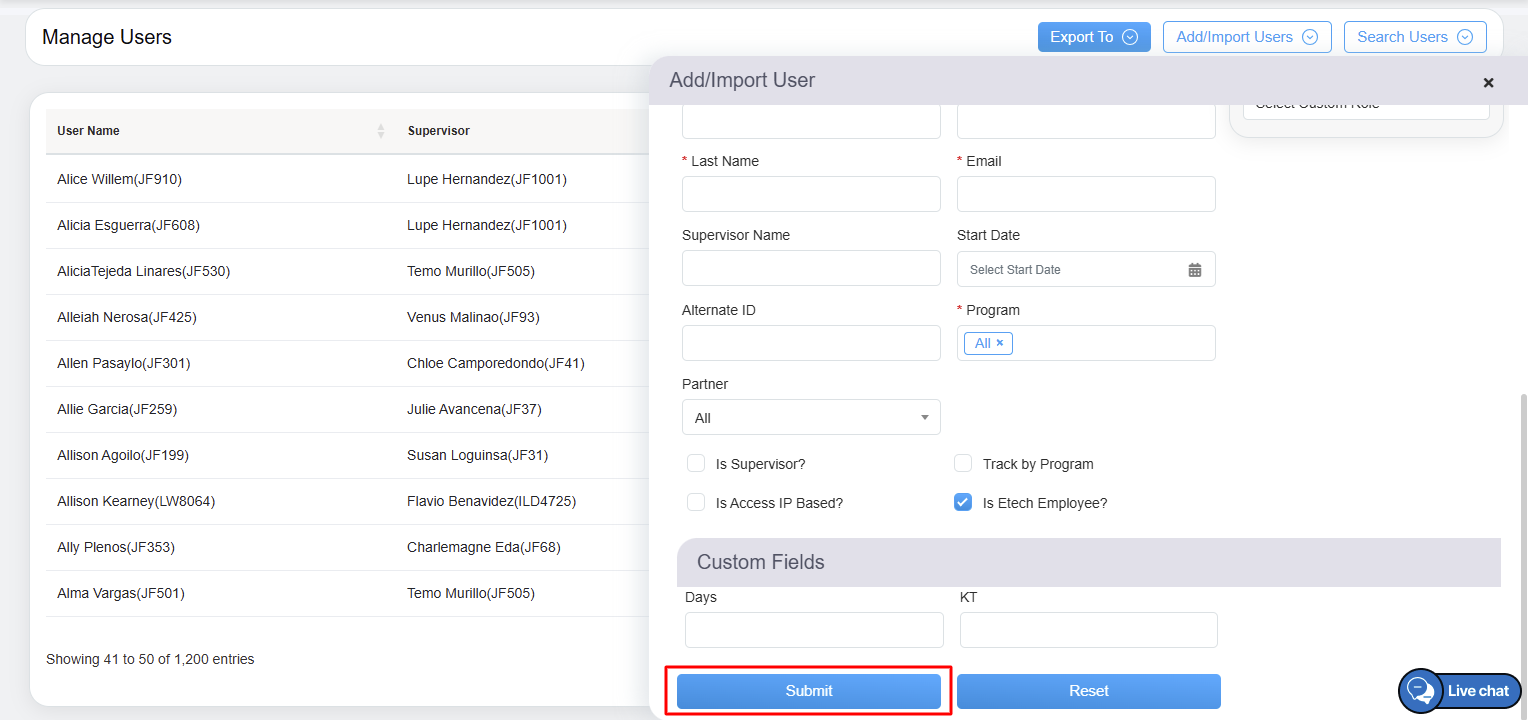
Submit Button to Add New User Details
Note: While submitting the details if any user details are already added in the QEval platform then the system will generate an error message.
After submitting the user details, an acknowledgment message will be displayed on the screen.
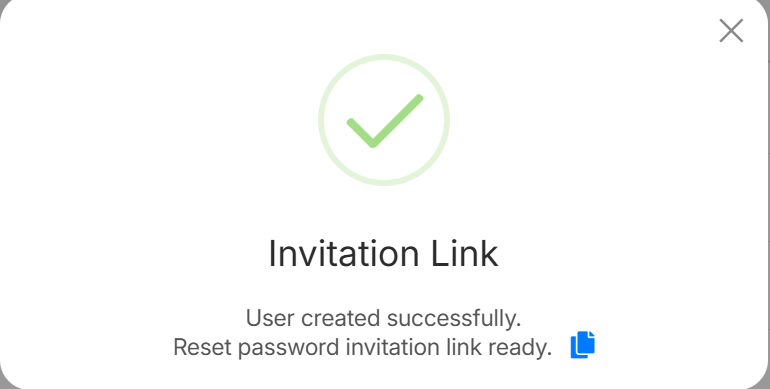
Acknowledgement Message
The logged-in user will be directed to the Manage Users page and the new user will be added to the QEval system and will be able to access the platform.
Newly Added User Details
The data elements displayed in the table grid are explained below:
| Table Elements | Description |
| User Name | Displays the username of the users added in the system. |
| Supervisor | Displays the supervisor’s name of the added user. |
| Location | Displays the name of the location of the added user. |
| Role | Displays the role assigned to the added user. |
| Alternate ID | Displays the alternate ID provided to the added user. |
| Action |
The Edit The Delete |
Import Users
The Import User feature allows the admin to import and add bulk users in the QEval system by downloading the import user template. As per the import user template, the admin can enter all the relevant details and import those users in the QEval System.
On the Manage Users page click on the Add/Import Users button. The Add/Import User window will be opened on the same and select the Import User tab displayed on the window as shown below:

Import User
Configure the mentioned below fields displayed on the Import Users tab:
- The Business Unit field is pre-selected and disabled by default. It represents the client’s name associated with the user.

Business Unit
Click on the Download Template button and the user will be able to download and save the import users template in .xlsx format in the local system.
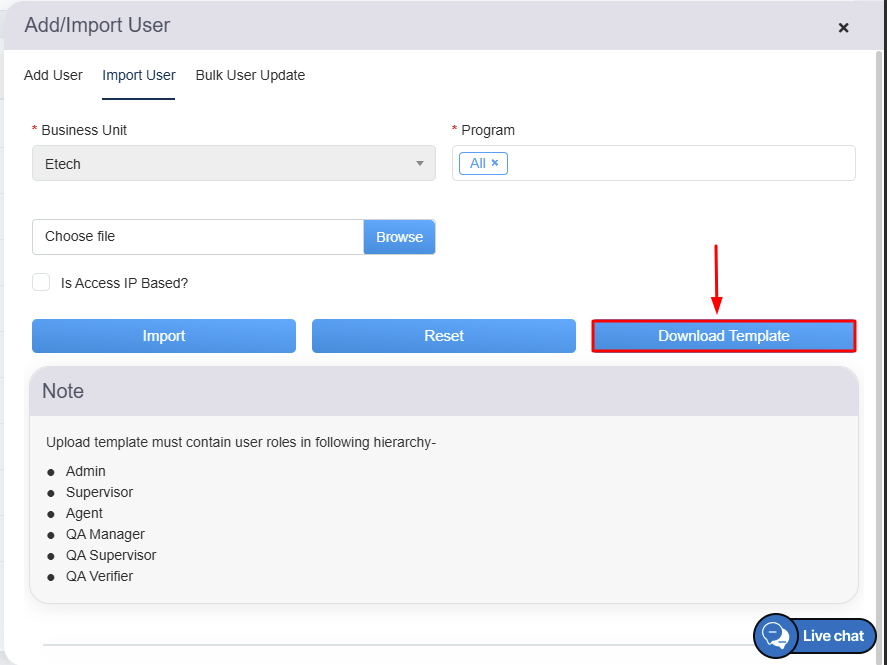
Download Template
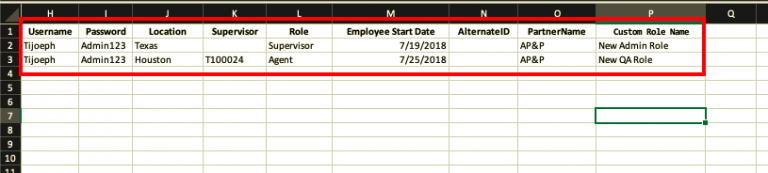
Once the file is downloaded it will have mentioned below fields:
-
-
- Username – Displays the assigned username for the employee.
- Password – Contains the system-generated password for login.
- Location – Specifies the designated work location of the employee.
- Supervisor – Indicates the assigned supervisor for the employee.
- Role – Defines the employee’s designated role within the organization.
- Employee Start Date – Reflects the date when the employee officially joined the organization.
- Alternate ID – Represents an additional identification number associated with the employee.
- Partner Name – Specifies the partner organization or entity associated with the employee, if applicable.
- Custom Role Name – Displays the custom role assigned to the employee, if different from standard roles.
-
Notes:
-
- Any field should not have any spacing before and/or after the entered value in the field.
- It is mandatory for the user to select the role from the drop-down menu only.
- The role of the new user should be added in Admin, Supervisor, Agent, QA Manager, QA Supervisor, and QA Verifier hierarchy only. (Refer to User Access Control to understand the access rights.)
- It is mandatory to save the file in .XLS or .XLSX or .CSV format only.
- Once all the details are entered in the excel sheet, to upload and import the users in the QEval system, click on the Browse button and choose the file from the local system. The file name and format will be displayed in the text-box.
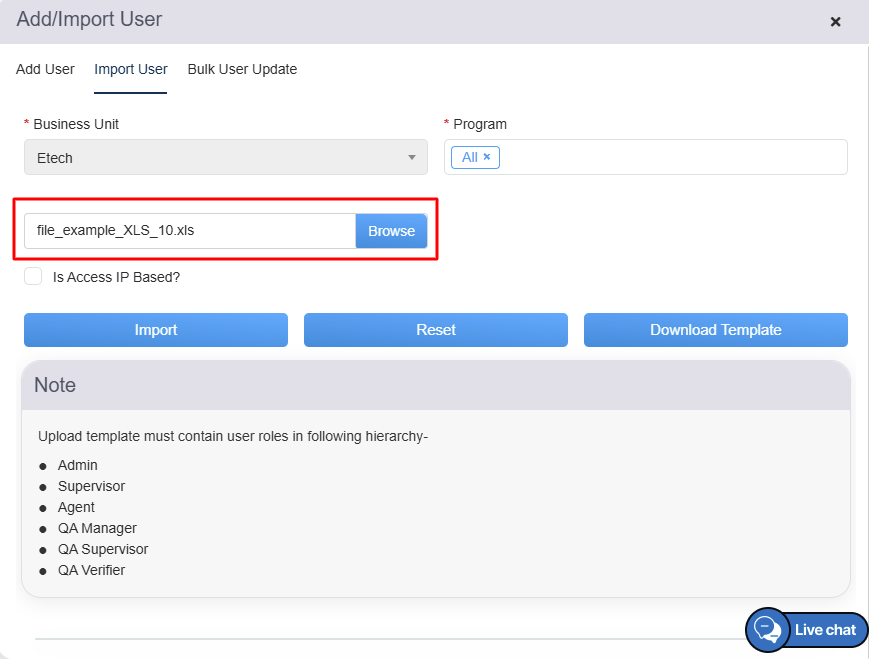
Browse file
- The Program drop-down menu displays the name of programs. Select one or multiple or all programs from the list. One can even search for specific program by entering the keywords in the Program field.
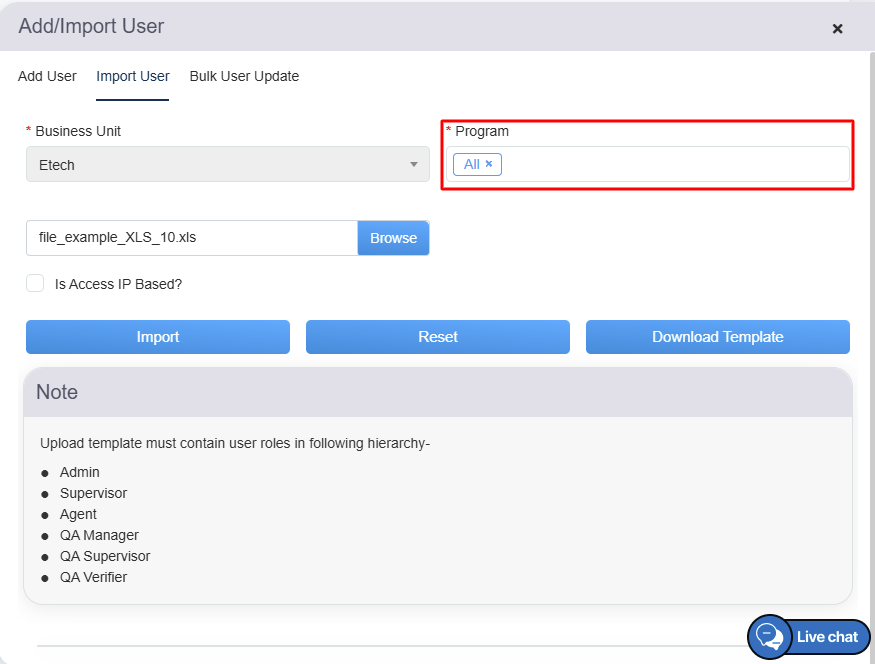
Program
Note: This allows the user to have access of selected programs only.
- Select the Is Access IP Based? checkbox to allow access to the users based on the IP Addresses.
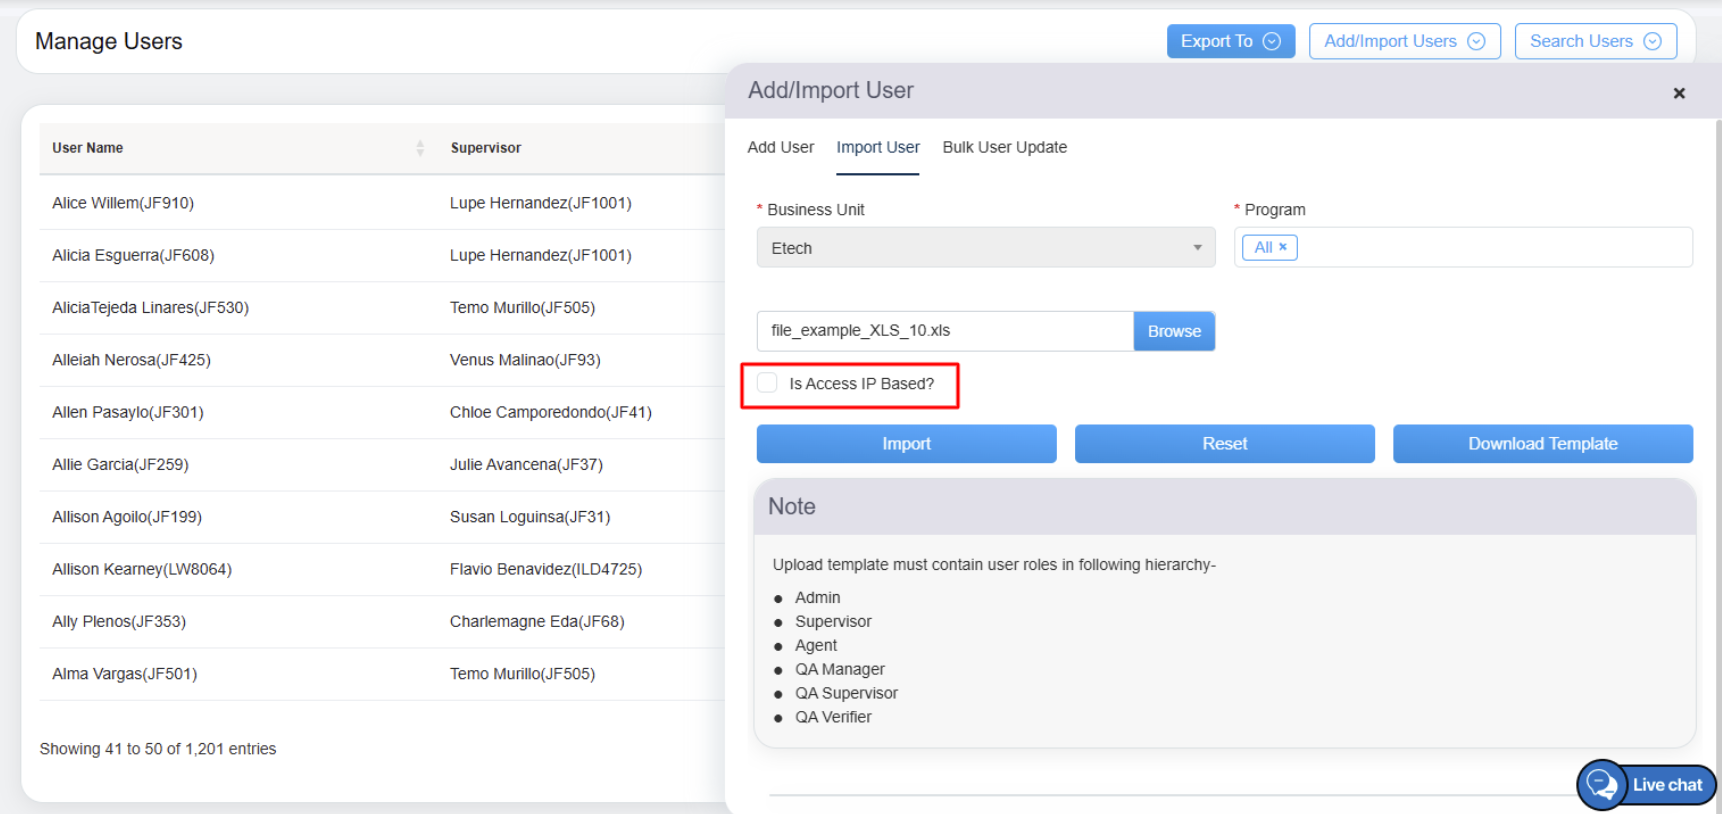
Is Access IP based checkbox
Note: Selecting this checkbox restricts the users from accessing QEval from any other IP Address.
Once the necessary fields are configured, click on the Import button to import and add new user to the QEval system or click on the Reset button to reset the configured fields.
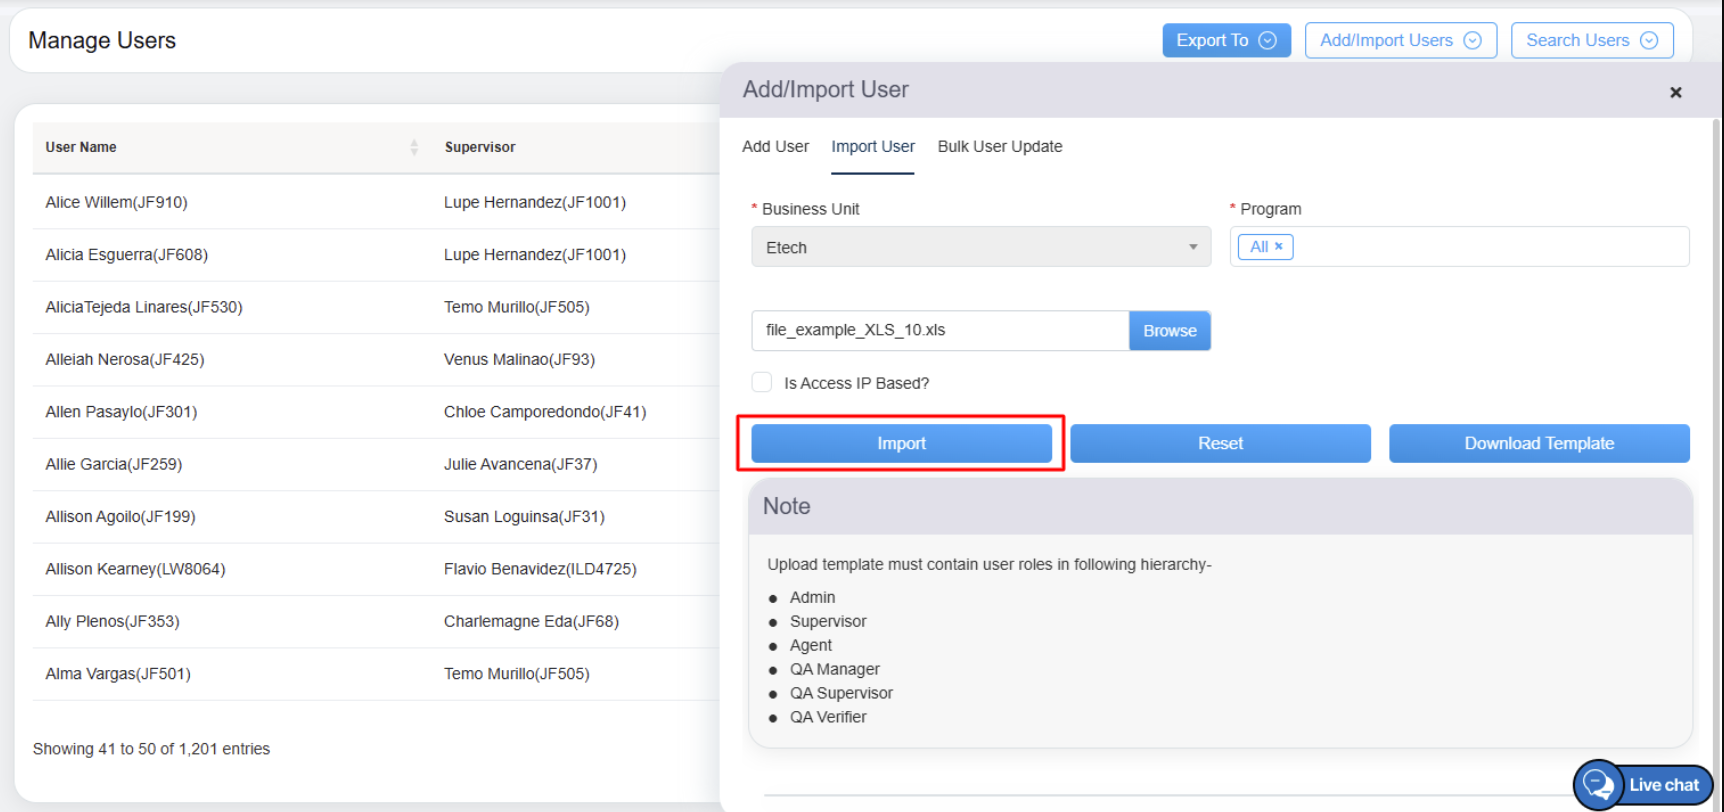
Import Button
If the file imported contains entries that are incorrect, then the system will generate an error message: “Excel file has been processed successfully. Please check below for incorrect records.”
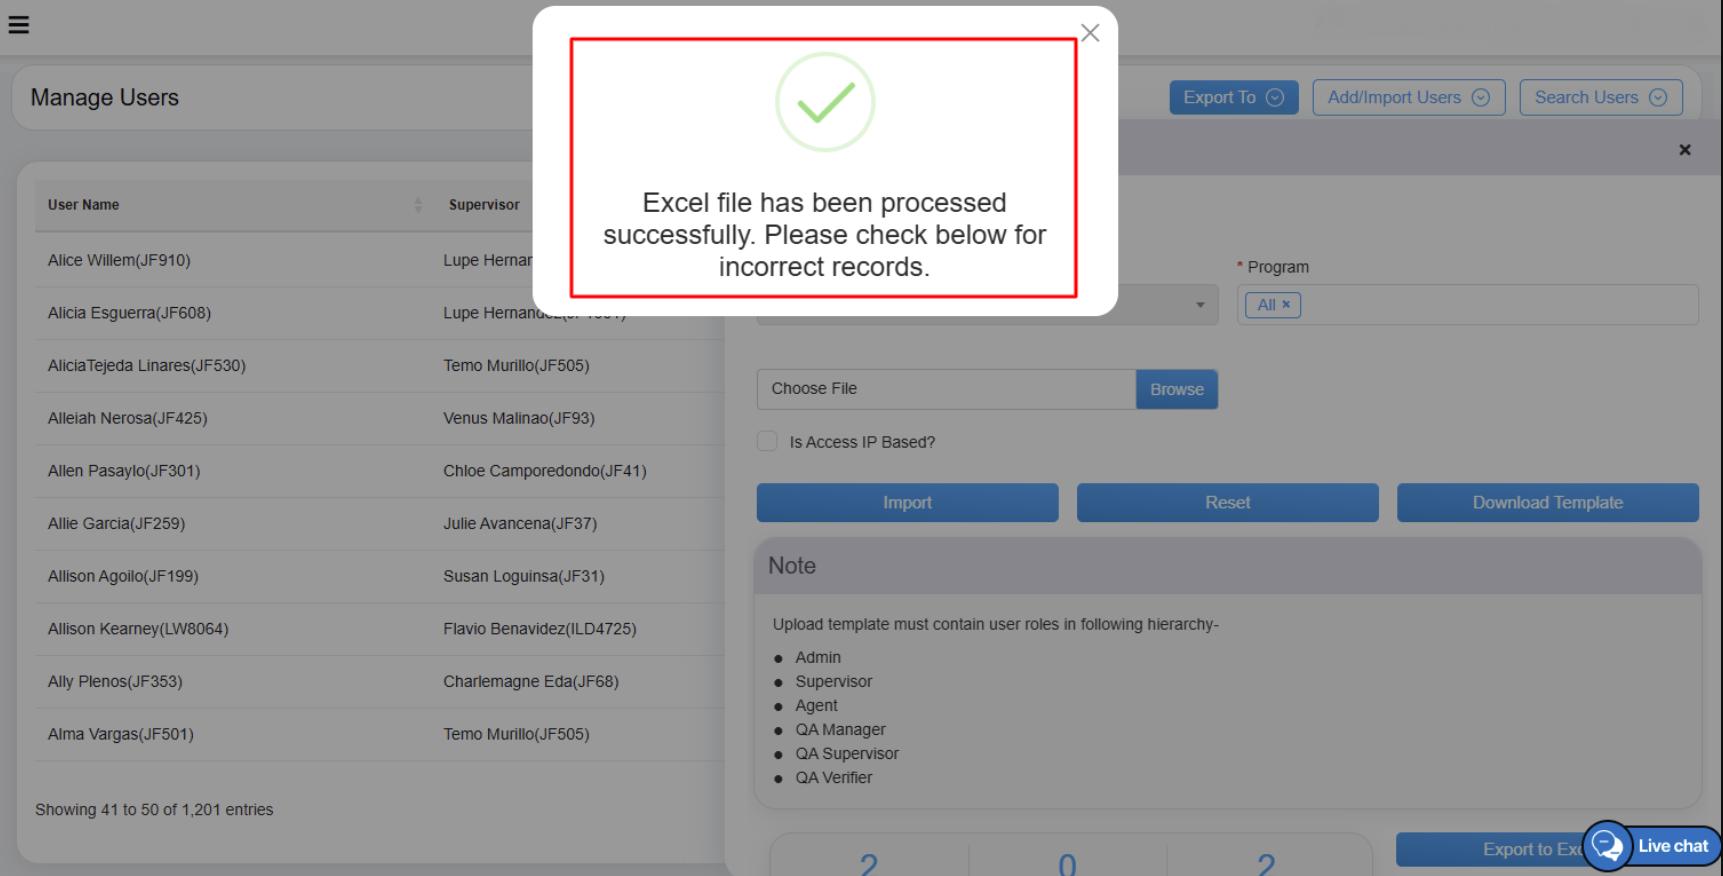
Error Message
Scroll down on the Import Users tab, the incorrect entries in the imported file will be displayed in the table grid.
- Total Records: Displays the sum of correct and incorrect records.
- Correct Records: Displays the number of correct records that are added in the system.
- Incorrect Records: Displays the number of incorrect records that are not added in the system.
The logged-in user can update the file accordingly and import it again to add all the users. The imported file can also be exported and downloaded to the local system by clicking on the Export to Excel button.
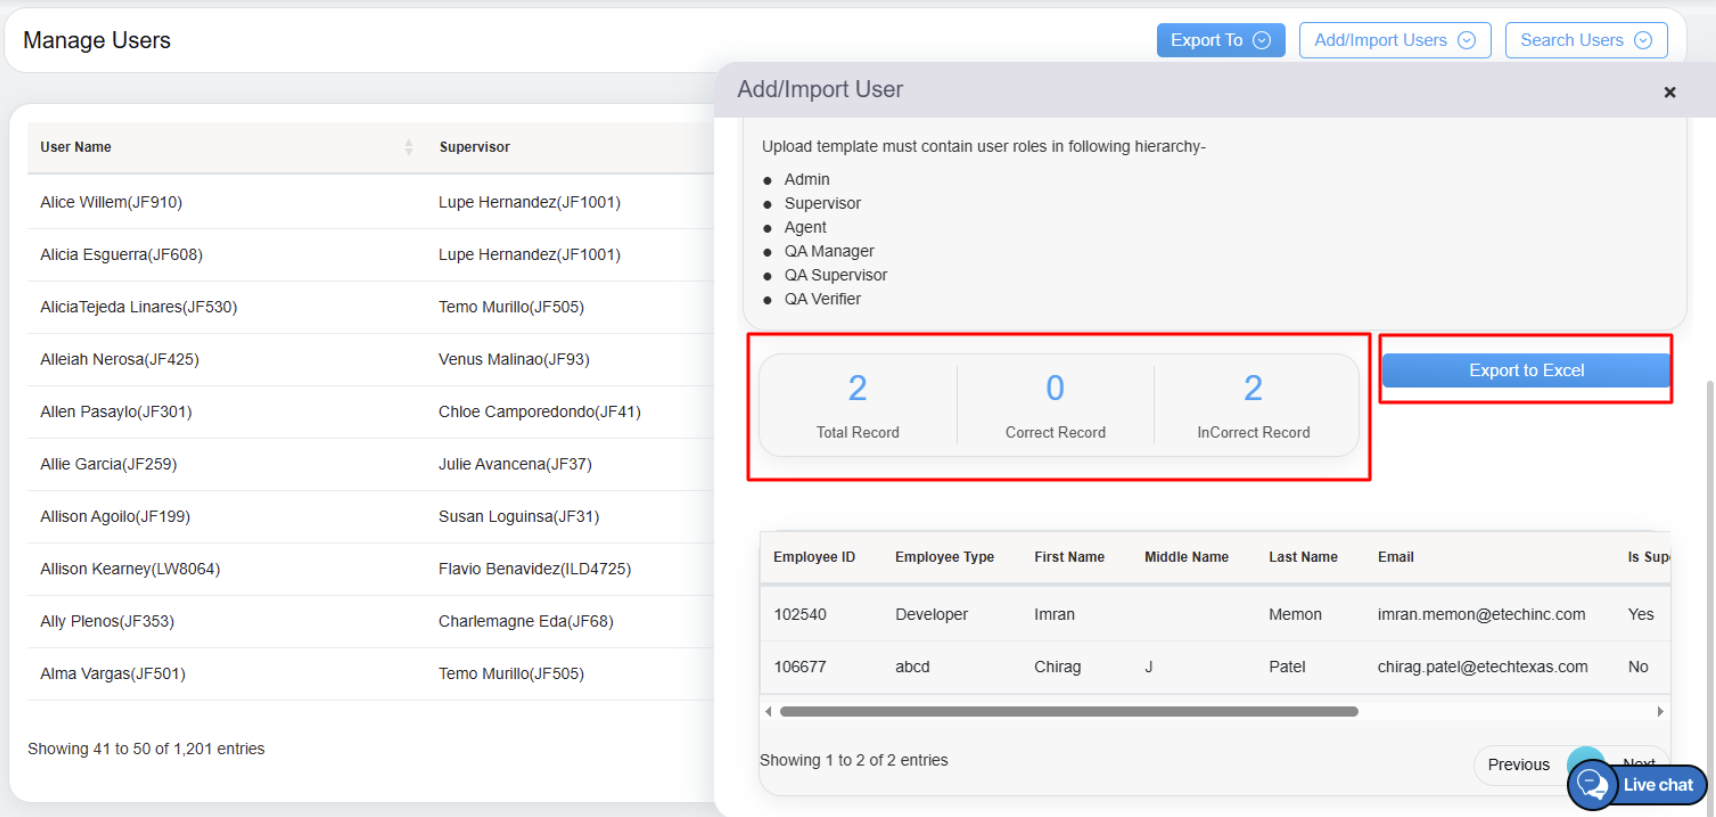
Record Details and Export to Excel
Once the necessary details are configured correctly, an acknowledgment message will be displayed on the screen.
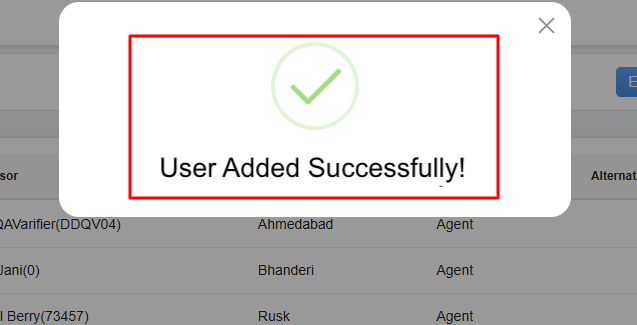
Acknowledgement Message
The user will be directed to the Manage Users page and the imported user details will be added in the QEval system and will be displayed in the table grid.
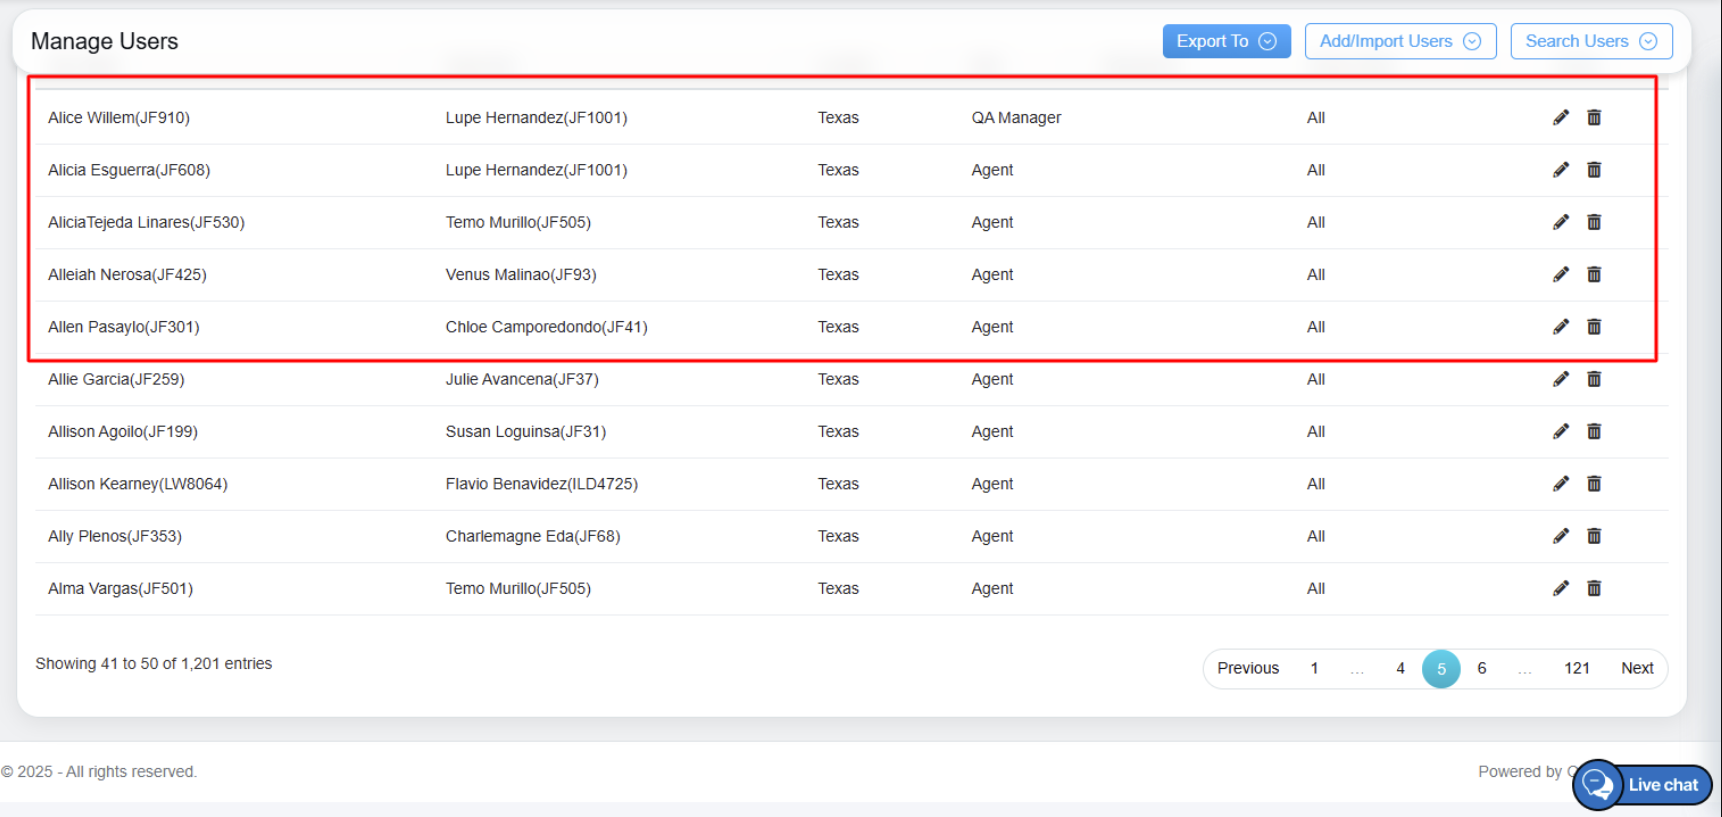
New User Added
The data elements displayed in the table grid are explained below:
| Table Elements | Description |
| User Name | Displays the username of the users added in the system. |
| Supervisor | Displays the supervisor’s name of the added user. |
| Location | Displays the name of the location of the added user. |
| Role | Displays the role assigned to the added user. |
| Alternate ID | Displays the alternate ID provided to the added user. |
| Action |
The Edit The Delete |
Bulk User Update
The Bulk User Update feature enables logged-in users to efficiently manage user data by providing options to download a template with specific filters or import files directly from their system for bulk updates.
Note:
When uploading a template, ensure that the user roles are structured in the following hierarchy to maintain system integrity. This hierarchy ensures proper role-based access and system functionality:
- Admin
- Supervisor
- Agent
- QA Manager
- QA Supervisor
- QA Verifier
To access this functionality, click on the Bulk User Updates button displayed on the Add/Import user page as highlighted in the screen below-
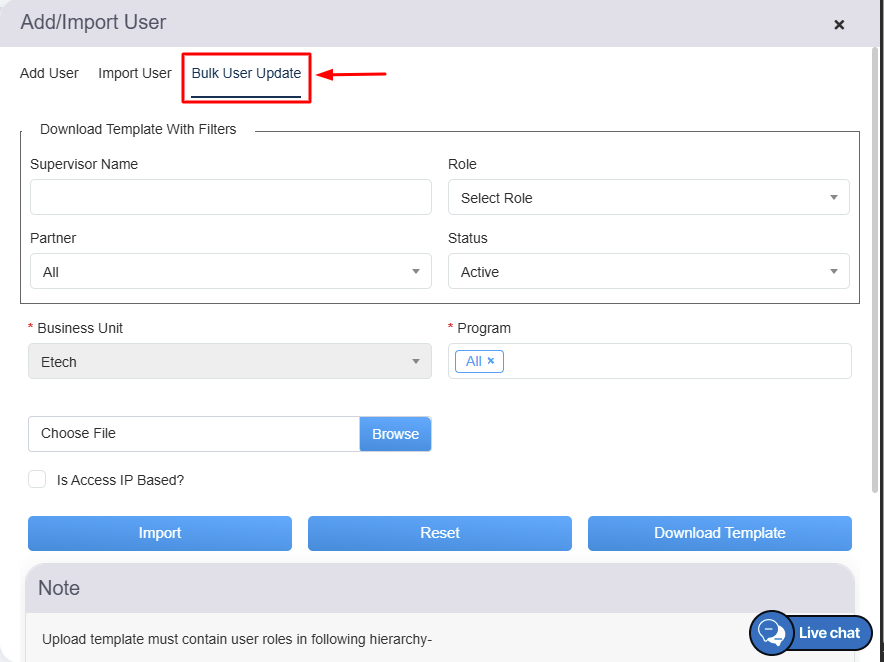
Bulk User Update
Download Template with Filters
The Download Template with Filters feature provides various filter options, enabling users to download templates based on specific criteria.
Available Filters:
- Supervisor Name: Enter the initials of the supervisor’s name to trigger the search option or manually input the full name in the text box.
- Role: Choose the desired role from the drop-down menu.
- Partner: Select the relevant partner name for which the template should be downloaded.
- Status: Filter by selecting either Active or Inactive status.
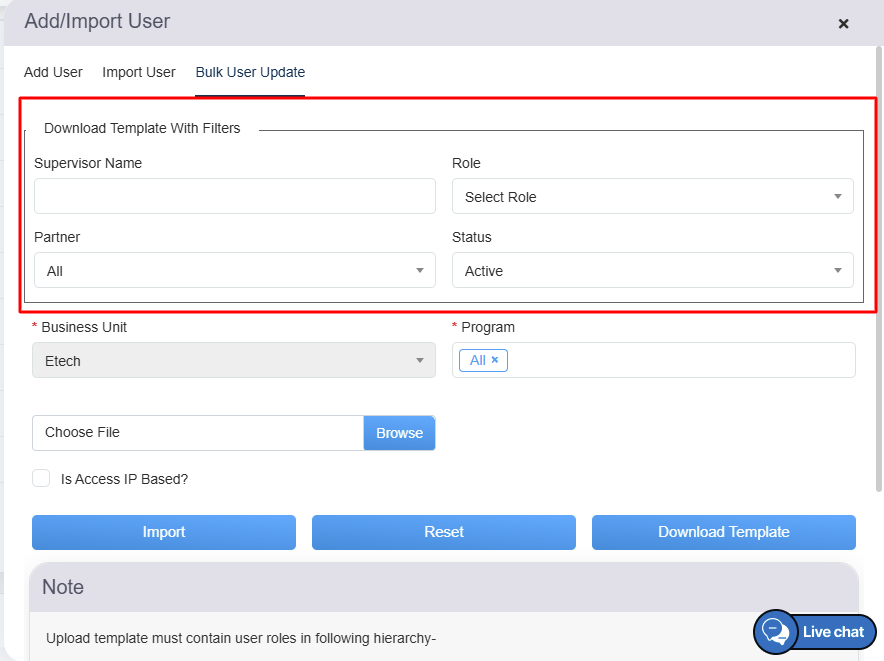
Bulk user update details
Once the required filters are set, click on the Download Template button, to download the specific template into the system, as highlighted in the screen below-

Download template button
To seamlessly import details from your local system and integrate them into the application, ensure the following fields are accurately filled:
- Business Unit: The designated business unit name will be auto-displayed by default, ensuring consistency across records.
- Program: Select the appropriate program from the available options.
- Choose File: Click the Browse button to upload the required document. Ensure the file format adheres to system specifications to facilitate a smooth upload process.
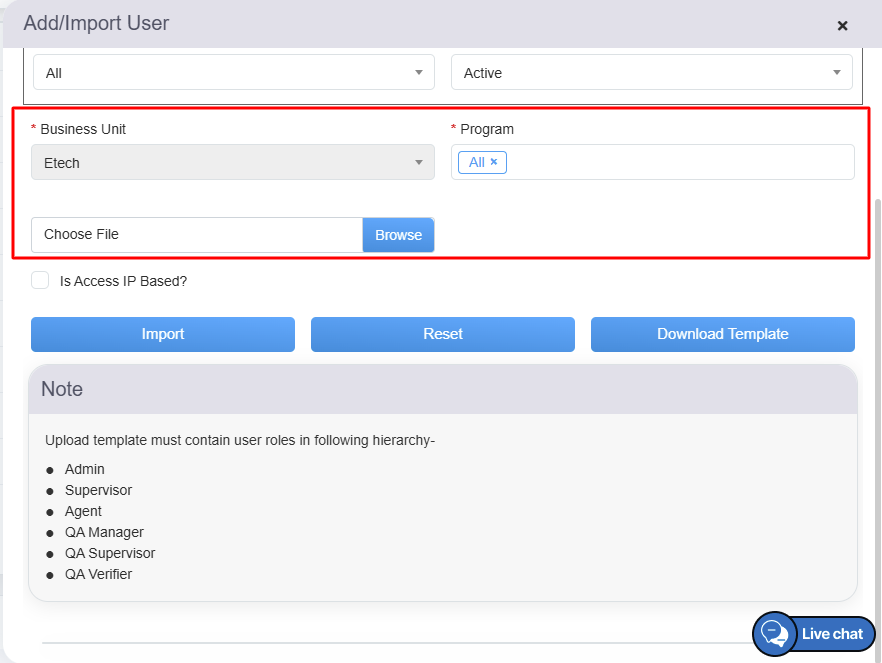
Add/Import User tab
Note: This feature enhances data management efficiency by allowing bulk imports directly into the system, reducing manual entry efforts.
Enable the “Is Access IP Based?” checkbox to restrict user access based on designated IP addresses. If IP-based access is not required, leave the checkbox unchecked.
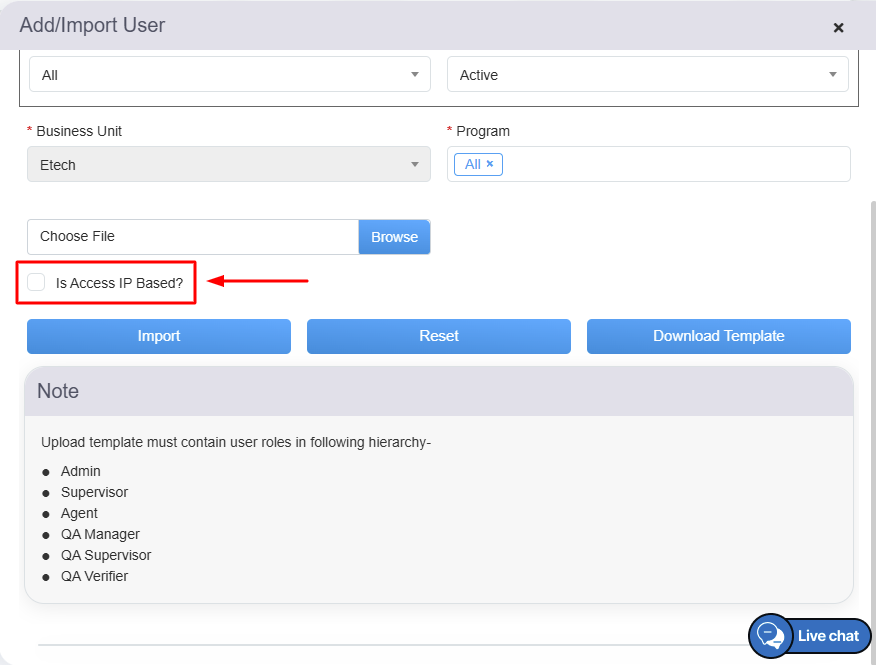
Add/Import user tab
Note: Selecting this checkbox restricts the users from accessing QEval from any other IP Address.
- Once the file is downloaded it will have mentioned below fields:

-
-
- First Name – The first name of the employee.
- Middle Name – The middle name of the employee (if applicable).
- Last Name – The last name of the employee.
- Email – The official email address of the employee.
- Is Supervisor – Indicates whether the employee is a supervisor (Yes/No).
- Location – The designated work location of the employee.
- Supervisor – The Employee ID of the assigned supervisor.
- Role – The designated role of the employee within the organization.
- Employee Start Date – The date on which the employee joined the organization.
- Alternate ID – An alternative identification number assigned to the employee.
- Partner Name – The name of the associated partner, if applicable.
- Is Etech Employee – Specifies whether the employee is part of Etech (Yes/No).
- Custom Role Name – A specialized role name assigned to the employee, if applicable.
-
After configuring all the necessary filters, click on the Import button to upload the selected data into the system. This functionality facilitates bulk data entry, ensuring seamless integration and efficient document management.
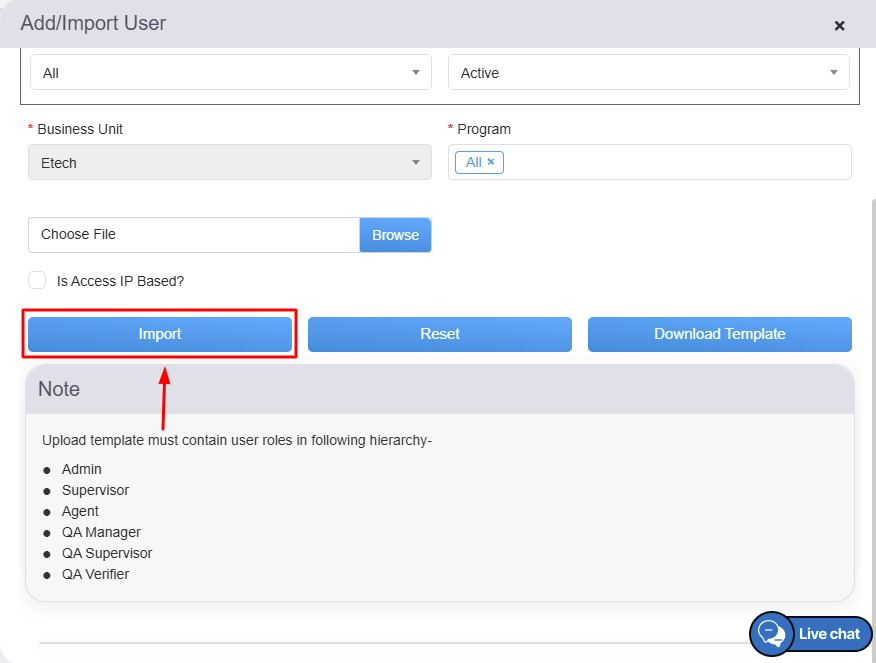
Import button
Note: Click the Reset button to clear all selected filters and restore default settings. This ensures users can quickly modify search criteria without manually deselecting previous inputs, improving usability and efficiency.
Search Users
The Search Users functionality allows the logged-in user to search the details of specific user added in the QEval database by configuring the search filters. The authorized user can also search the details of specific user based on the role, username, email address, supervisor name, or status.
To access this functionality, click on the Search Users button displayed on the Manage Users page.
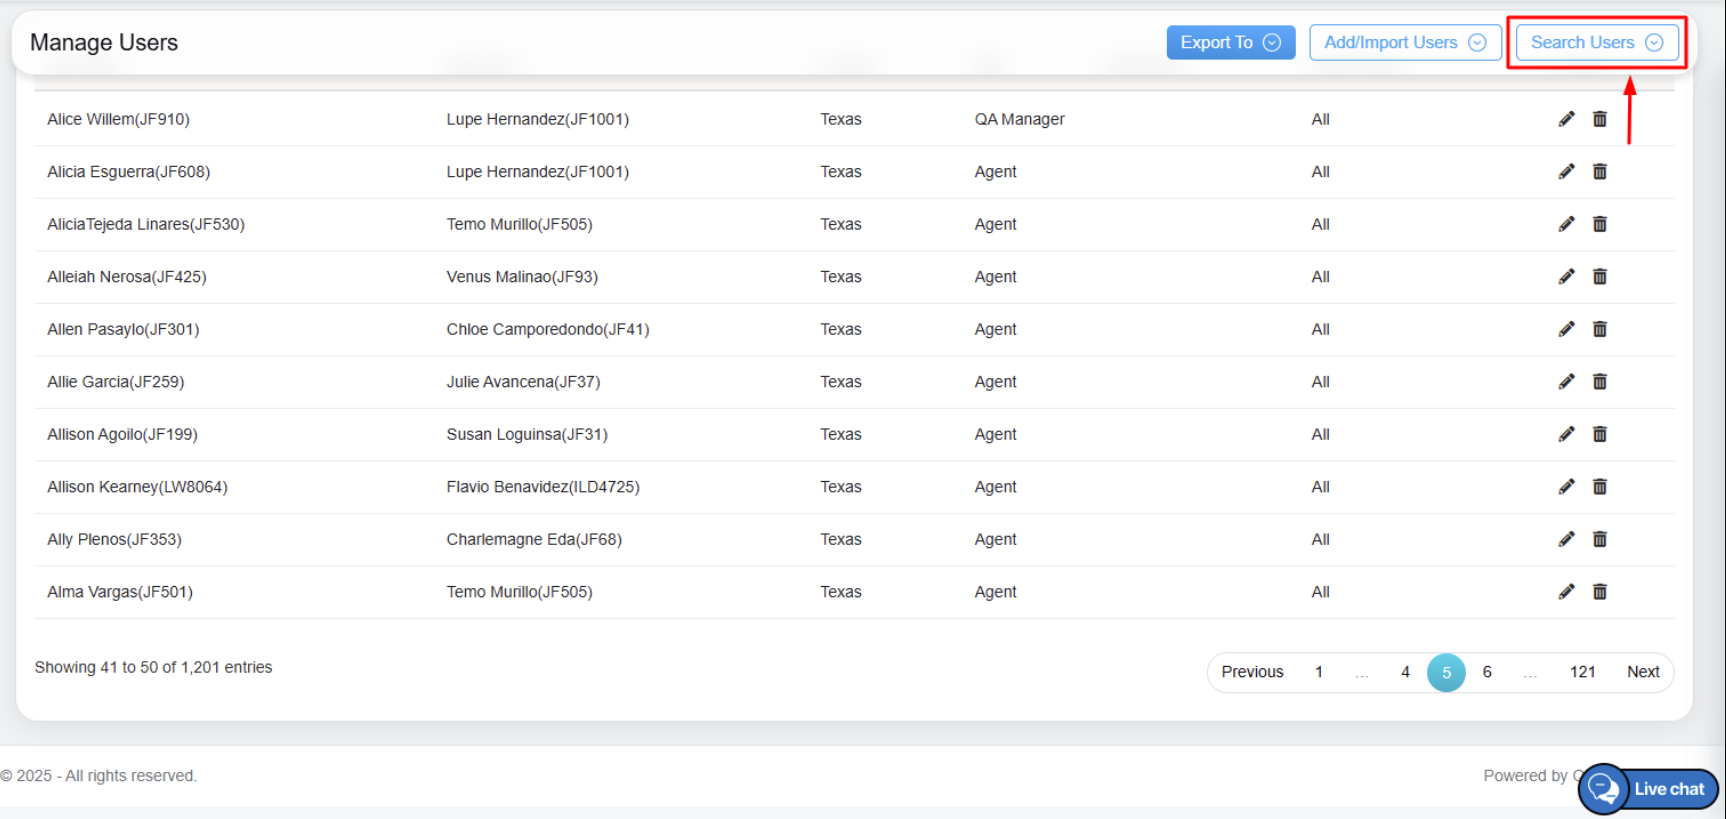
Search Users
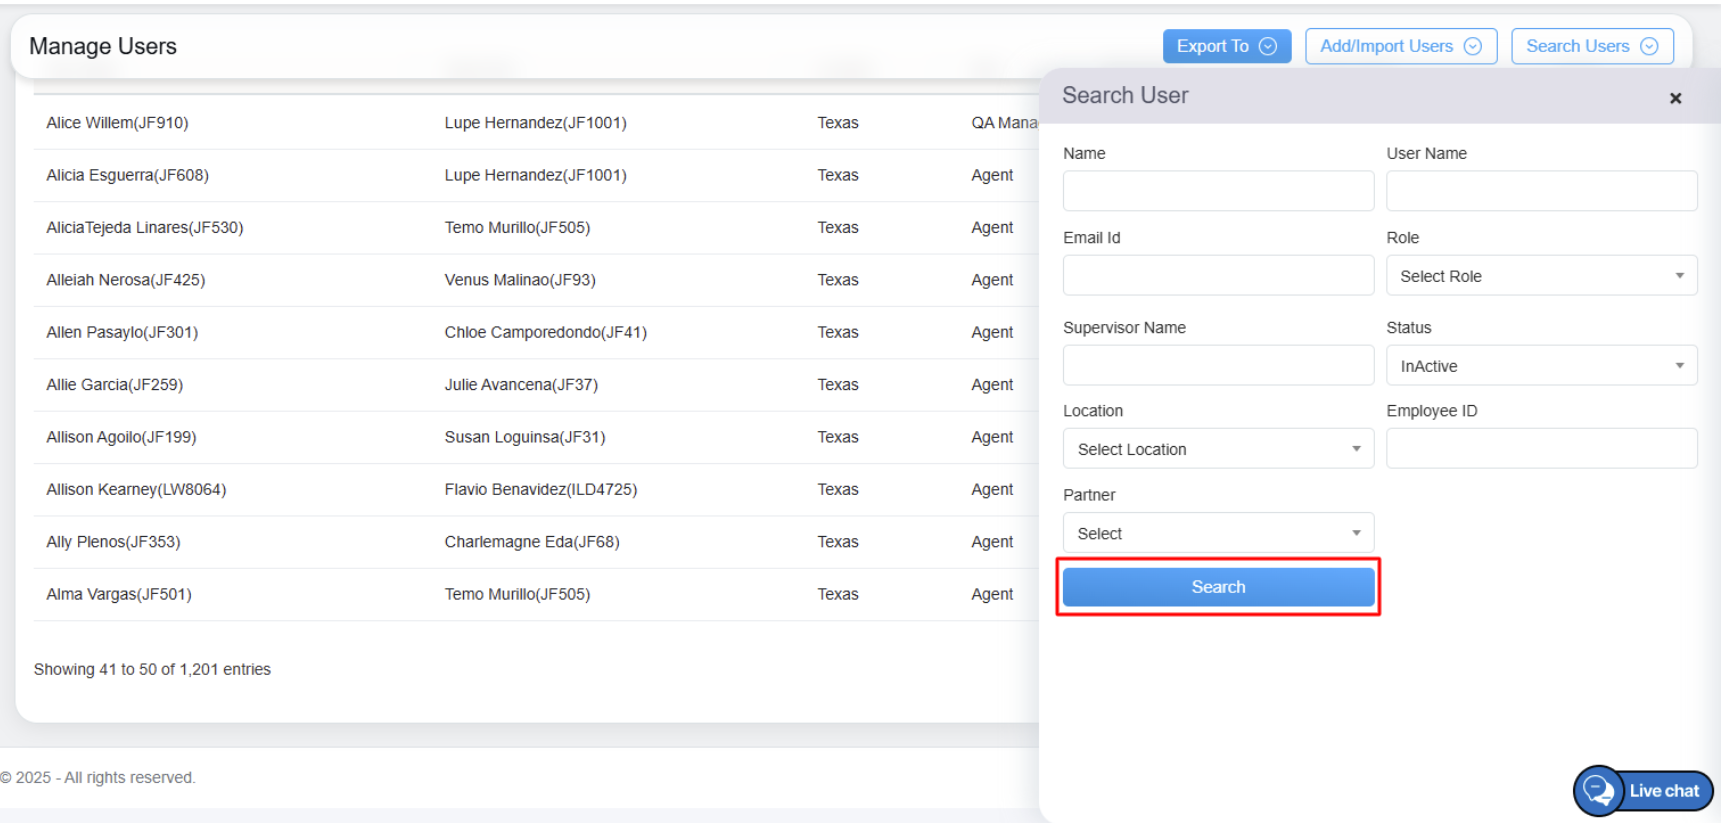
The Search User window will be opened on the same page. Here the logged-in user will be able to set the search criteria to search the details of added users.
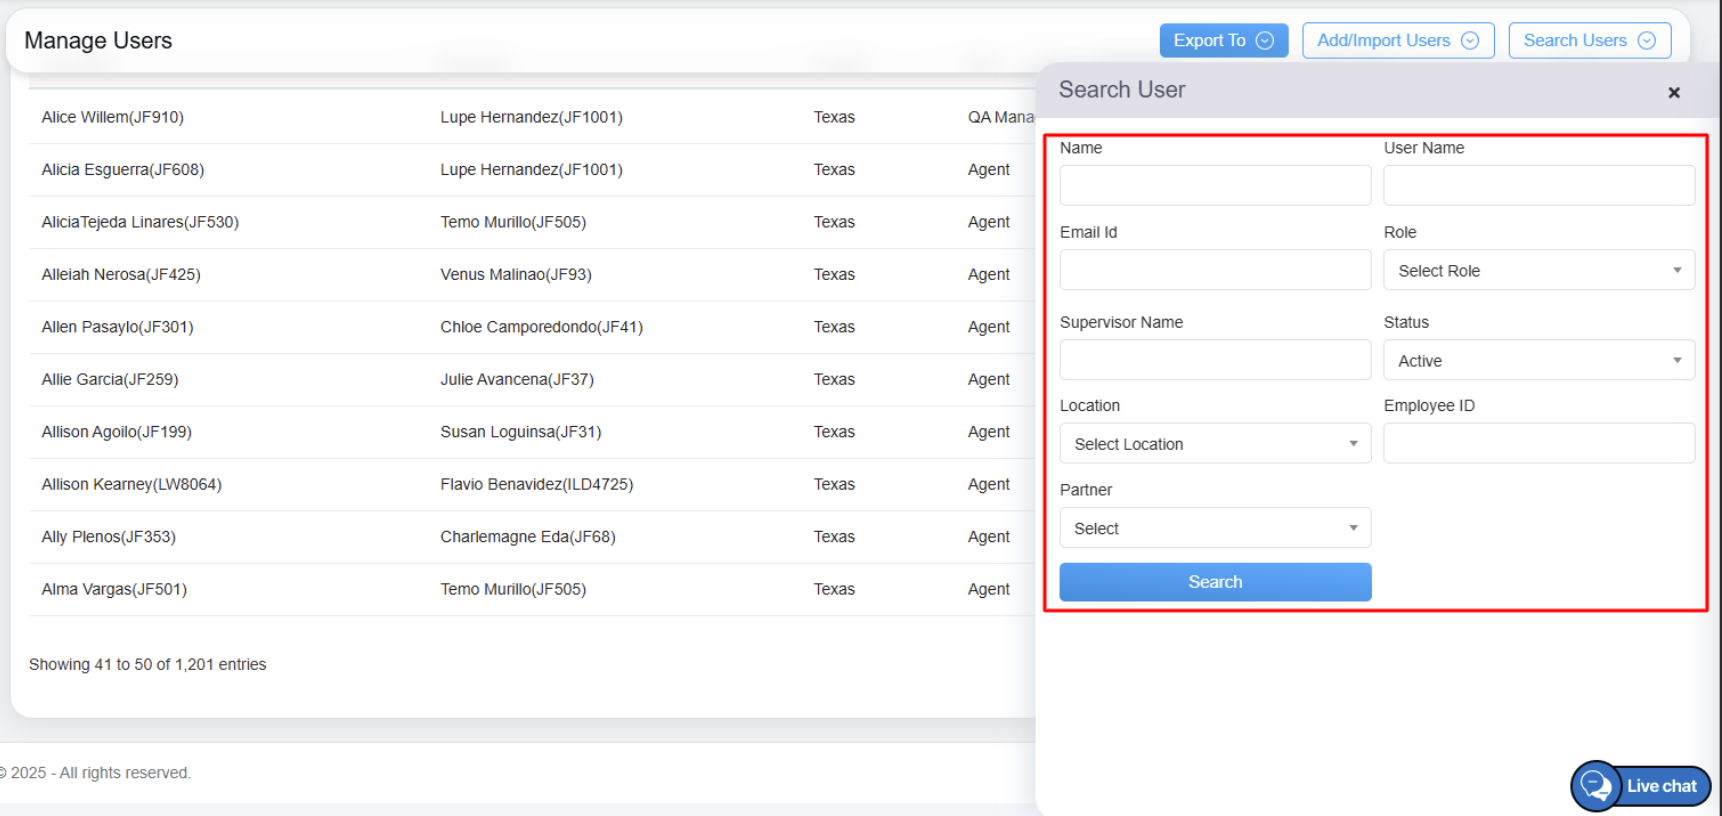
Search User Details
The specific user details can be searched based on the selected criteria or a combination of any selected criteria by following mentioned below steps:
- By entering the name of the user in the textbox, a list of added users matching the keyword will be displayed under the Name field. Select the name from the list to search the details of selected name.
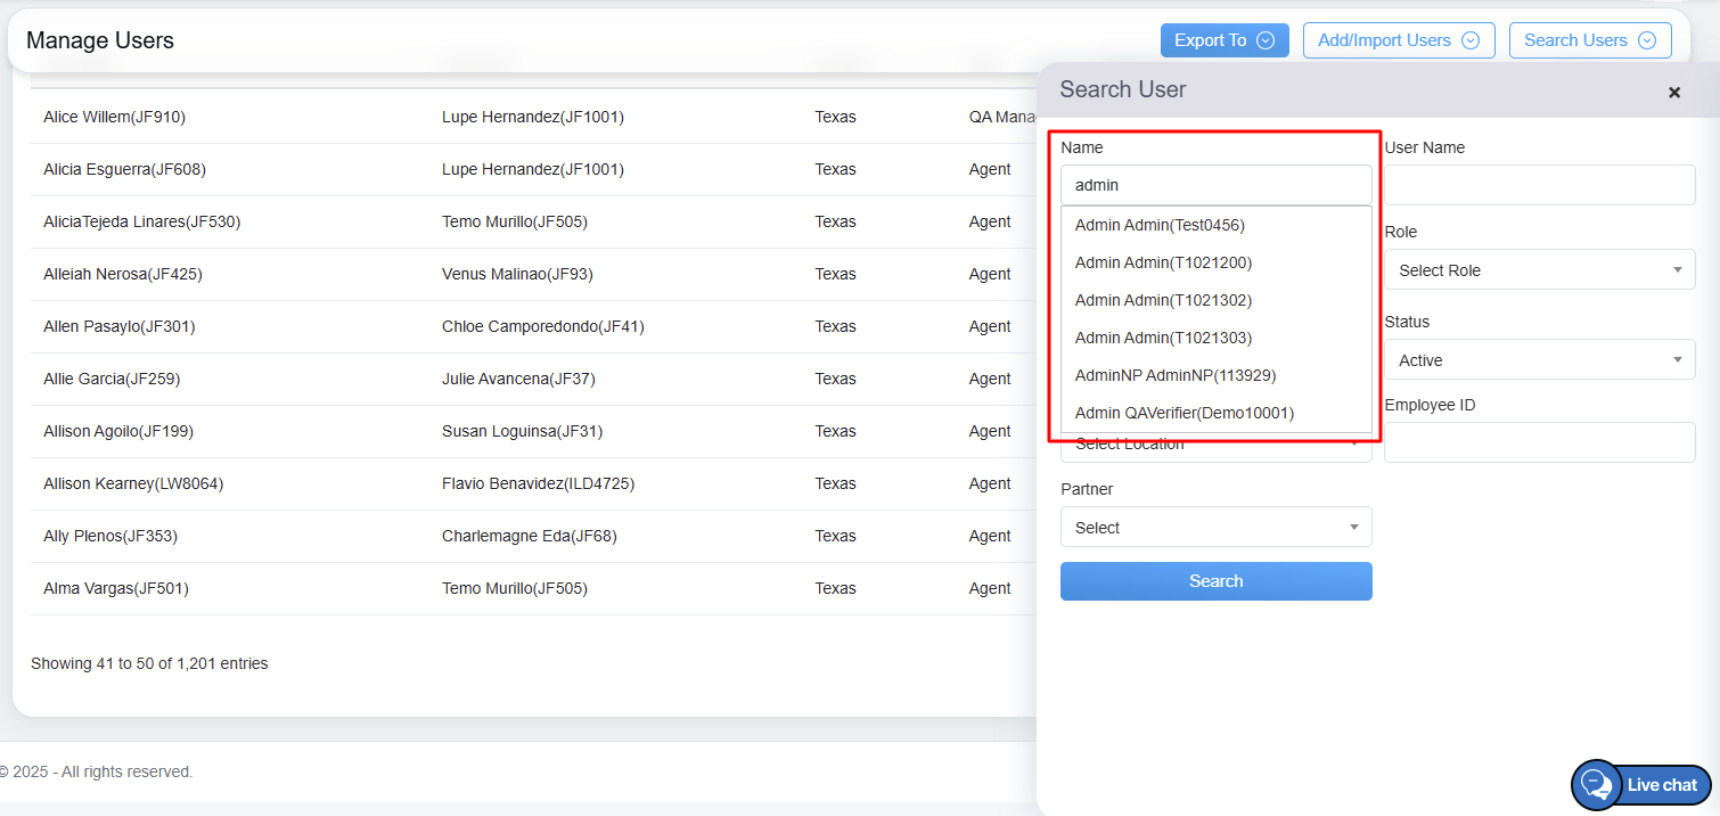
Name Textbox
- Enter the already created unique username in the User Name text-box to search the user details based on username.
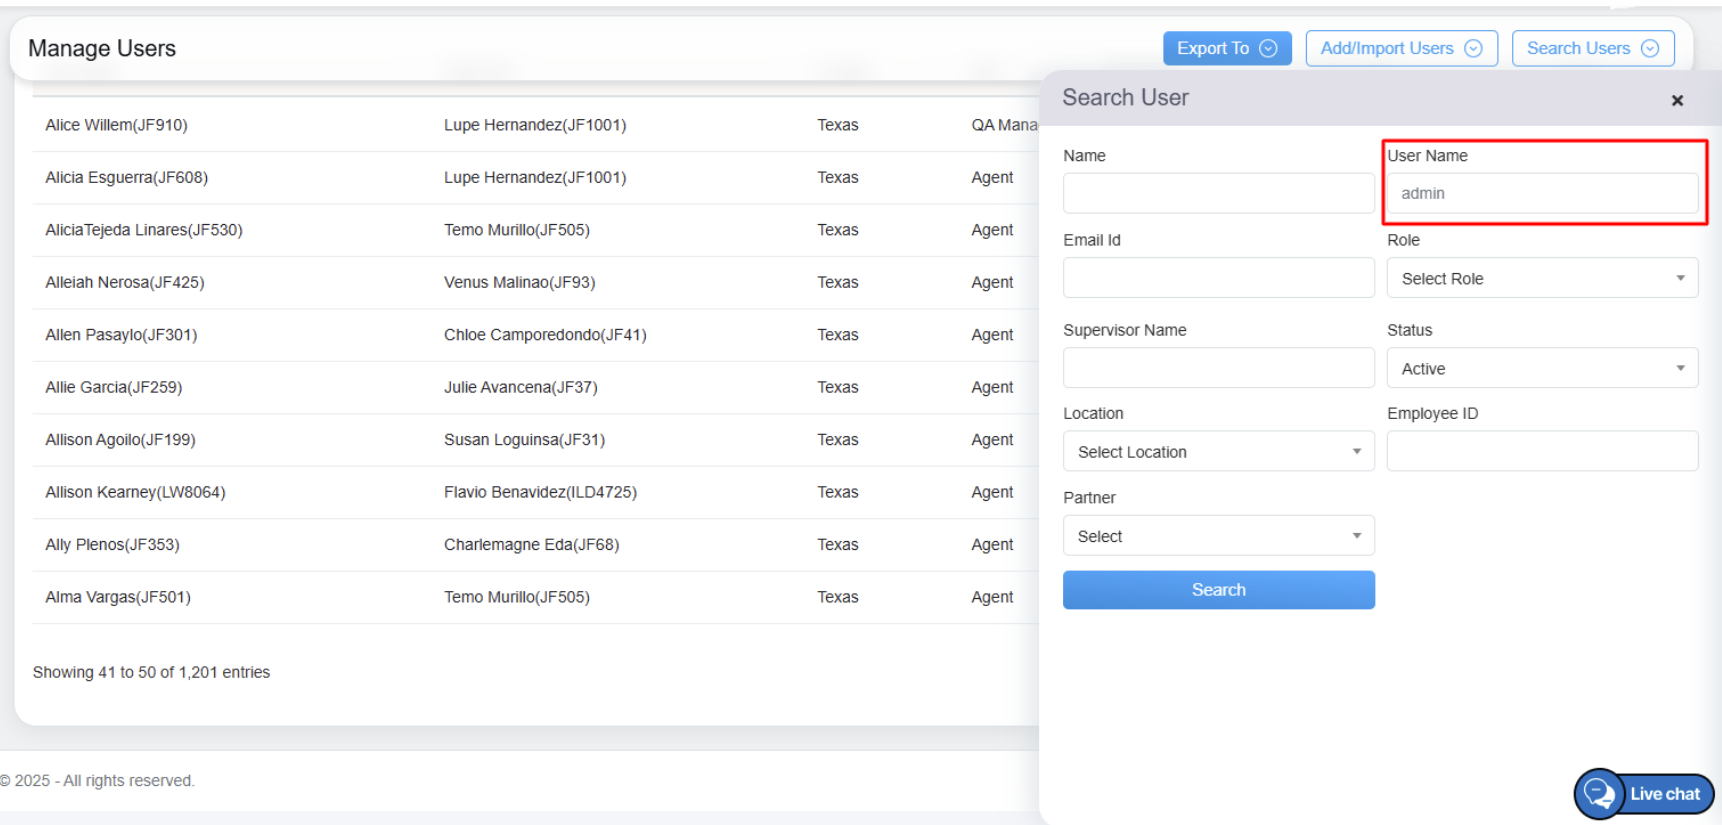
Username Textbox
- Enter the specific email address in the text-box displayed under Email ID field.
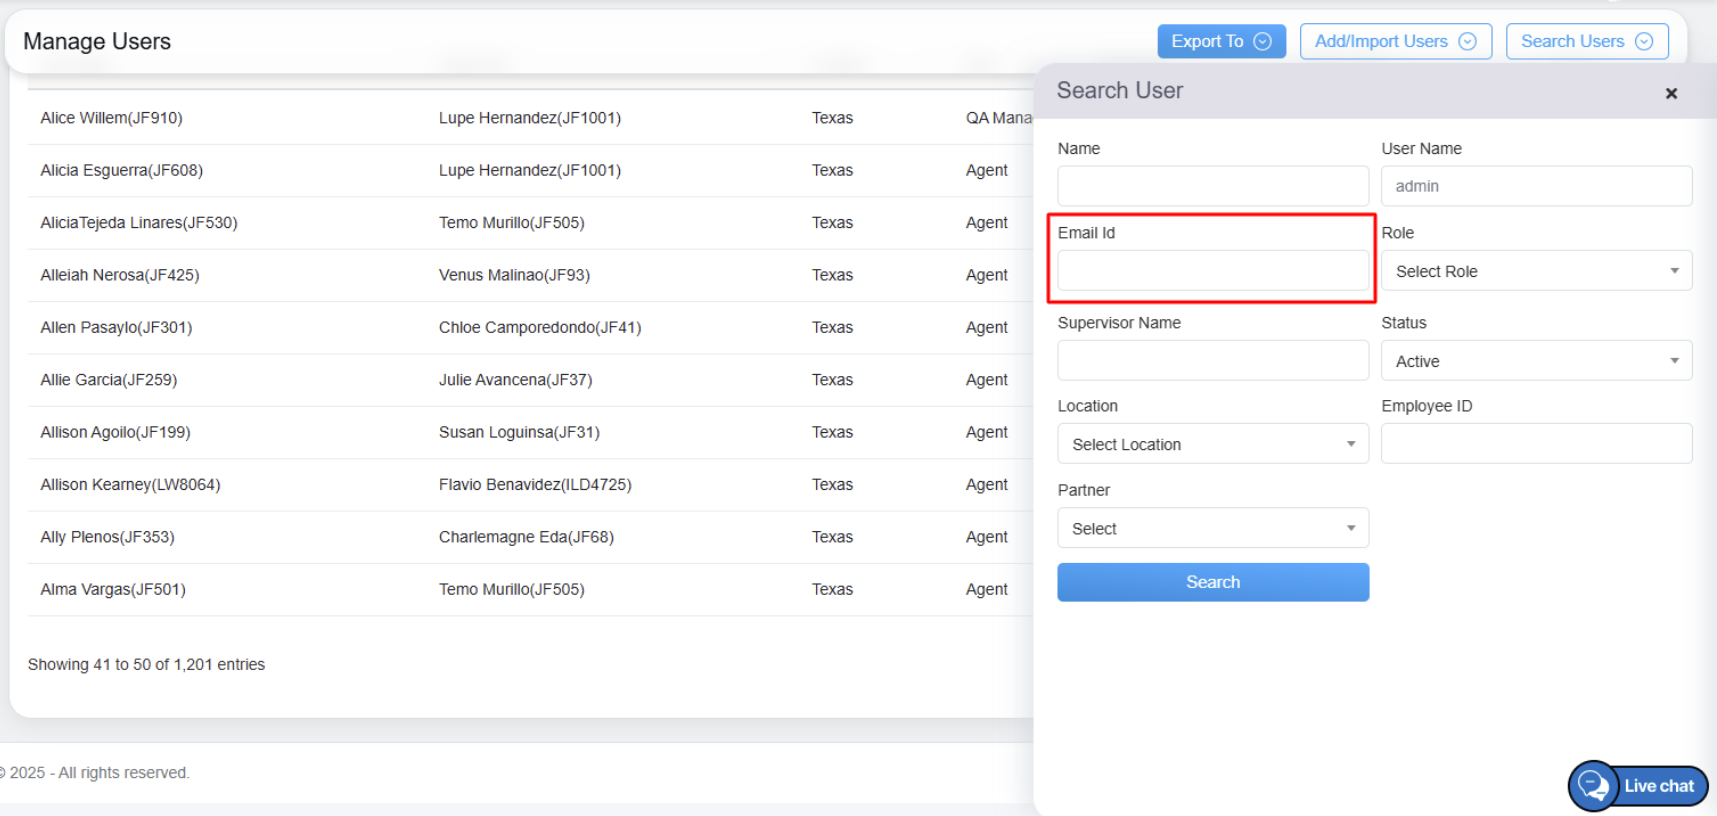
Email Id Textbox
- To search the user details based on assigned role, select the specific role from the Role drop-down menu. One can even search the user role by entering keywords in the Search Bar text-box displayed under the field.
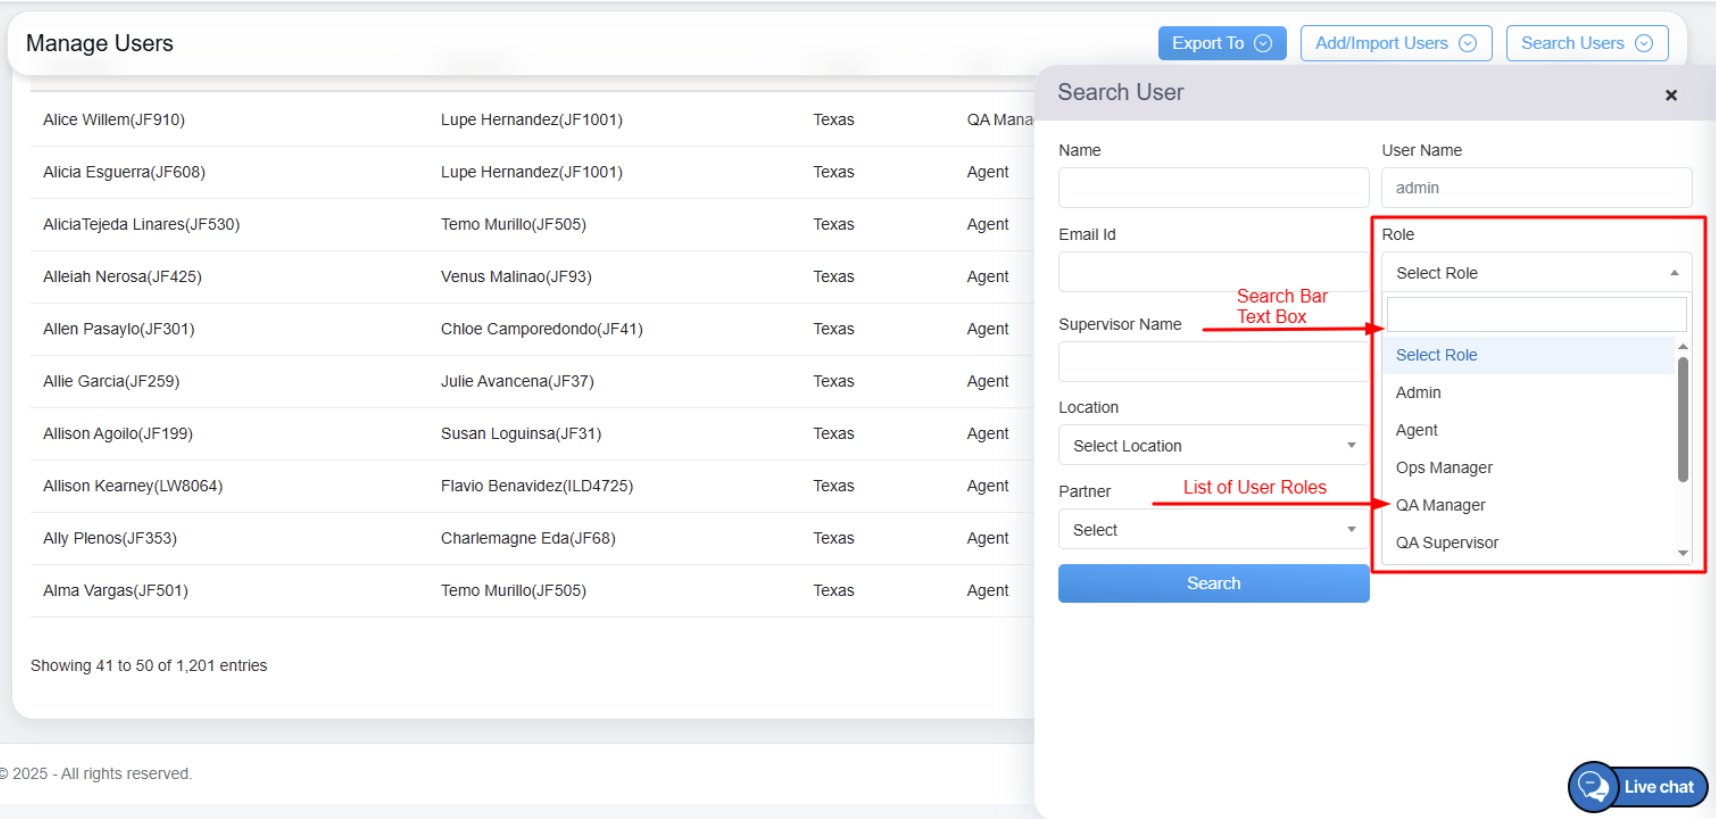
Role Dropdown
- By entering the name in the text-box, a list of supervisors matching the keyword will be displayed under the Supervisor Name field. Select a supervisor’s name from the list.
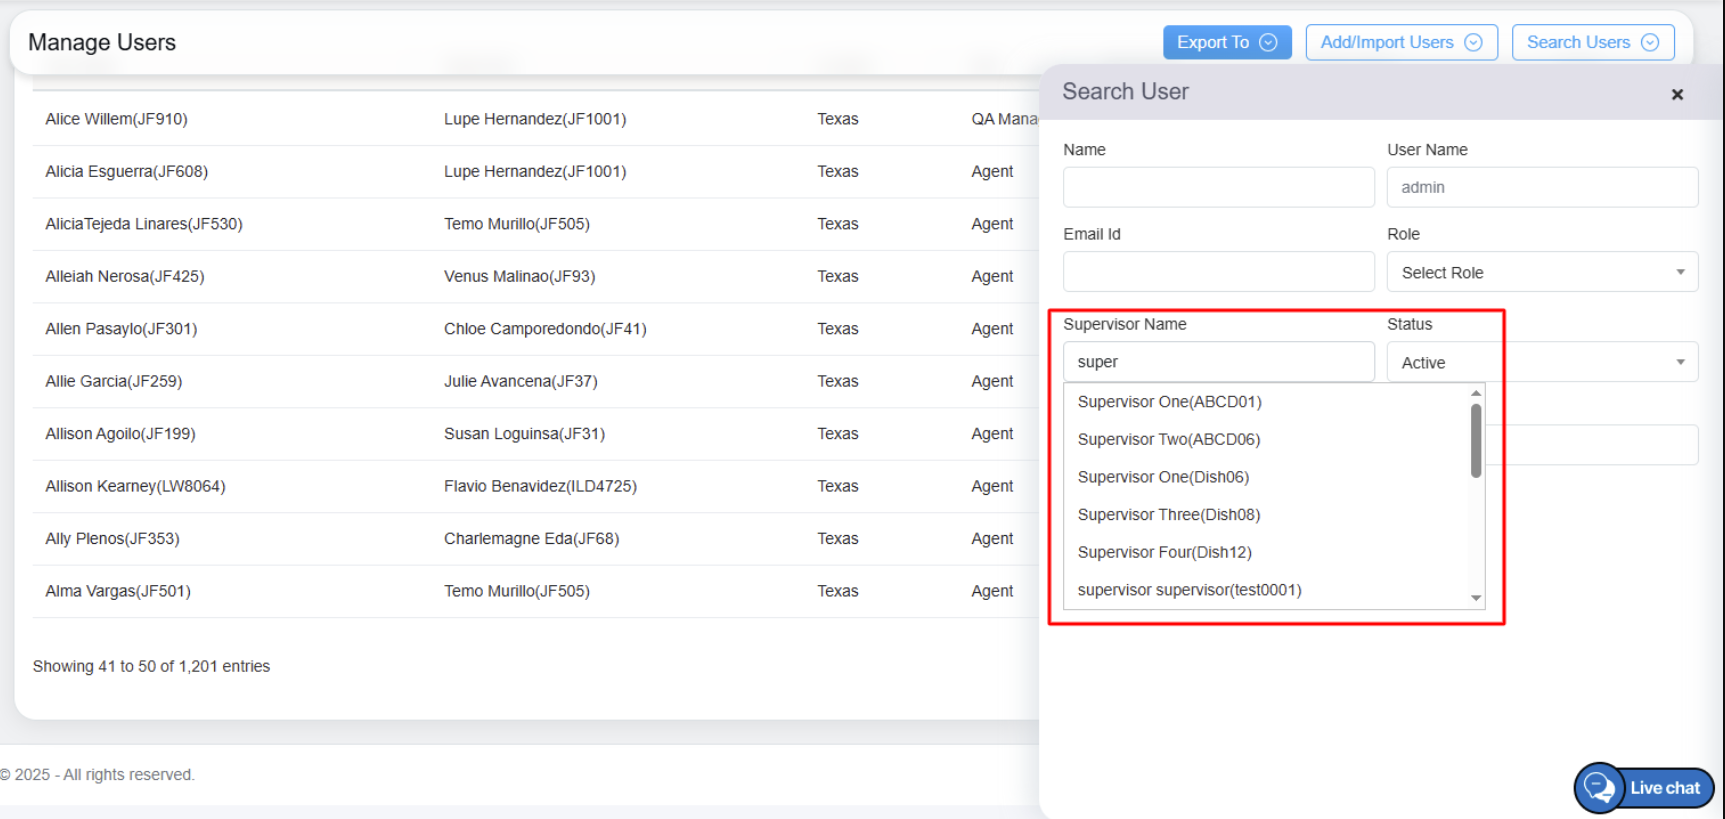
Supervisor Name
- To search the Active users, click on the Status drop-down menu and then select Active option. (Refer to Edit User to change Active to InActive User)
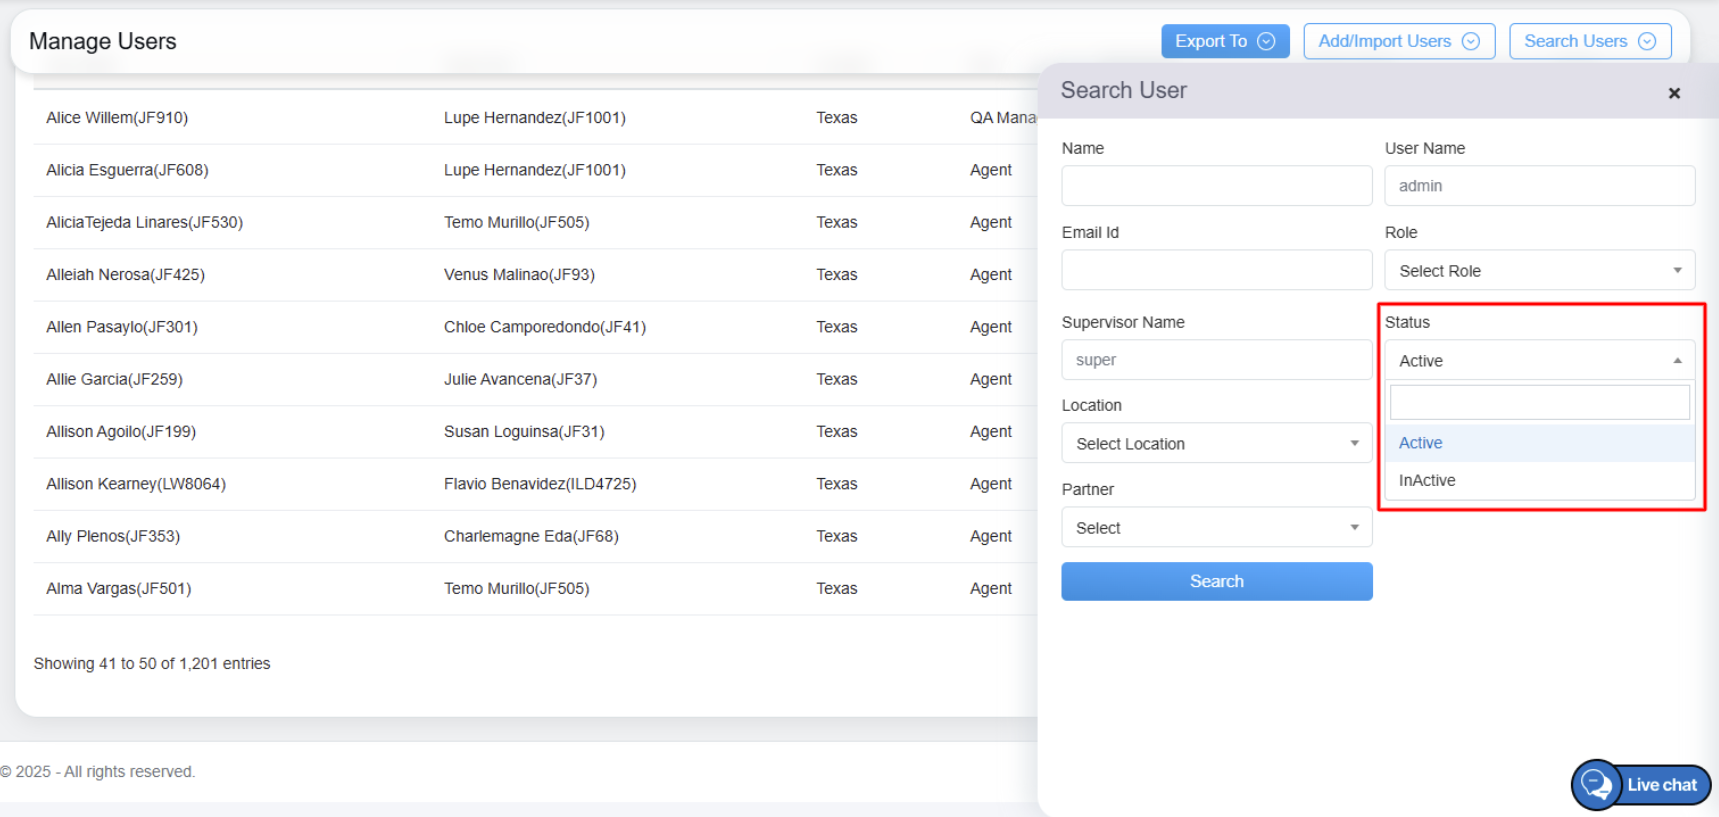
Status
- The Location drop-down menu displays the list of location names. Select the location name from the list. One can search location by entering keywords in the Search Bar text-box displayed under the drop-down list.
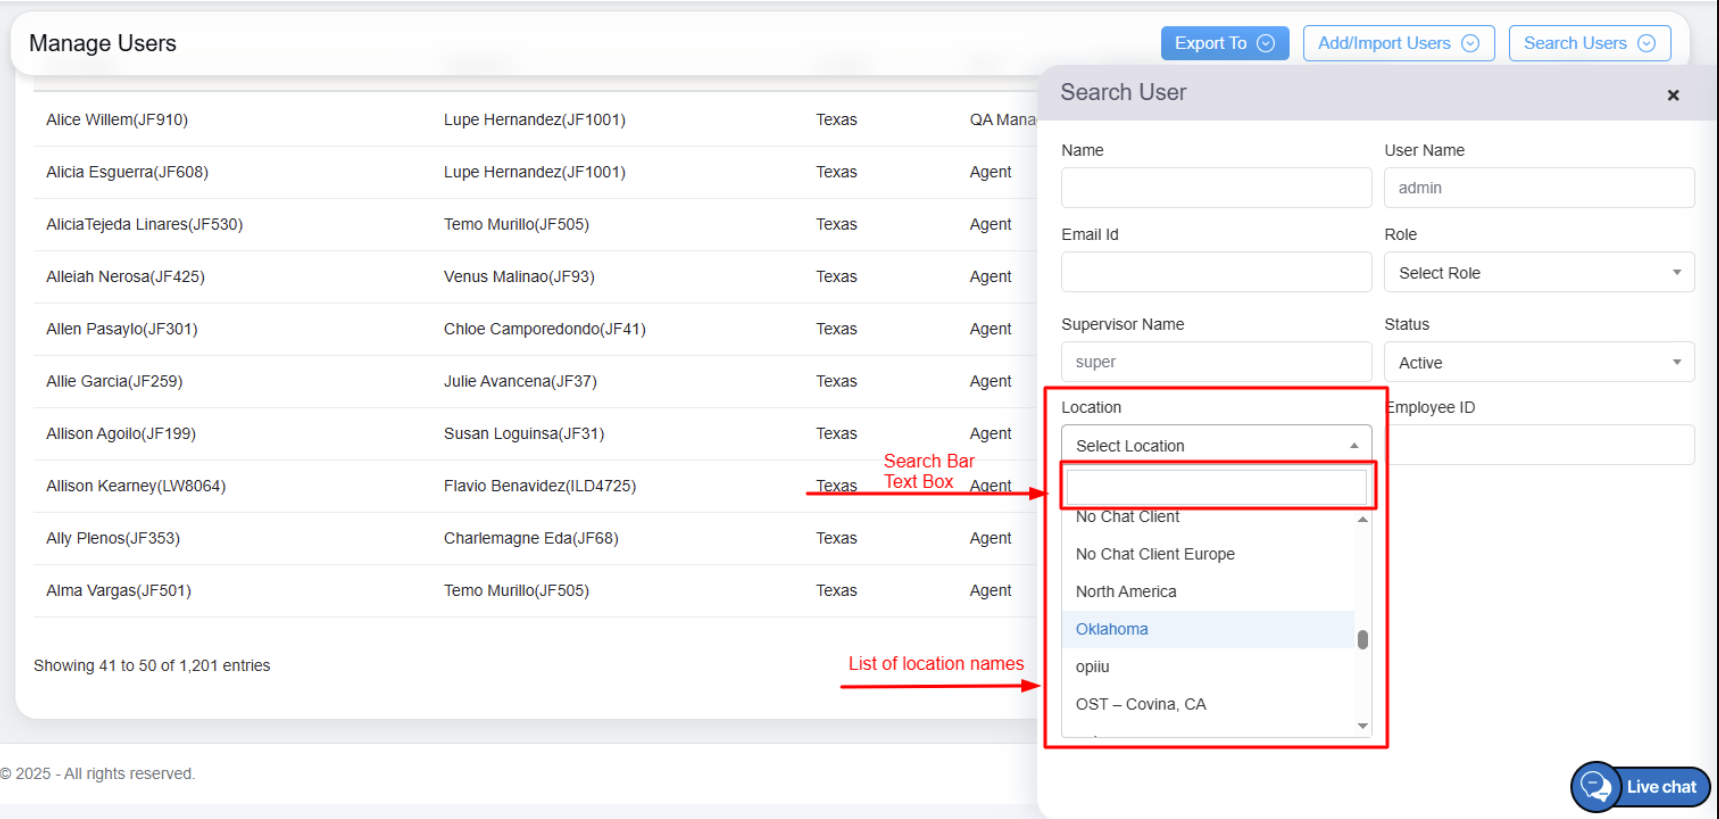
Location
- Enter the unique employee id displayed under the Employee ID text-box.
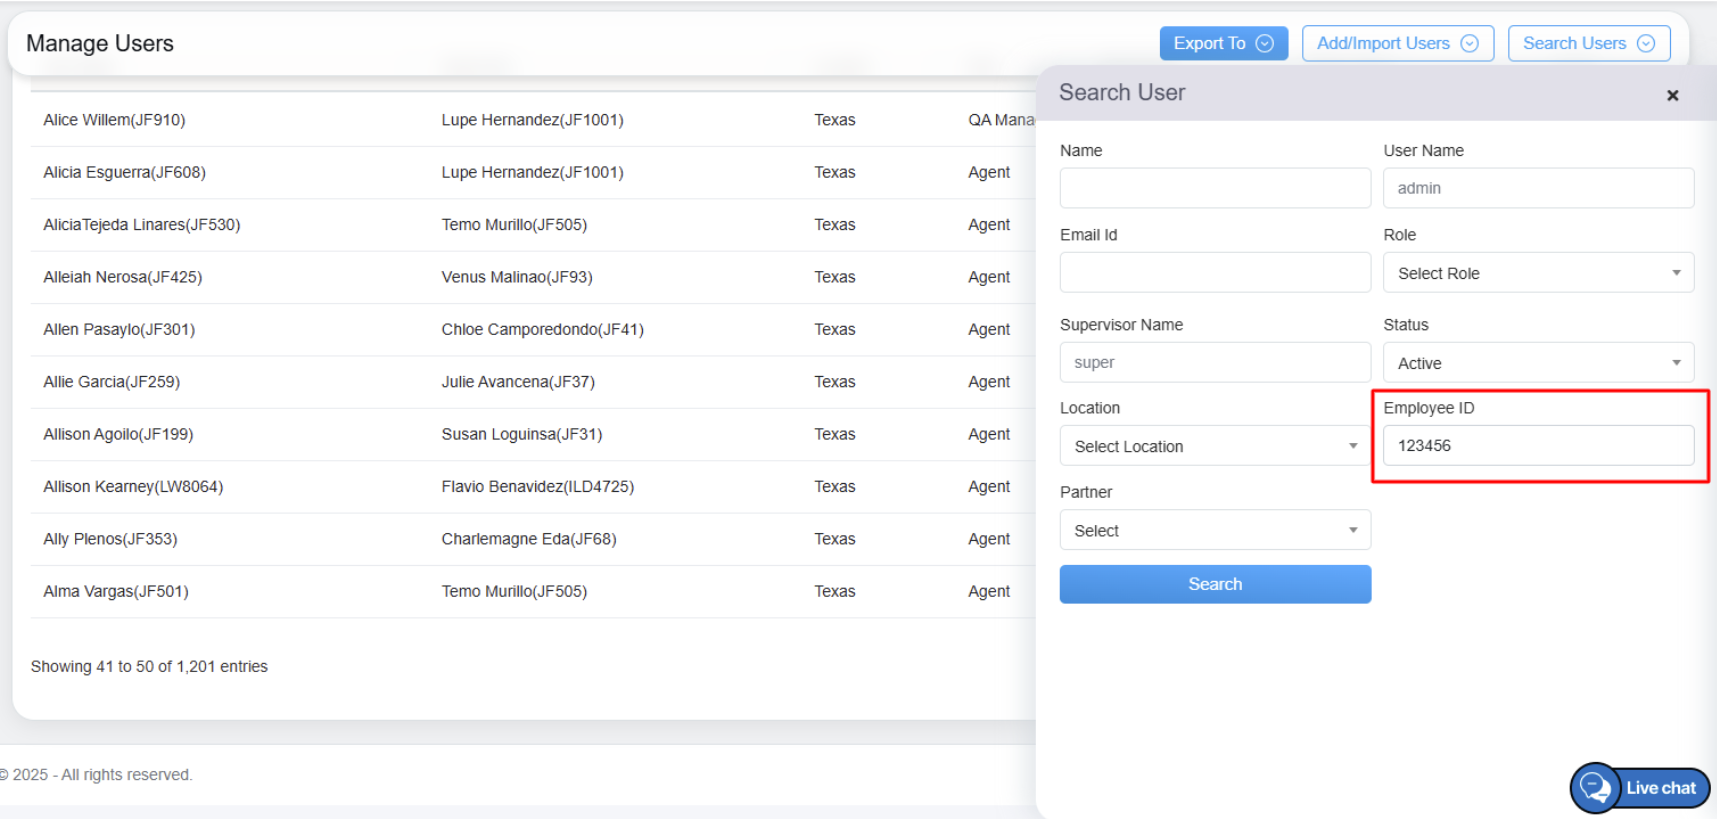
Employee ID
Once the necessary search filters are configured, click on the Search button to search the details of active users.

Search Button
Based on the search criteria the user will be directed to the Manage Users page and Active User details will be displayed in the table grid.
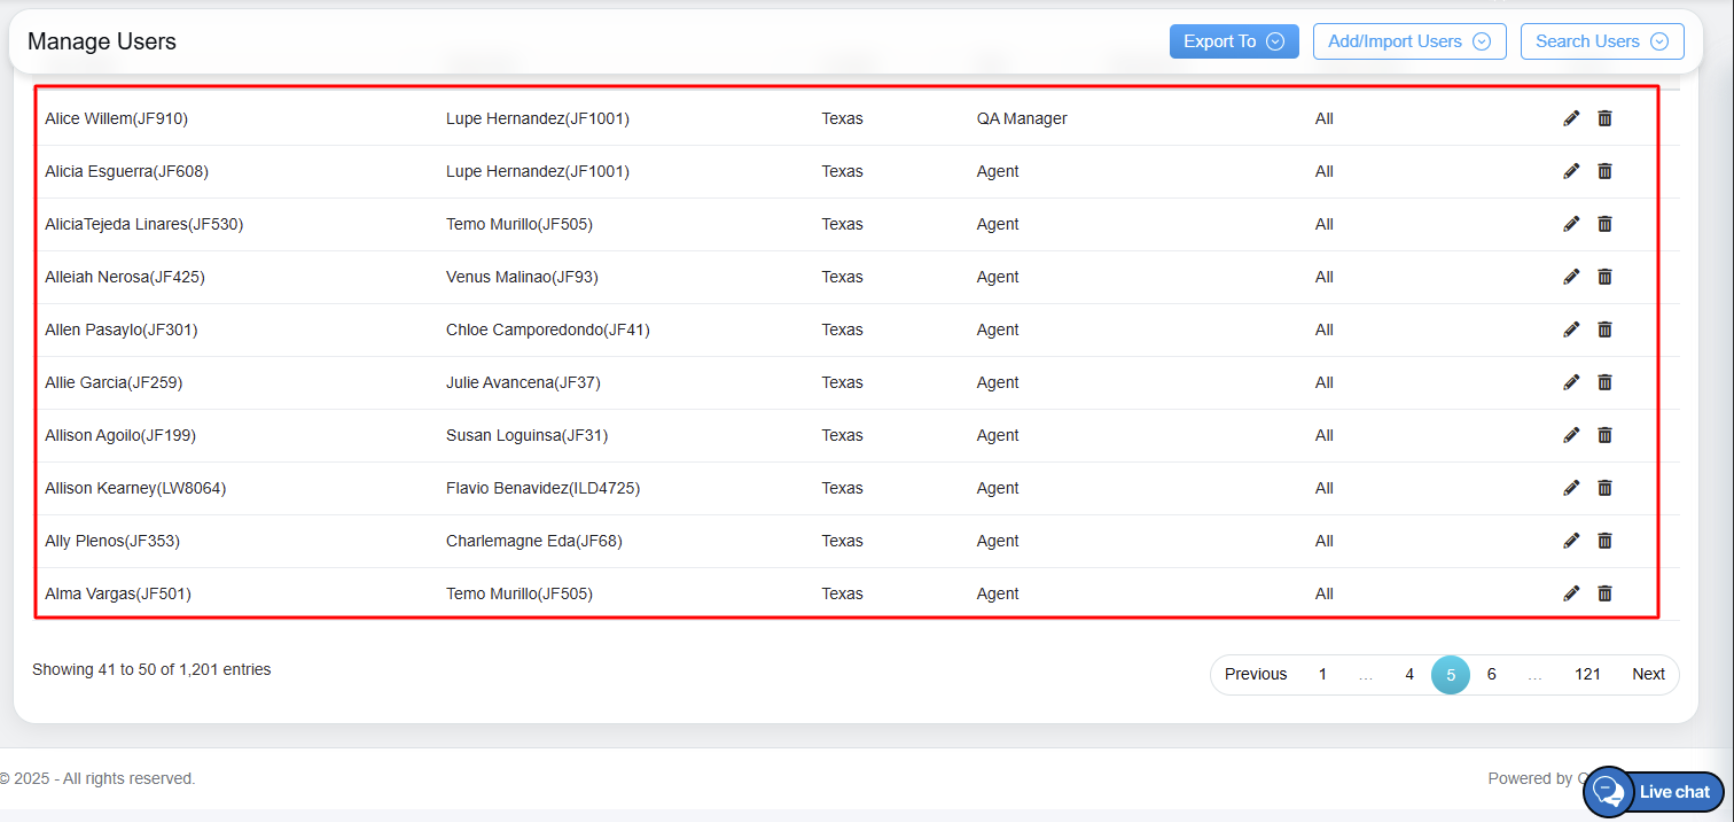
Search results of active users
The Inactive user details can be searched based on the selected criteria – Name, User Name, Email ID, Role, Supervisor Name, Location, Employee ID, or combination of any selected criteria, and from Status drop-down menu select the Inactive option.
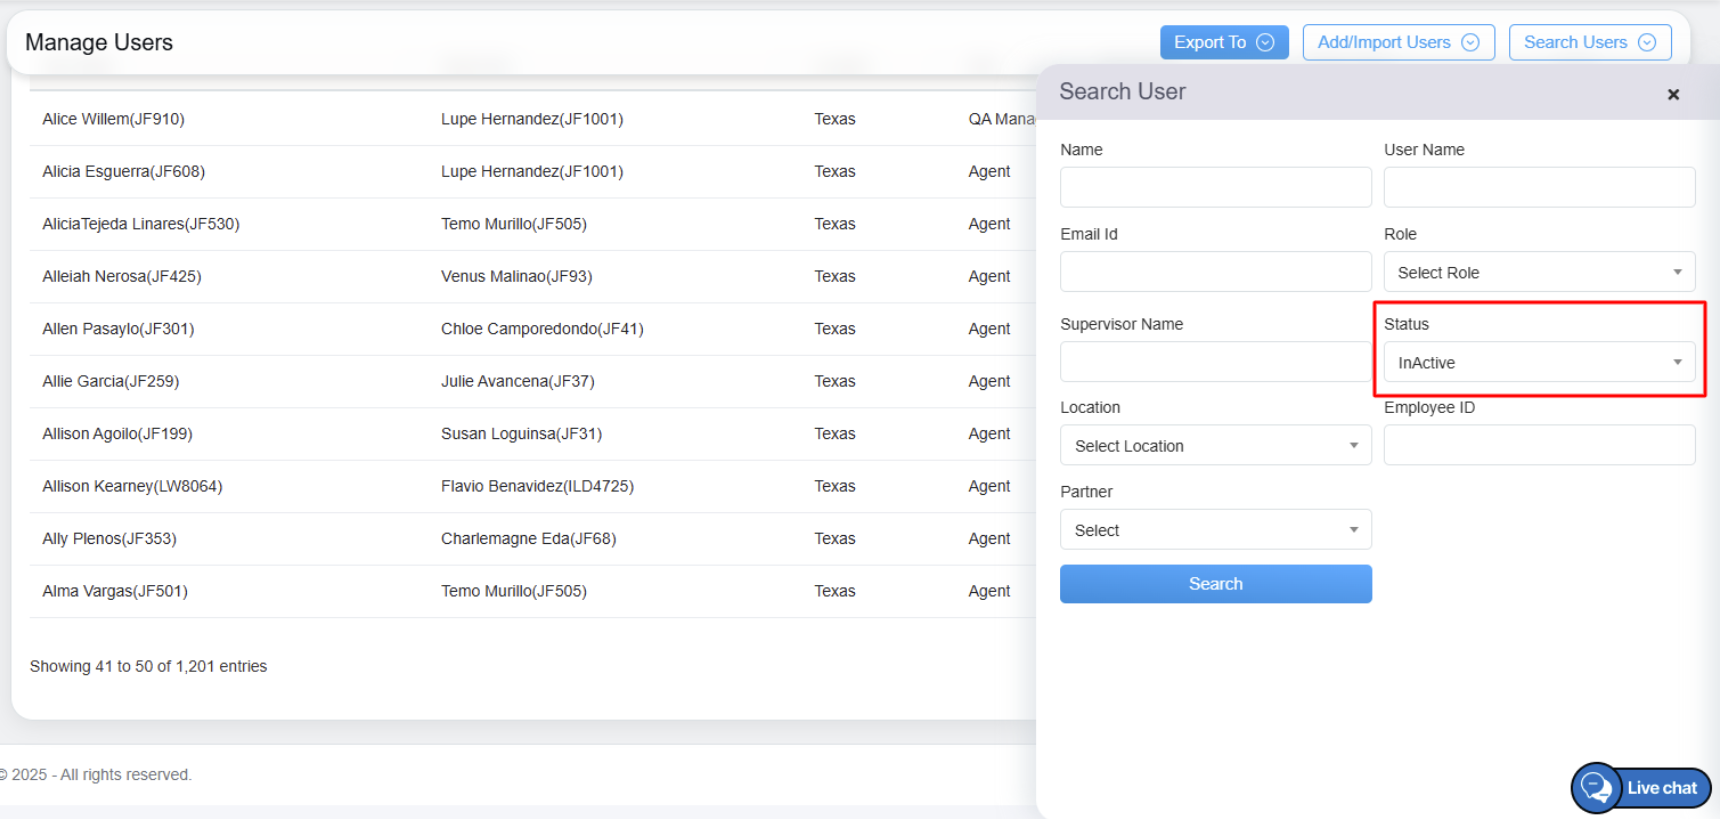
Status
Once the necessary search filters are configured, click on the Search button to search inactive user details. (Refer to Edit Users to change Inactive Users to Active Users)
Search Button
Based on the search criteria the user will be directed to the Manage Users page and inactive user details will be displayed in the table grid.

Search results of inactive users
The data elements displayed in the table grid are explained below:
| Table Elements | Description |
| User Name | Displays the username of the users added in the system. |
| Supervisor | Displays the supervisor’s name of the added user. |
| Location | Displays the name of the location of the added user. |
| Role | Displays the role assigned to the added user. |
| Alternate ID | Displays the alternate ID provided to the added user. |
| Action |
The Edit The Delete |
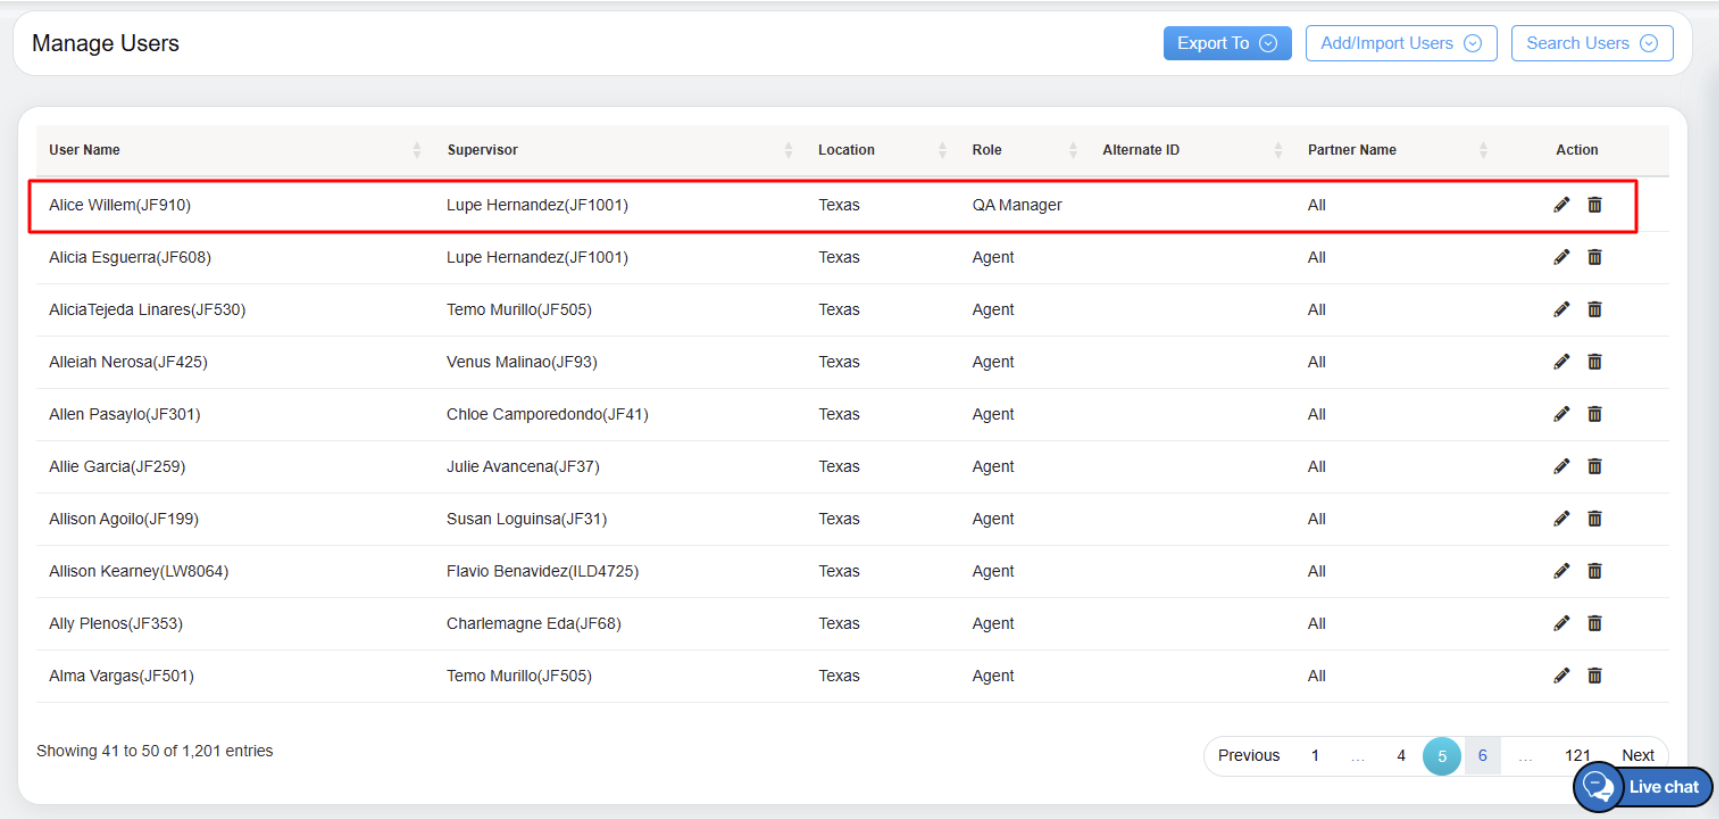
Edit Users
On the Manage Users page, the authorized user can modify the already added user details and can change the status of the user from Active to Inactive.
To access this functionality, click on the Edit ![]() button displayed under the Action column as highlighted in the screen below:
button displayed under the Action column as highlighted in the screen below:
Edit
Note: Refer to Search Users to search Active or Inactive User Details.
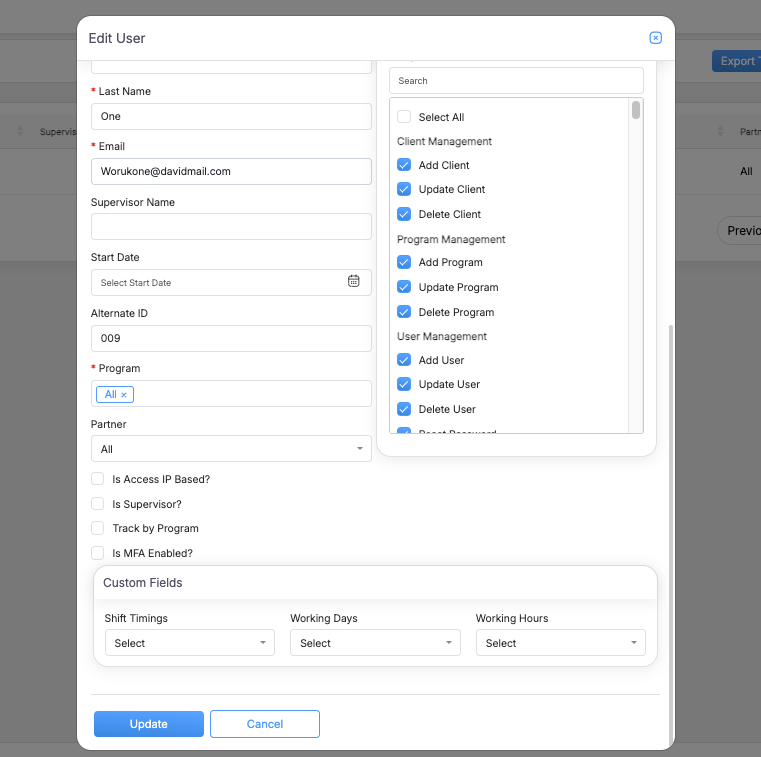
The Edit User window will be opened on the same page. Here the authorized user can modify and change the details. (Refer to Add User for understanding the fields)

Edit User tab
Also, the Role and based on that select Custom Role drop-down menu displays the list of user roles. Select the role of the user to restrict or allow the access rights. One can even search the specific role by entering keywords in the Search Bar text-box displayed under the Role field. (Refer to User Access Control to know details of each role.)
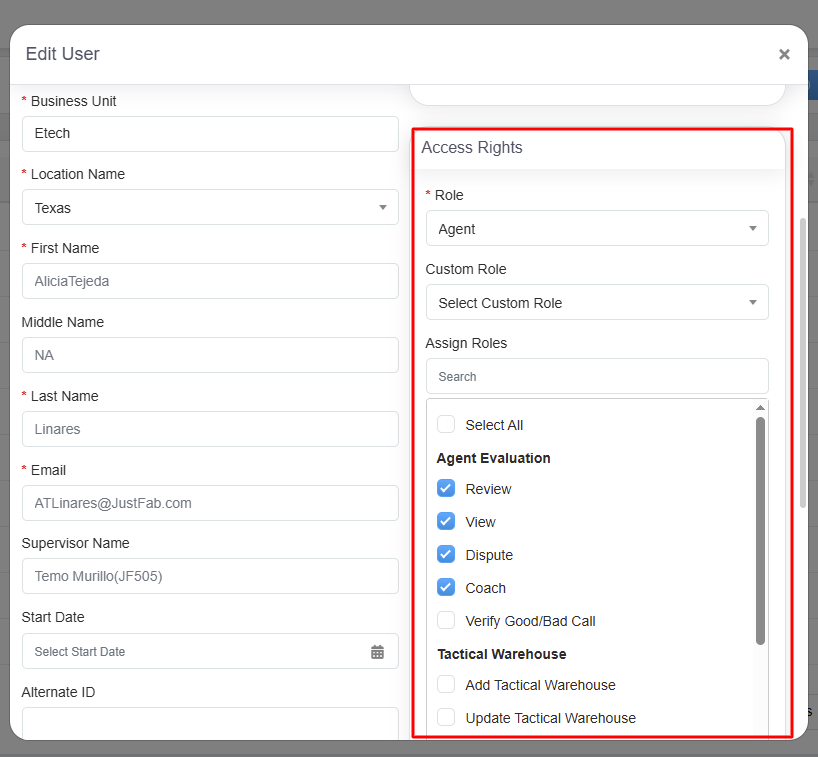
Access rights section
To change the status of the user from Active to Inactive or vice versa, under the Credentials section, click on the Status drop-down menu and select the status either Active or Inactive of specific user.
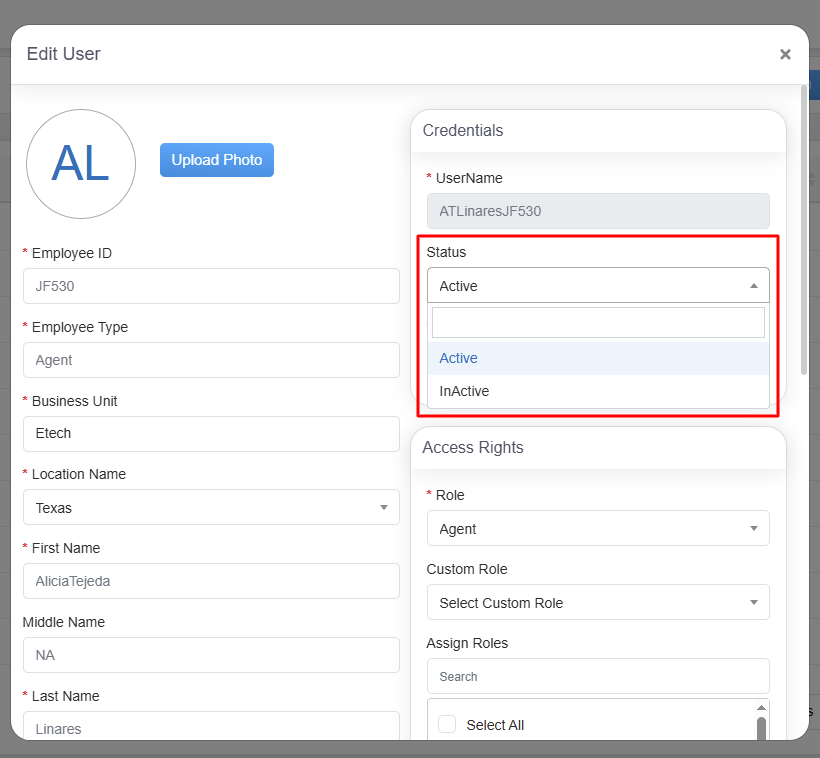
Select Status
Note:
- The UserName field displayed under the Credentials section is disabled by default. The logged-in user doesn’t have the option to change the already assigned username of the specific user. If the username of the specific employee needs to be changed then the logged-in user to contact QEval Support Team with proper approvals and reasons.

Credential Section
- After modifying the details of the specific user, the logged-in user needs to enter the Password under the Credentials section to save the changes. It is a mandatory process to update the user details. Without entering the password, the user details will not be changed.
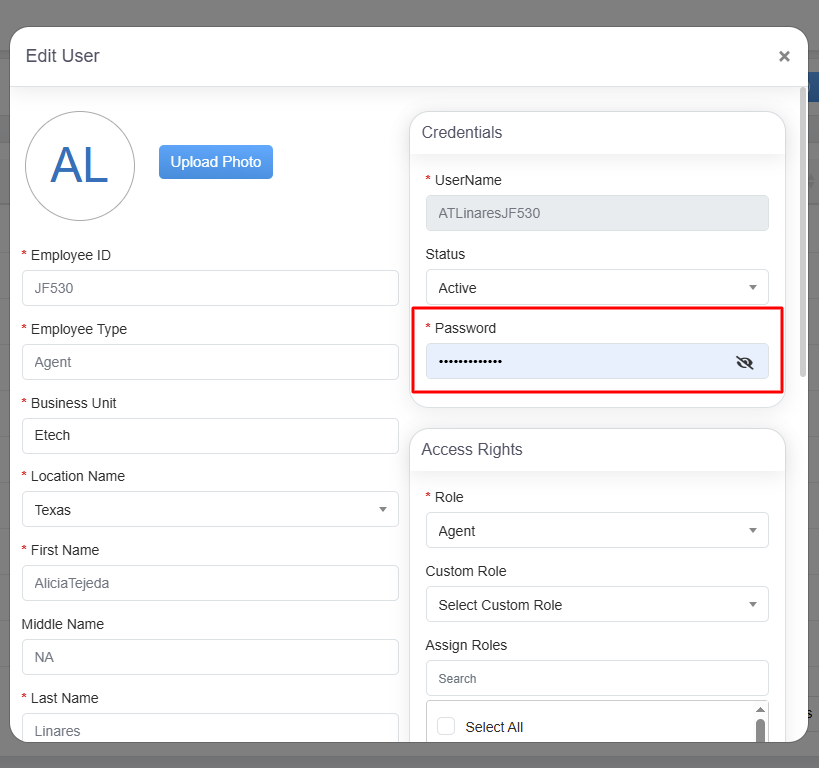
Password section
Once the necessary details are modified, click on the Update button to save the changes or click on the Cancel button to discard the changes.
Update button
An acknowledgment message will be displayed on the screen and the specific user details will be modified.

Acknowledgement Message
The logged-in user will be directed to the Manage User page and the specific user details will be modified and displayed on the table grid.
Updated User Details
The data elements displayed in the table grid are explained below:
| Table Elements | Description |
| User Name | Displays the username of the users added in the system. |
| Supervisor | Displays the supervisor’s name of the added user. |
| Location | Displays the name of the location of the added user. |
| Role | Displays the role assigned to the added user. |
| Alternate ID | Displays the alternate ID provided to the added user. |
| Action |
The Edit The Delete |
Delete Users
On the Manage Users page, the authorized user can delete the user details from the QEval database.
To access this feature, click on the Delete ![]() button displayed under the Action column as highlighted in the screen below:
button displayed under the Action column as highlighted in the screen below:
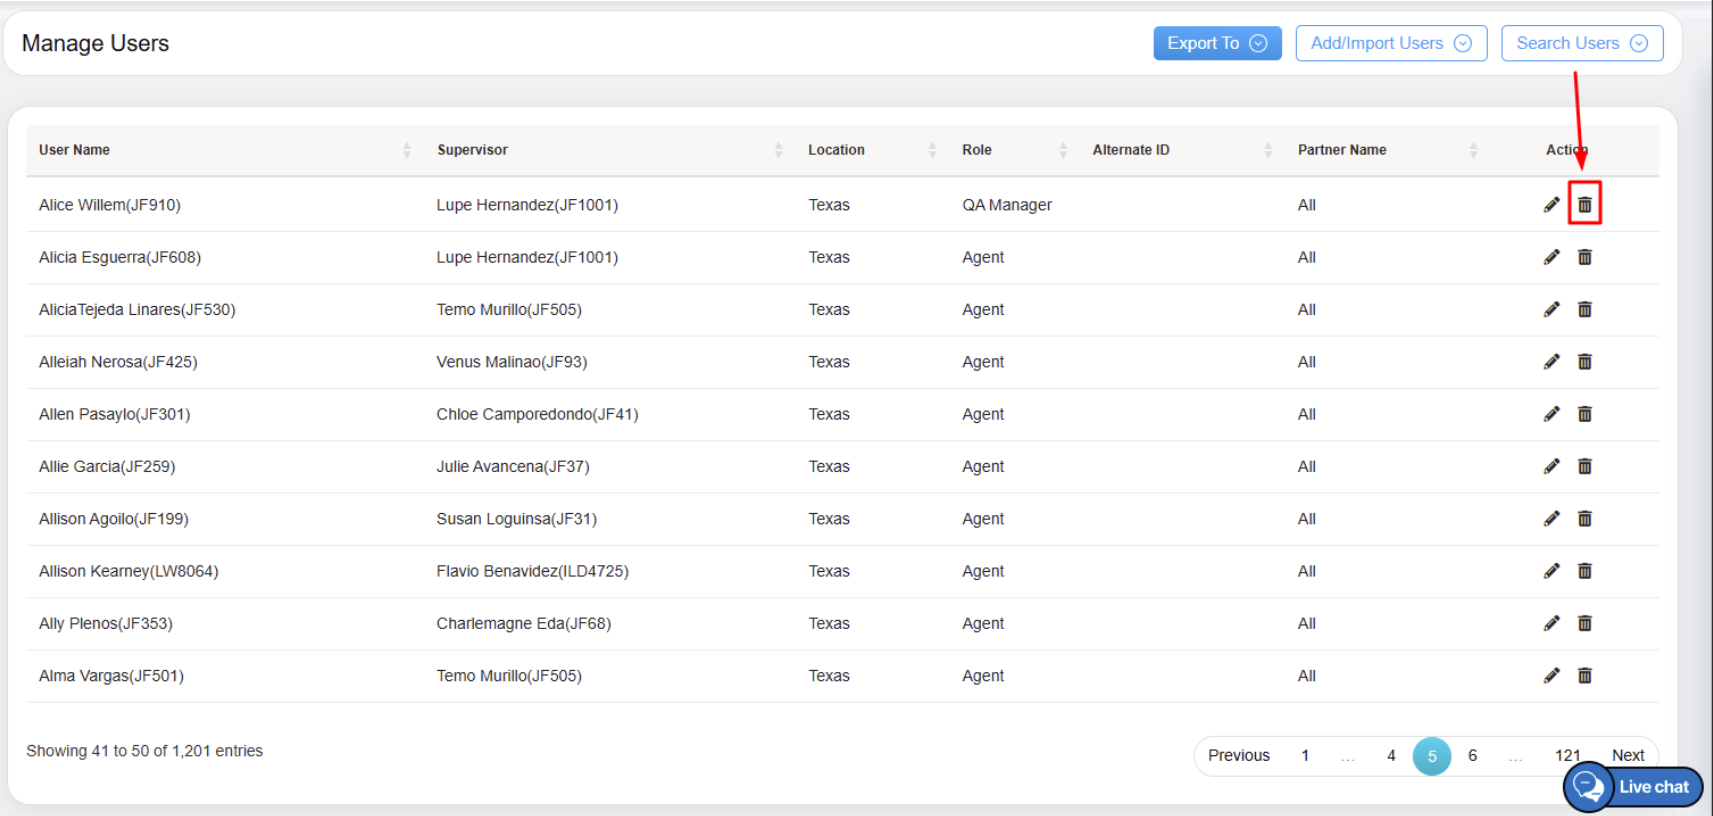
Delete Button
Note:
- It is advisable to change the user status to “Inactive” rather than opting to delete the user. (Refer to Edit User to change the user status.)
- Deleting the specific user will result in the permanent removal of user details from the QEval database, making it possible for the logged-in user to fetch or recover the user details.
A confirmation message will be displayed on the same page. Click on the Yes button to delete the specific user details or click on the No button to discard this process.
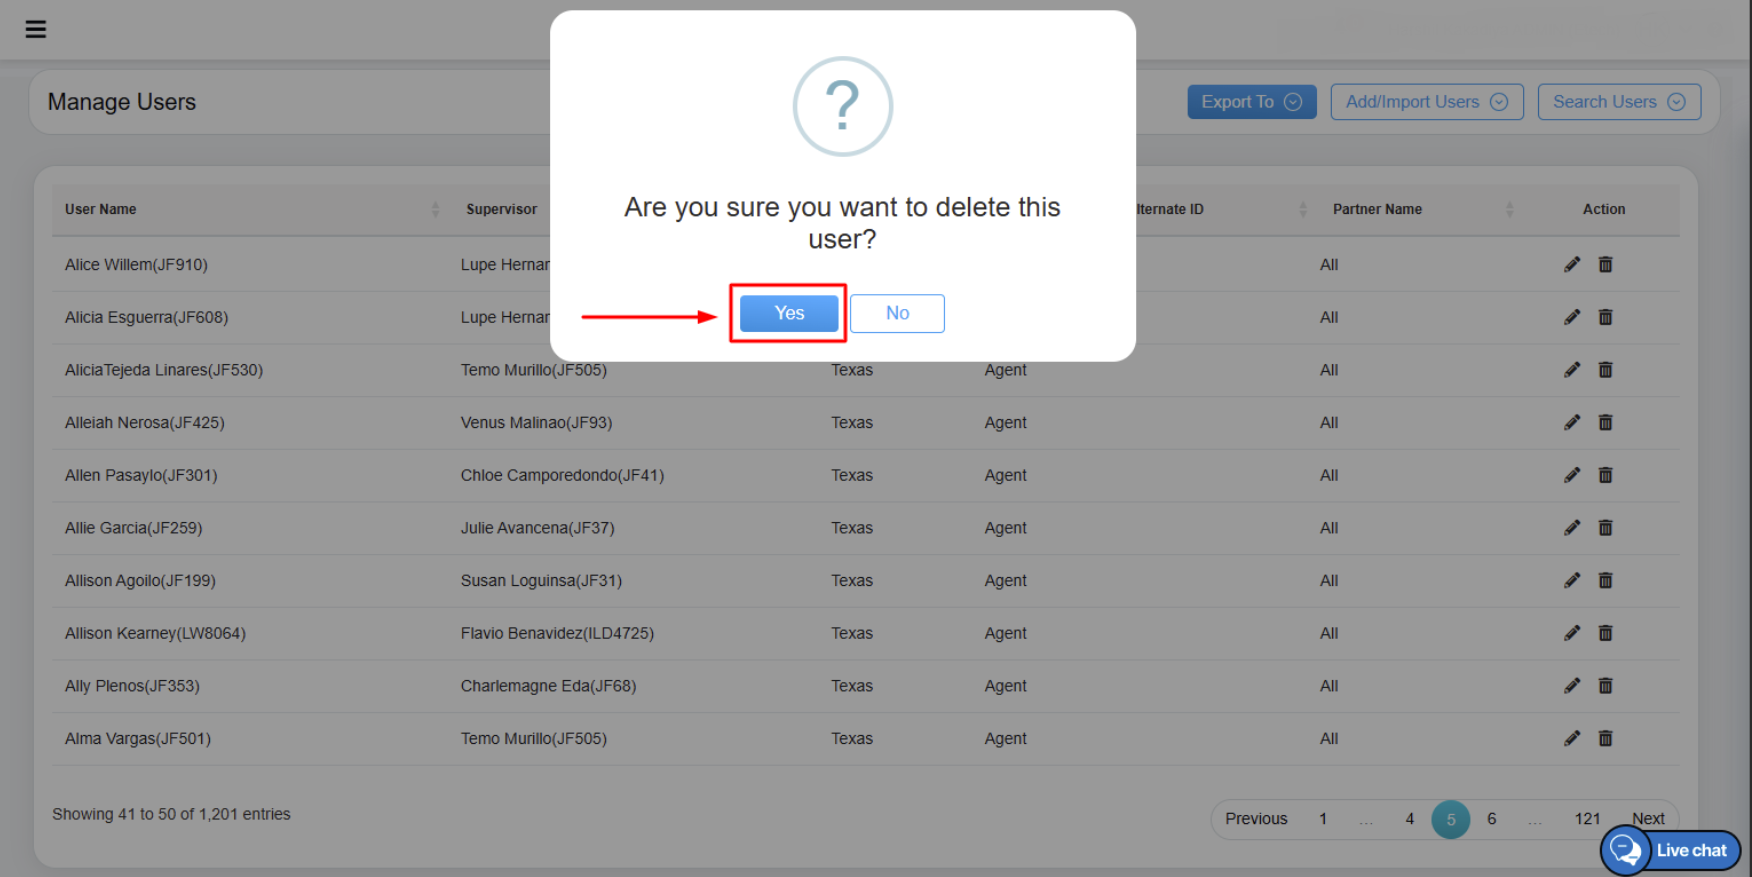
Delete Dialog Box
An acknowledgment message will be displayed, and the specific user details will be removed from the QEval database.

Acknowledgement Message
Export To
The Export To feature allows the logged-in user to export all the added user details and save it to the local system in Excel or CSV format.
To access this feature, click on the Export To button displayed on the Manage Users page as highlighted in the screen below:
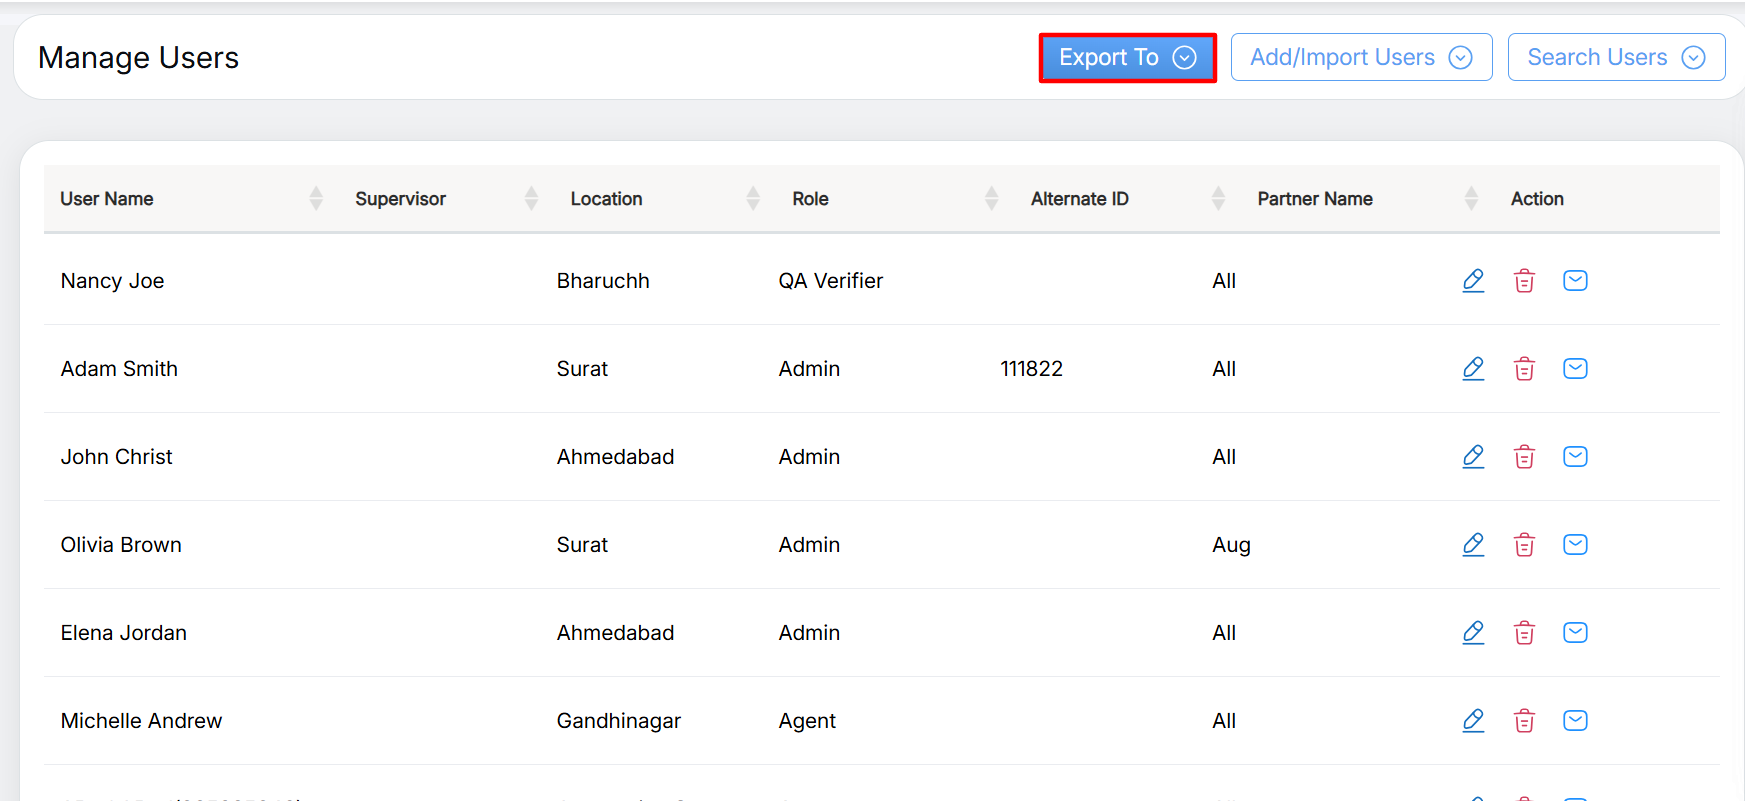
Export To Button
The Excel or CSV formats will be displayed. The logged-in user will be able to download, export all the added user details and save it in the local system based on selected format.
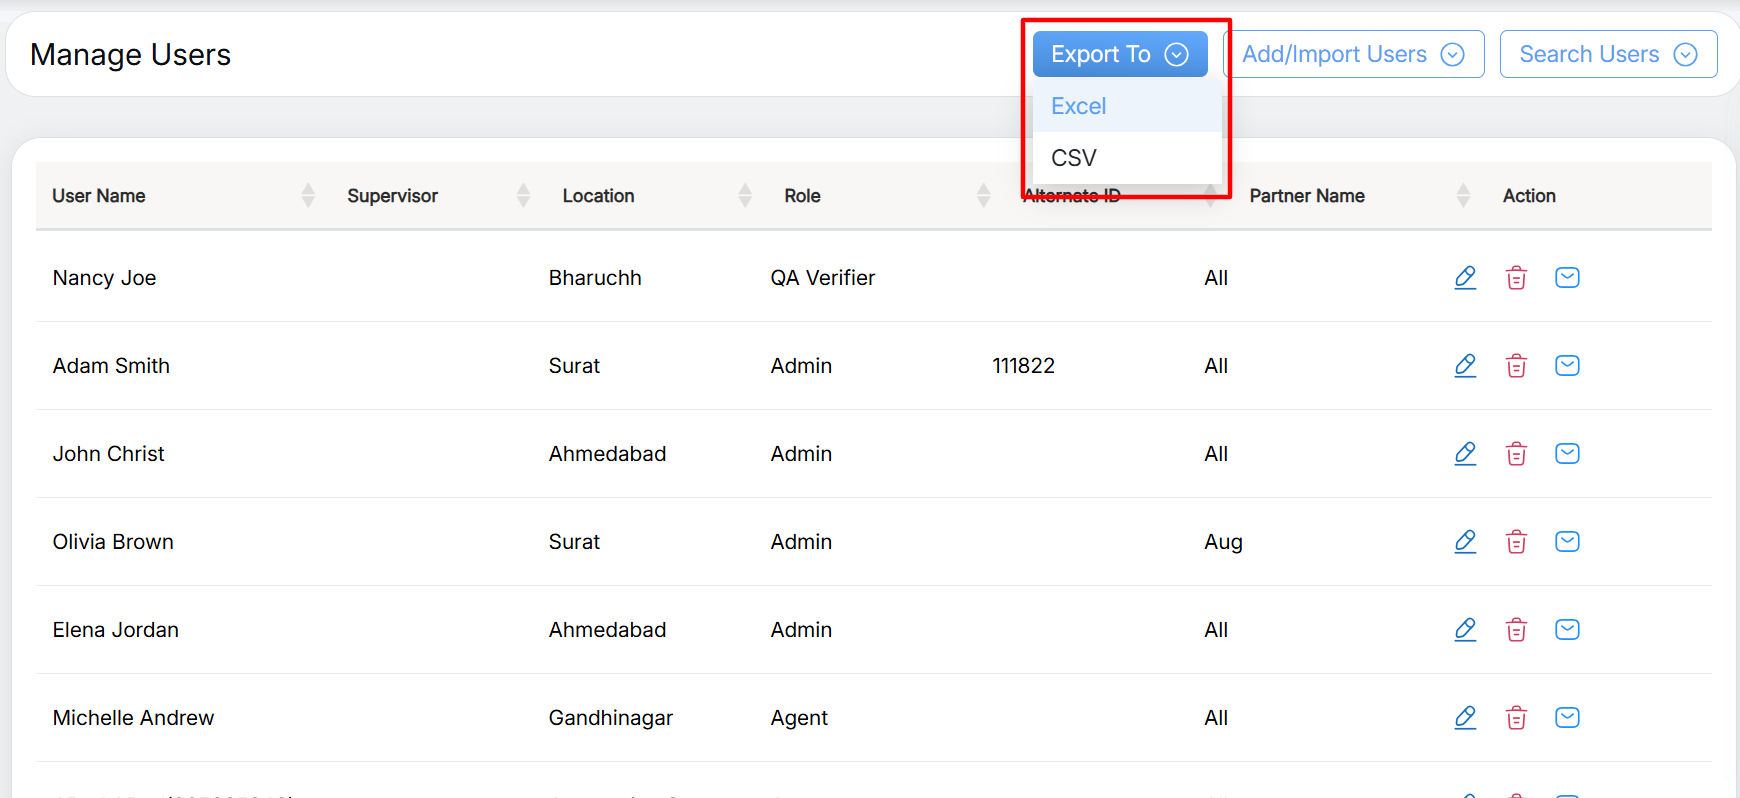
Export to Formats
The exported file will display the user details in the same structure as it is displayed in table grid of Manage Users page.
Video